

Click on thumbnails below for larger pics....
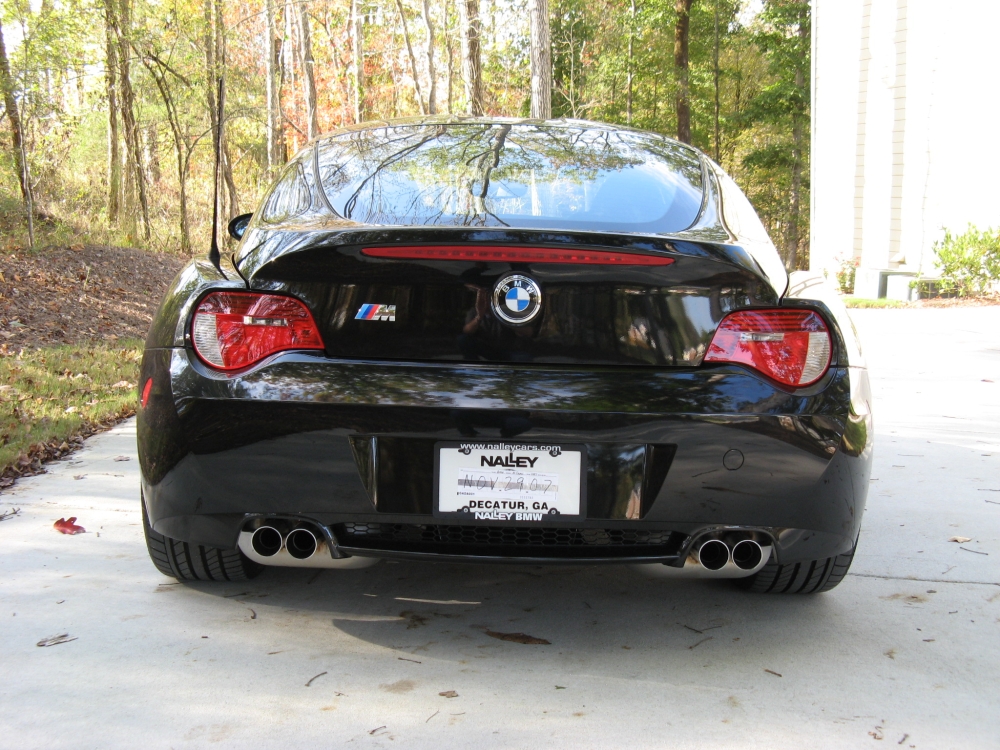
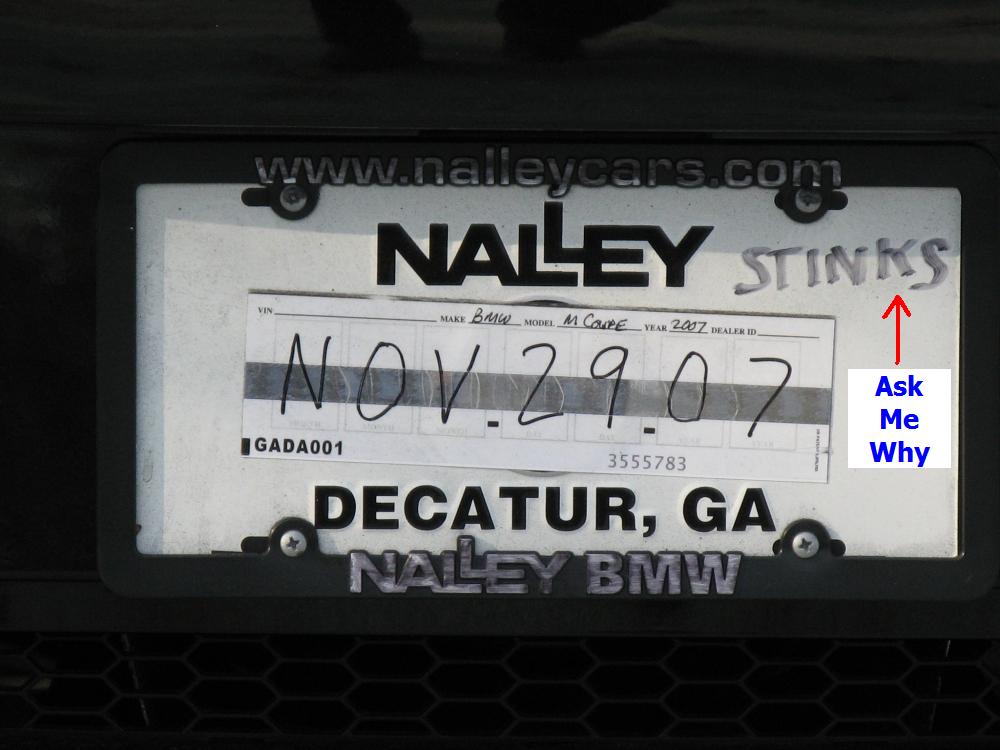
This 2007 M Coupe was purchased from Nalley BMW, our sales consultant was somewhat helpful over the course of several weeks as I conducted multiple
test drives and finally decided this was the car for me. However, the numbers we spoke about changed as the deal progressed to paper so be VERY careful if you decide to
do business with these guys, I was worn out and failed to notice the lack of integrity between the oral vs written deals (a problem I have never had with my VW dealer in 6 transactions)
- not a large amount but based on principle alone and the way I was handled post sale, I will NEVER give them any more business and have had MUCH better service at United BMW since. Please email me
if you have any questions, I will be happy to answer them so that you don't make the same mistake I made. Nalley equals BAD buying experience and post sale problems in my opinion, I have encountered several
people that had the same issues with service and sales: NALLEY BUYER BEWARE.....
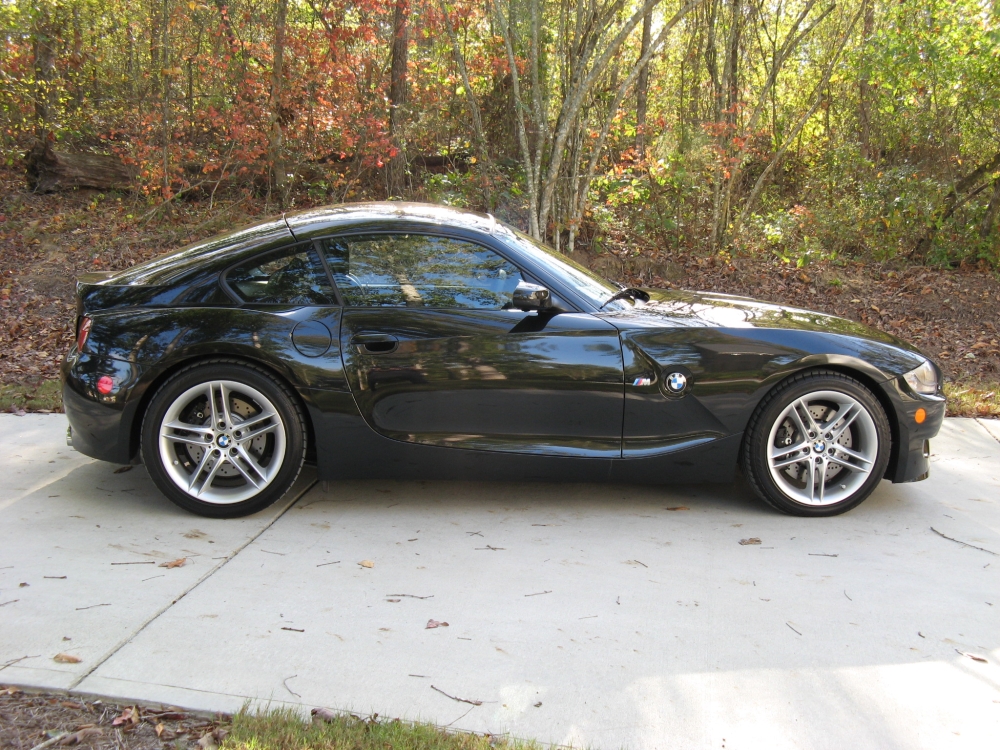
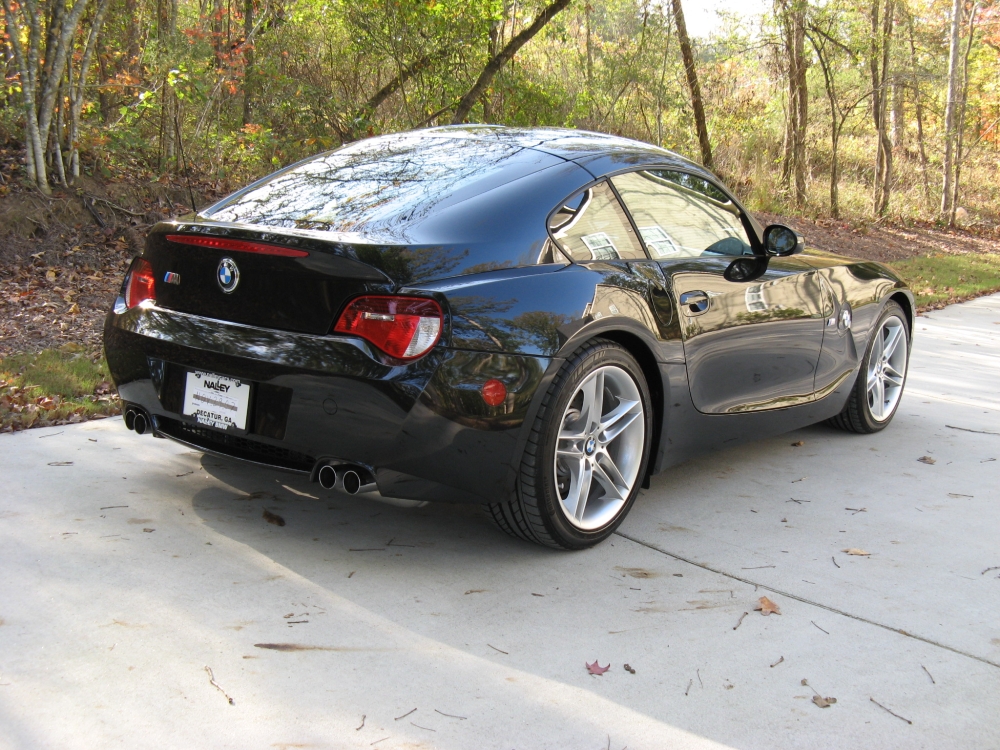
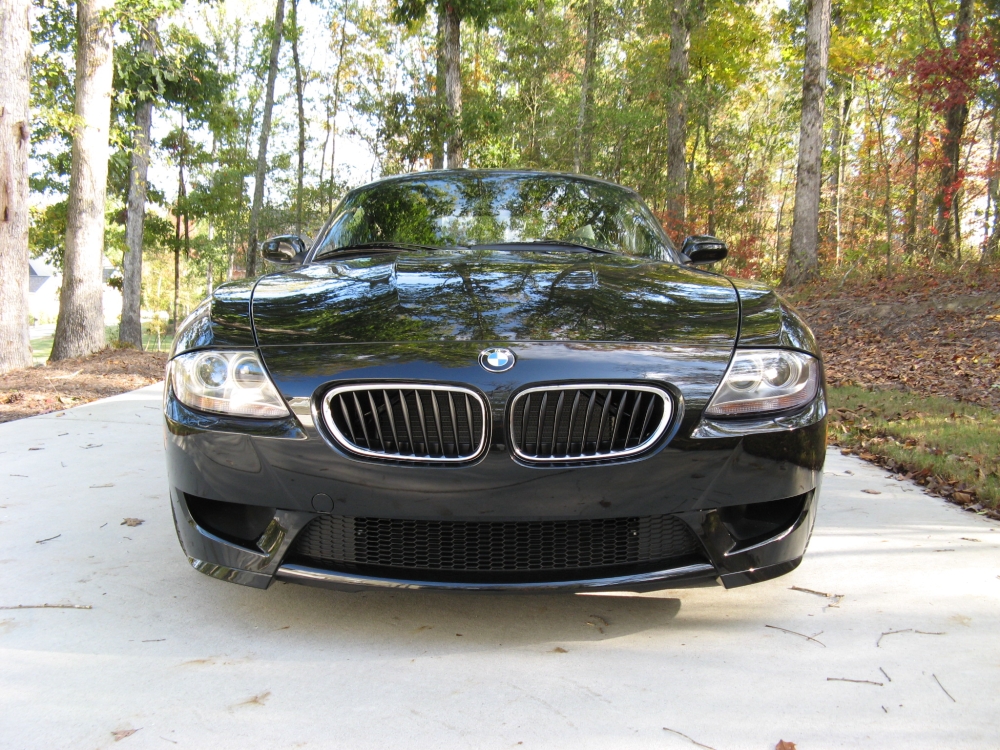
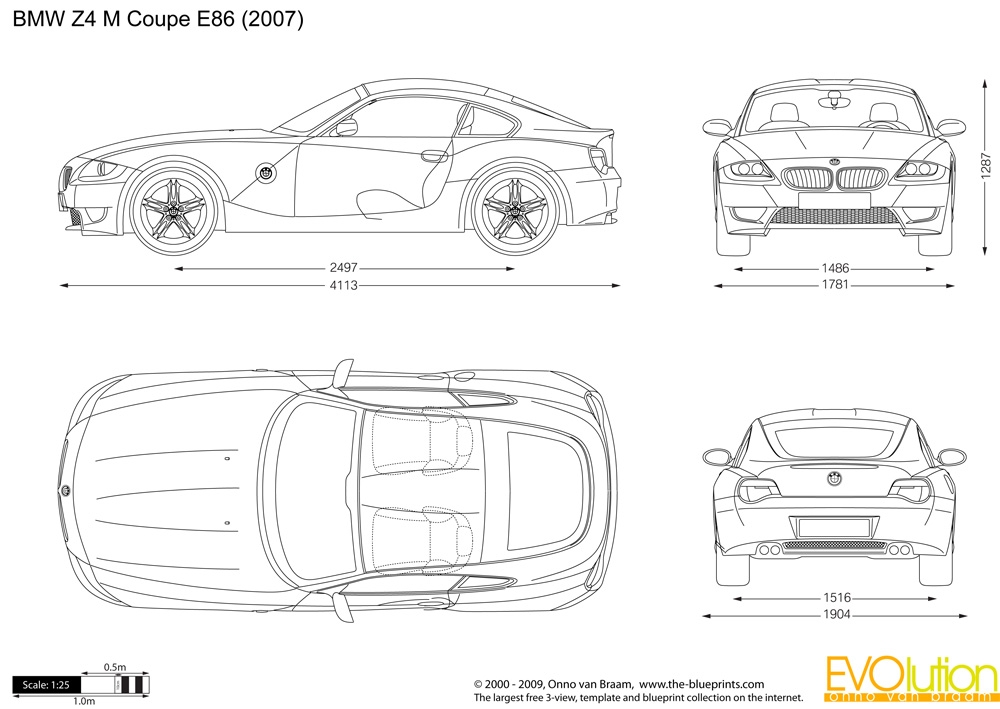
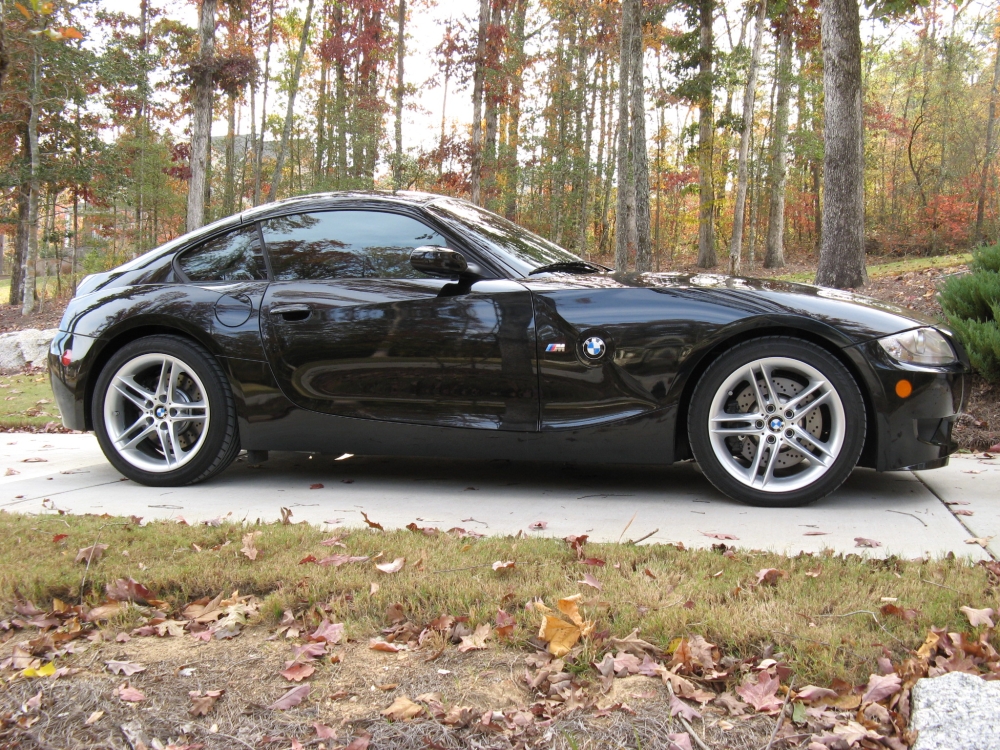
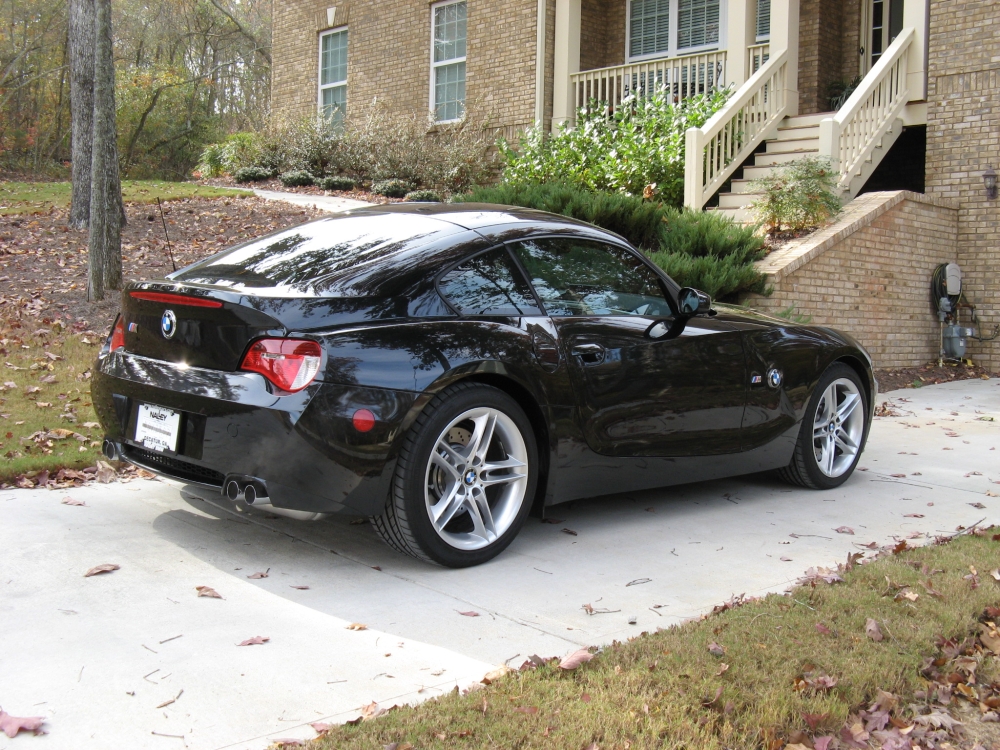
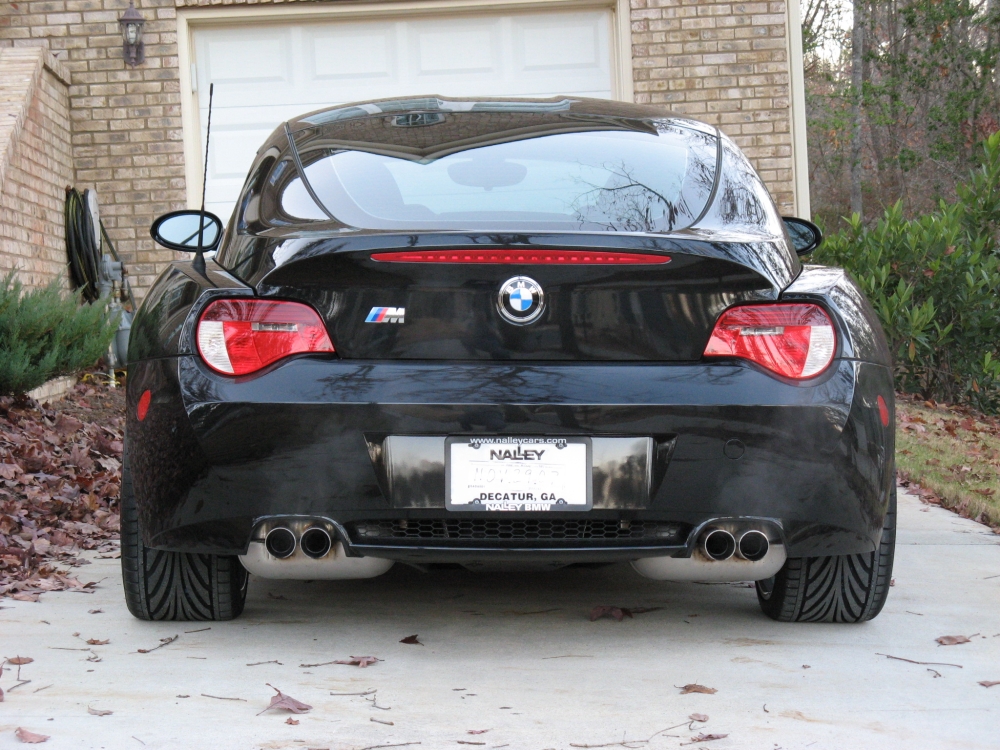
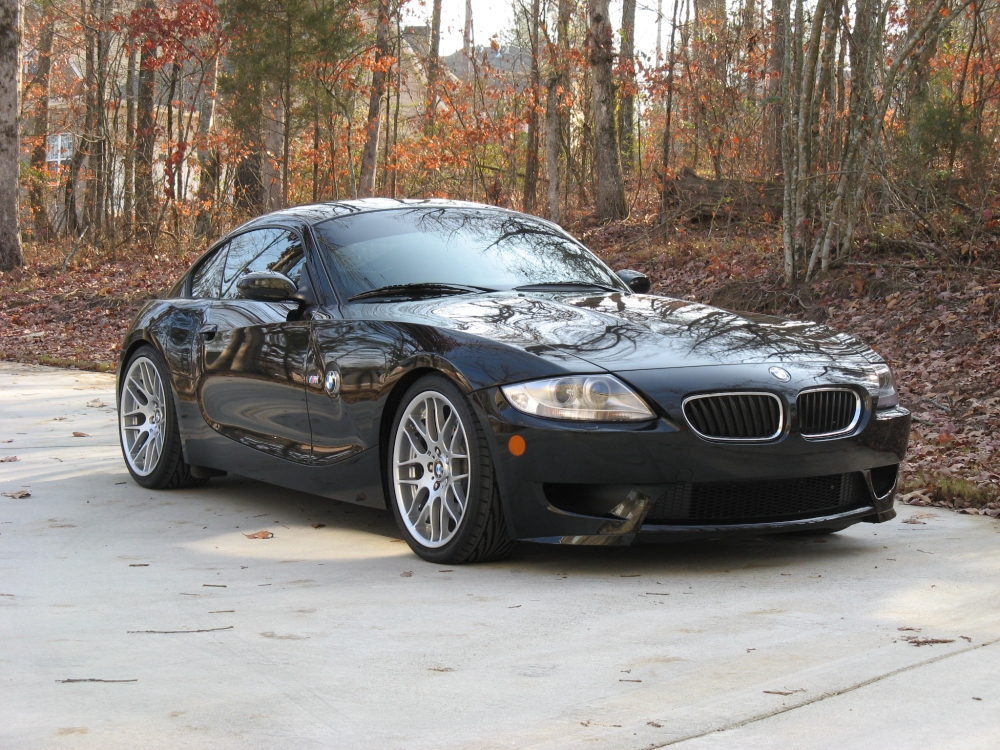
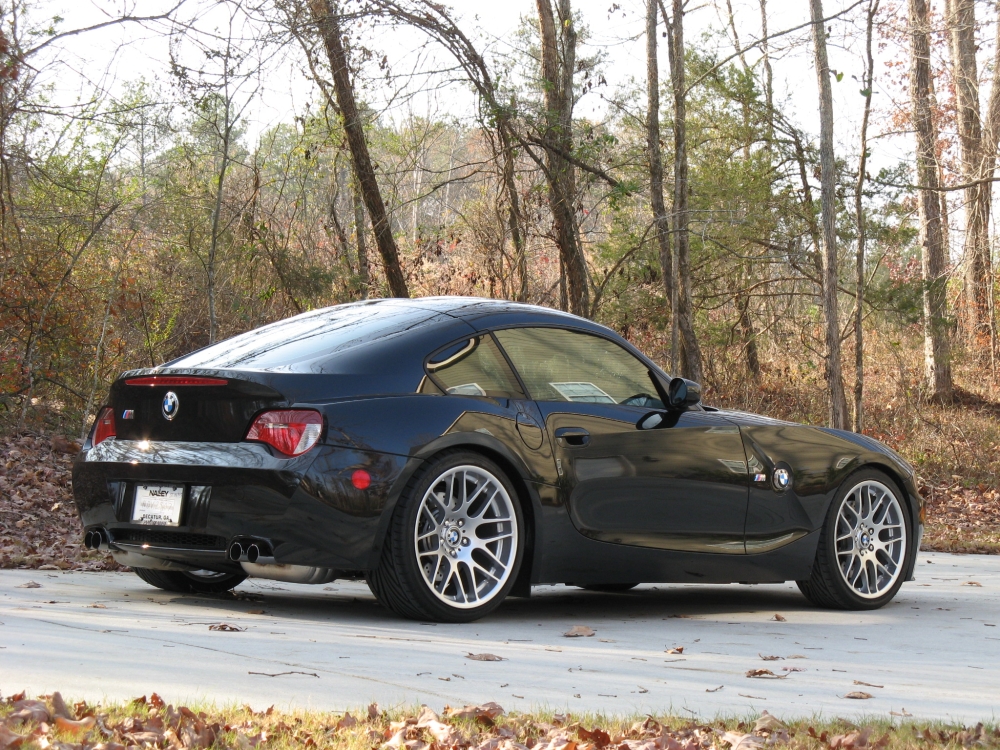
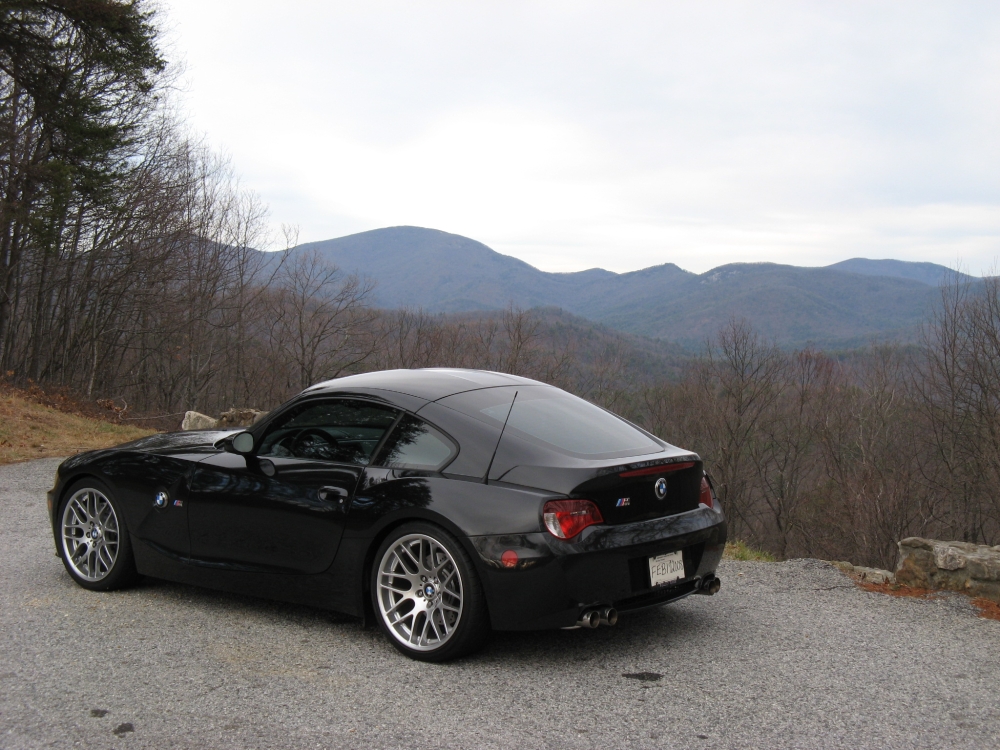
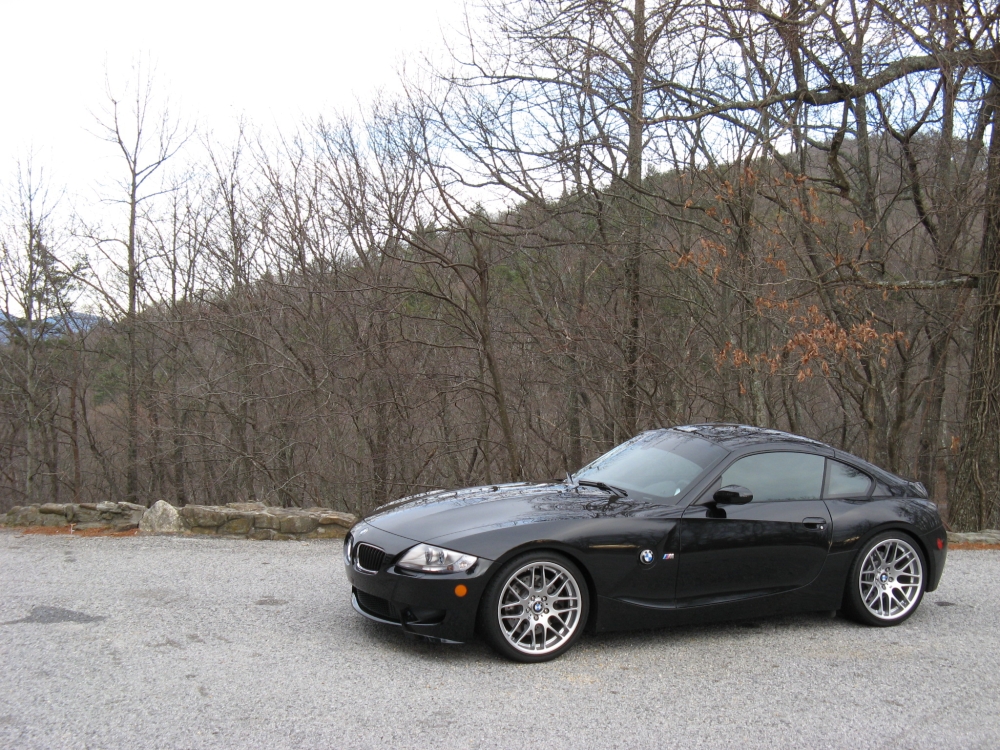
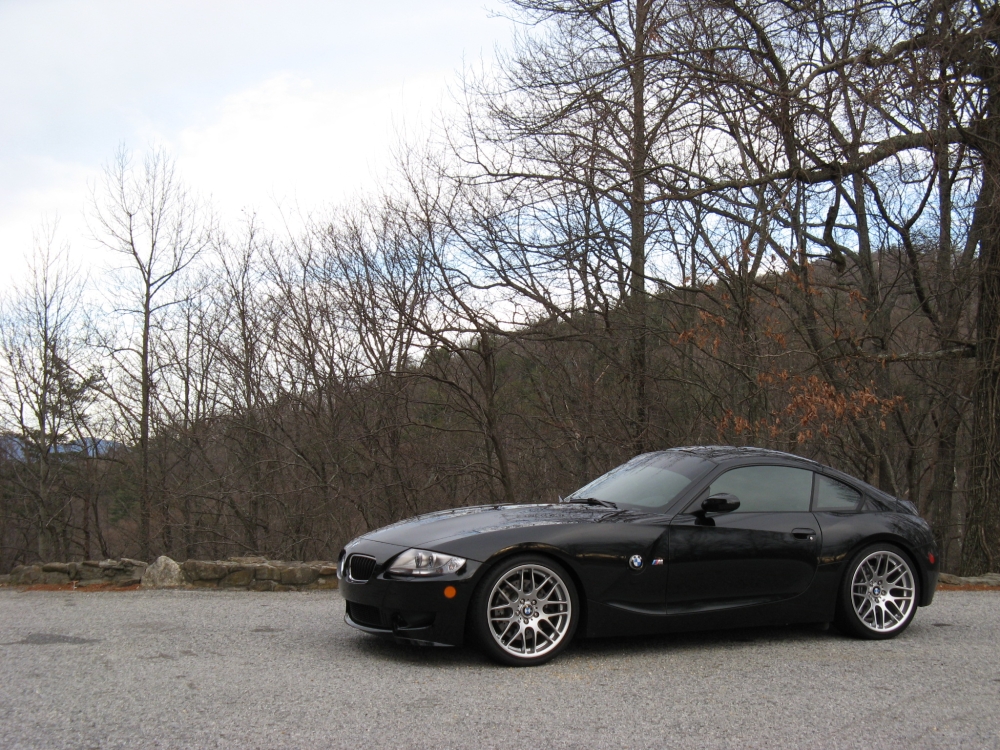
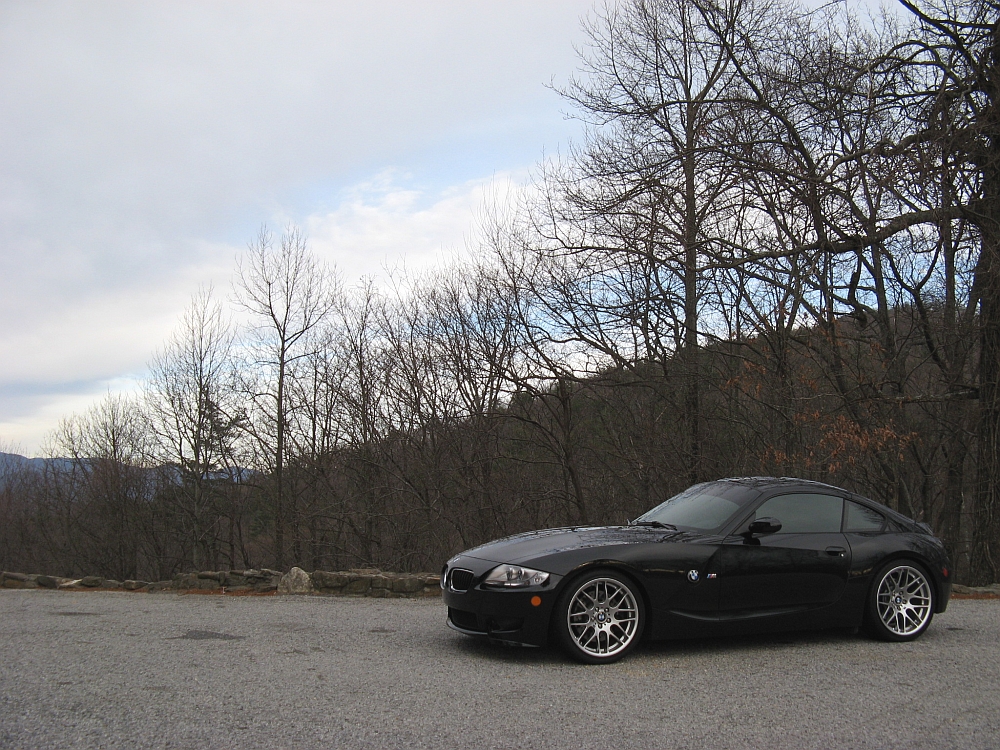
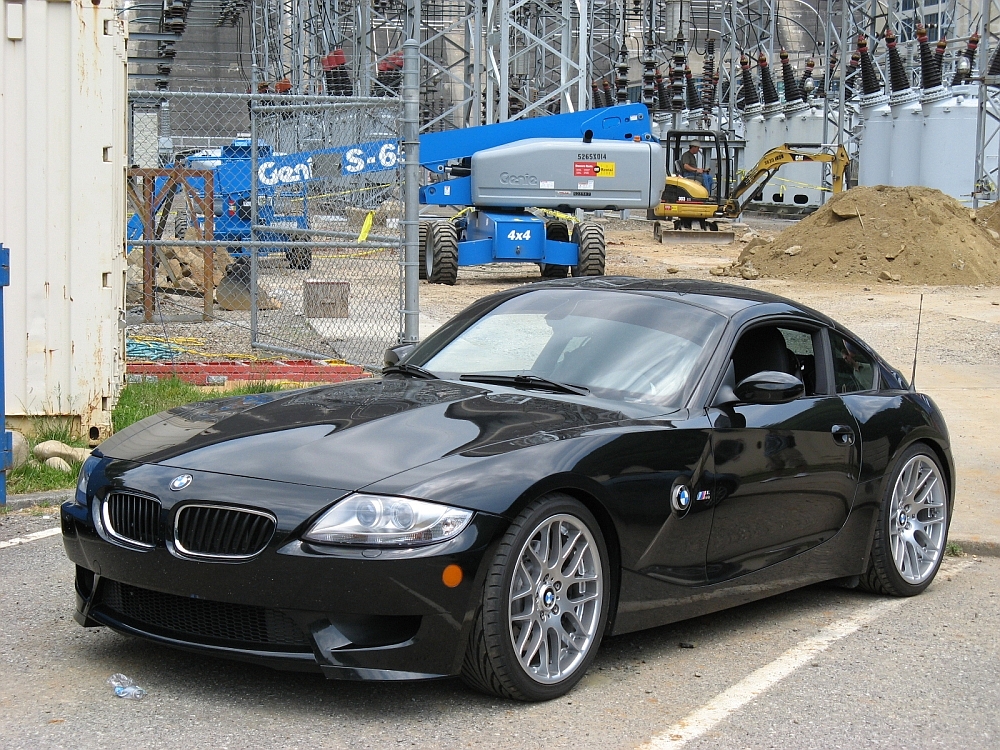
 2007 BMW M Coupe

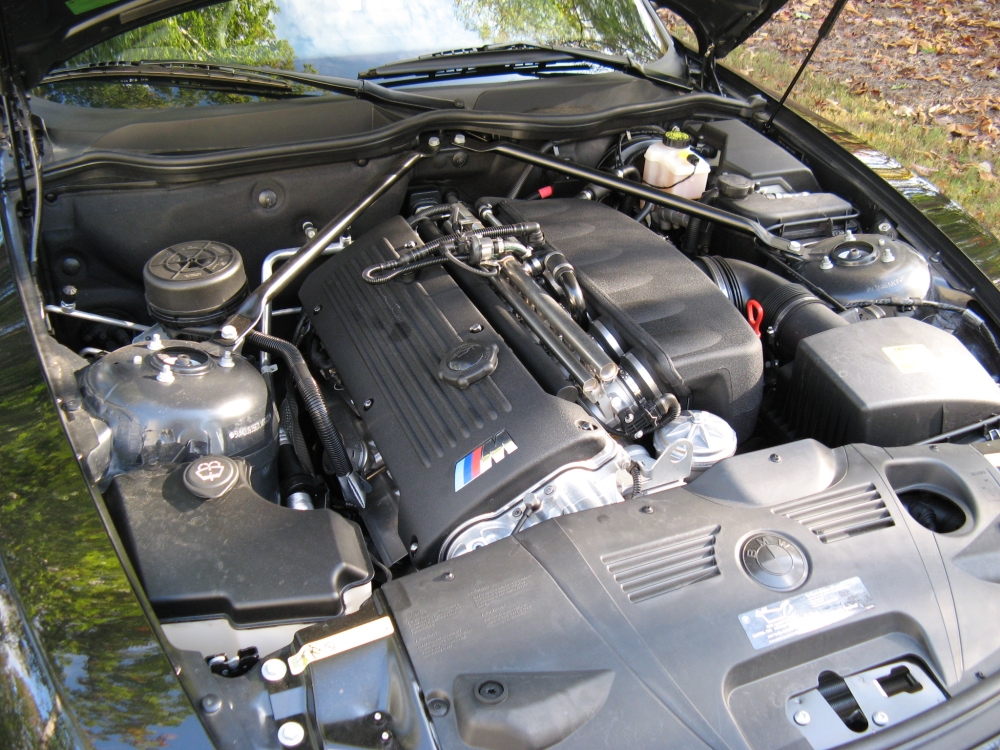
Hard to pass up with end-of-year incentives, this BMW is the E86 Coupe body style and utilizes the same S54 inline 3.2L six cylinder motor as the old E46 M3.
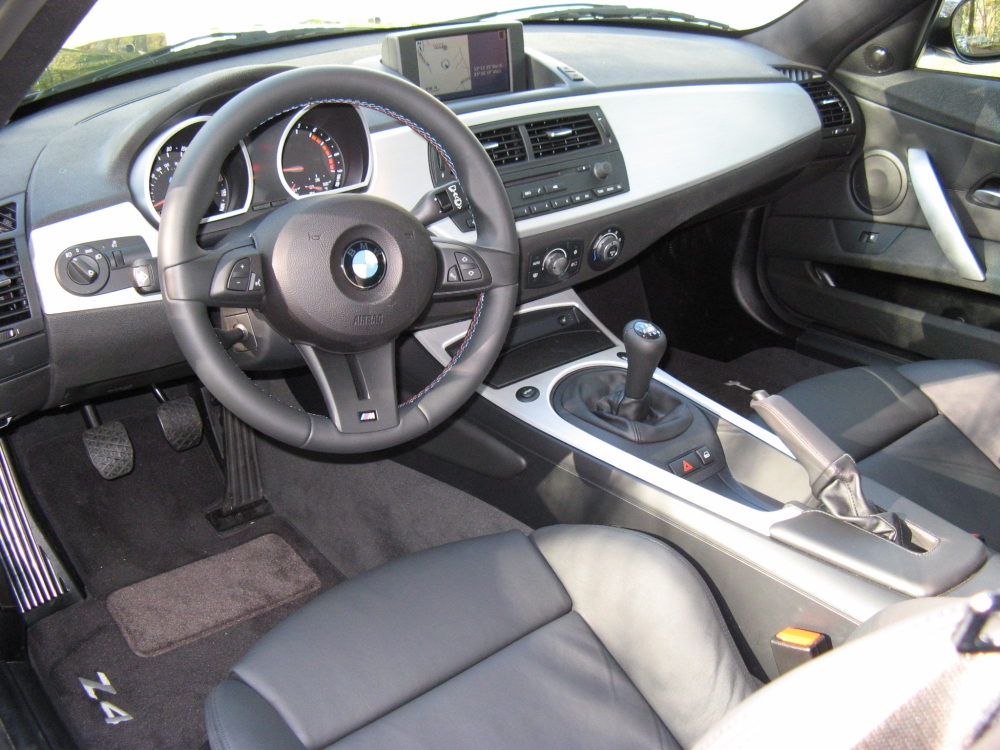
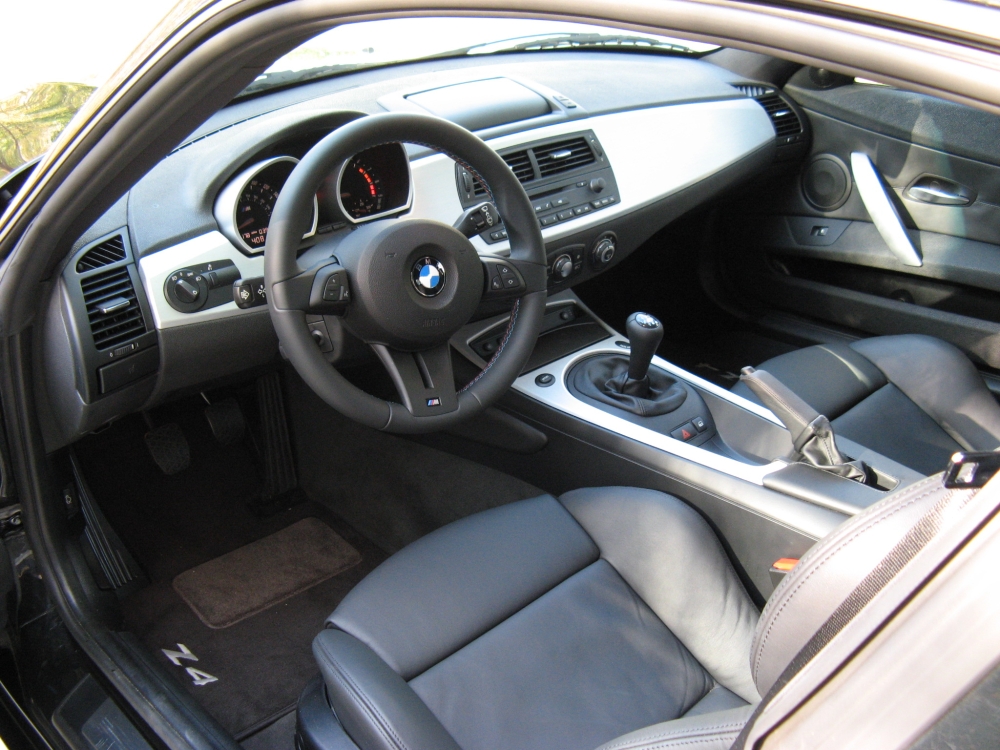
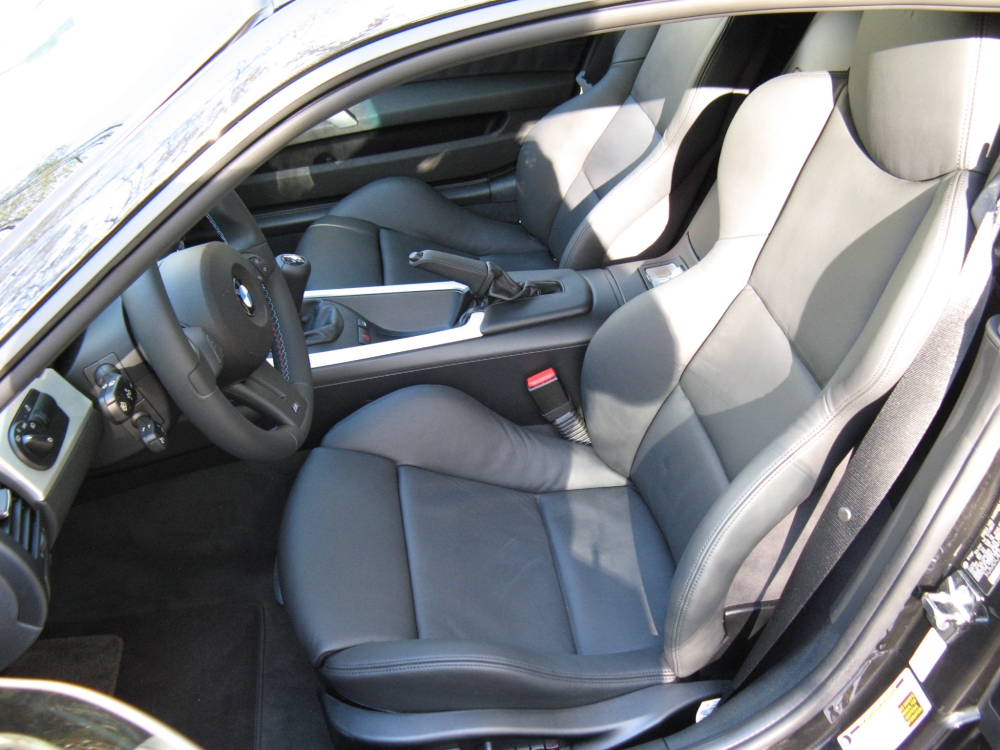
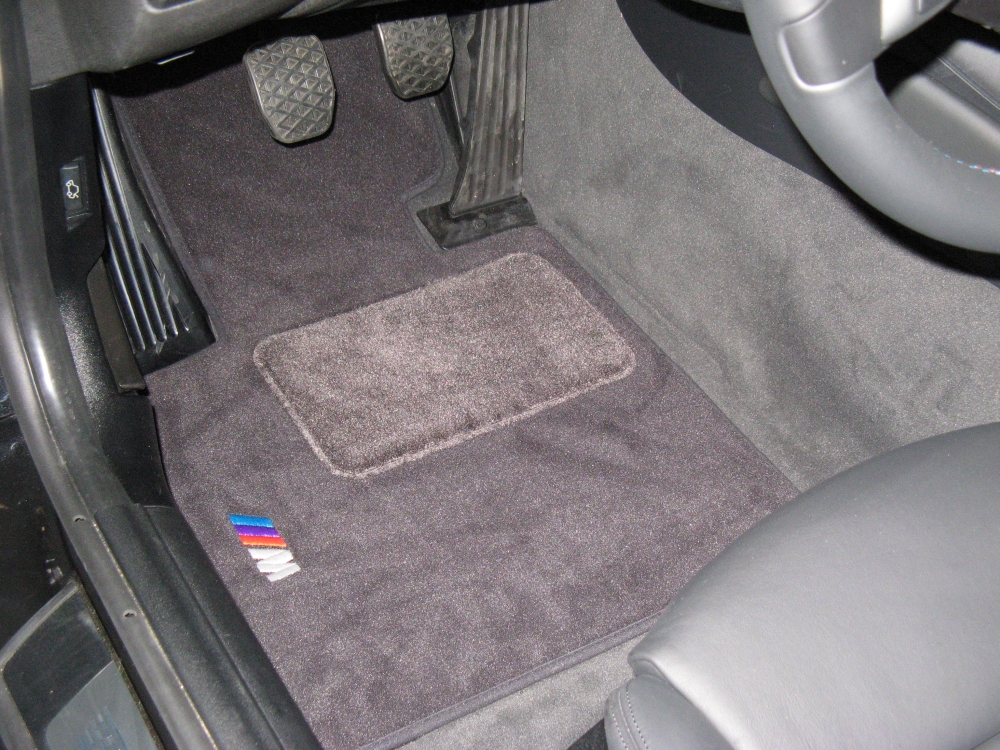
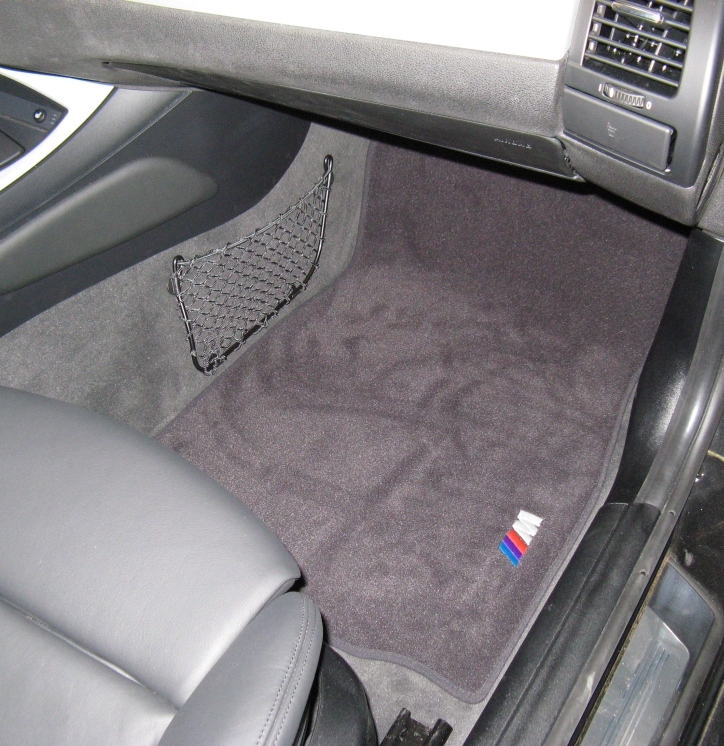
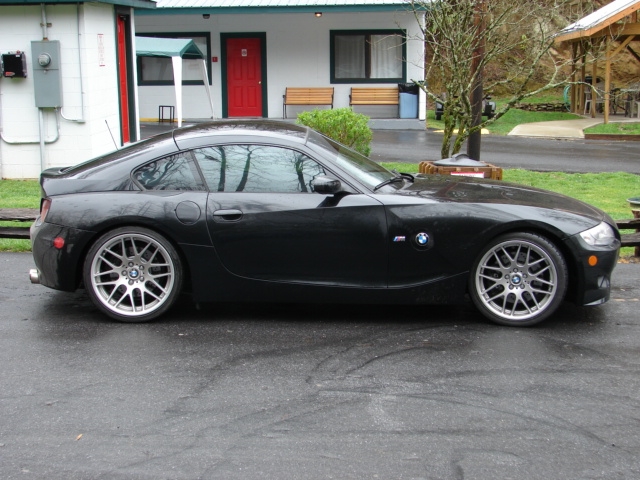
Here are some pics the day after I brought it home. Please disregard the Z4 floor mats, the dealership parts department ordered the incorrect part number initially and these will be
replaced with the correct M floor mats soon. Please also disregard the lack of a quality detail job, this again was sub-par service from Nalley: 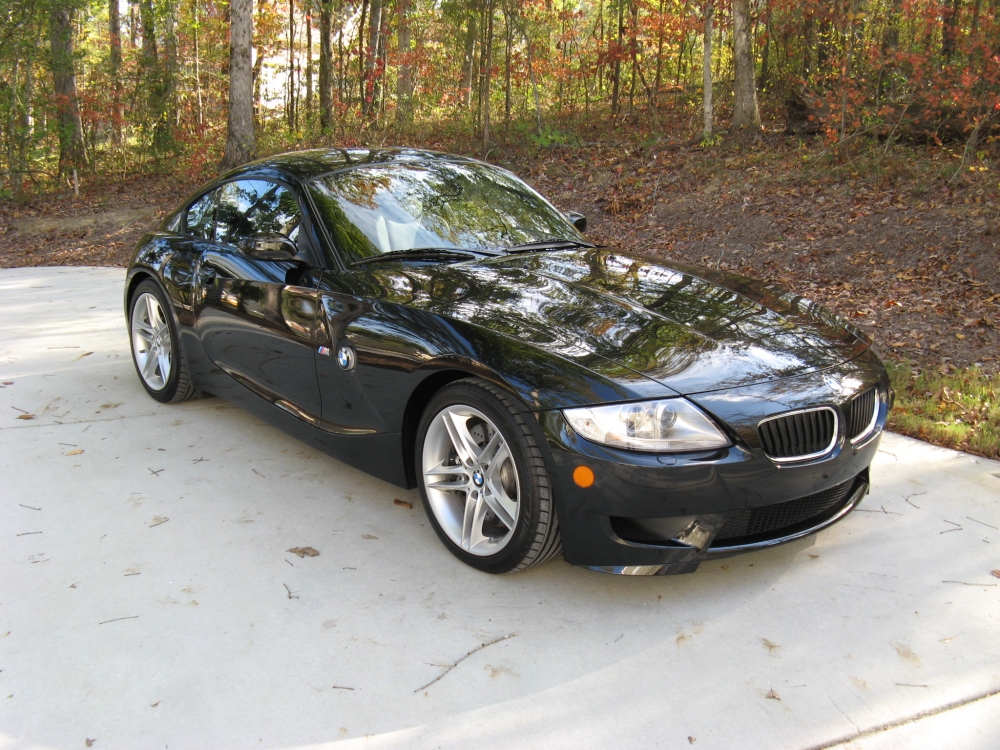


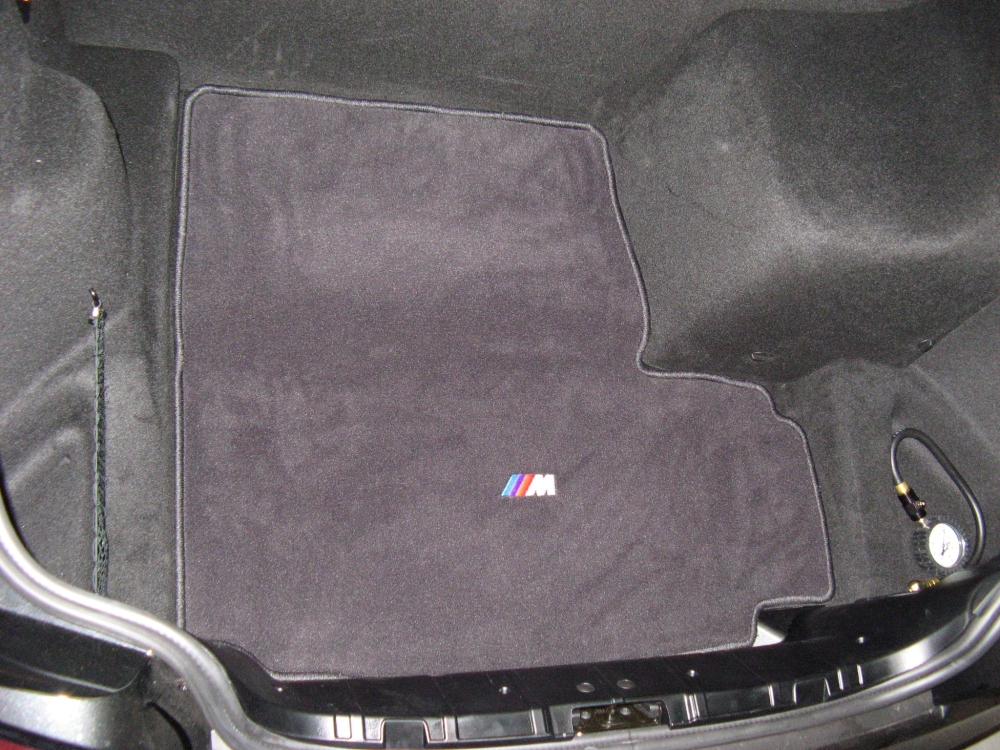
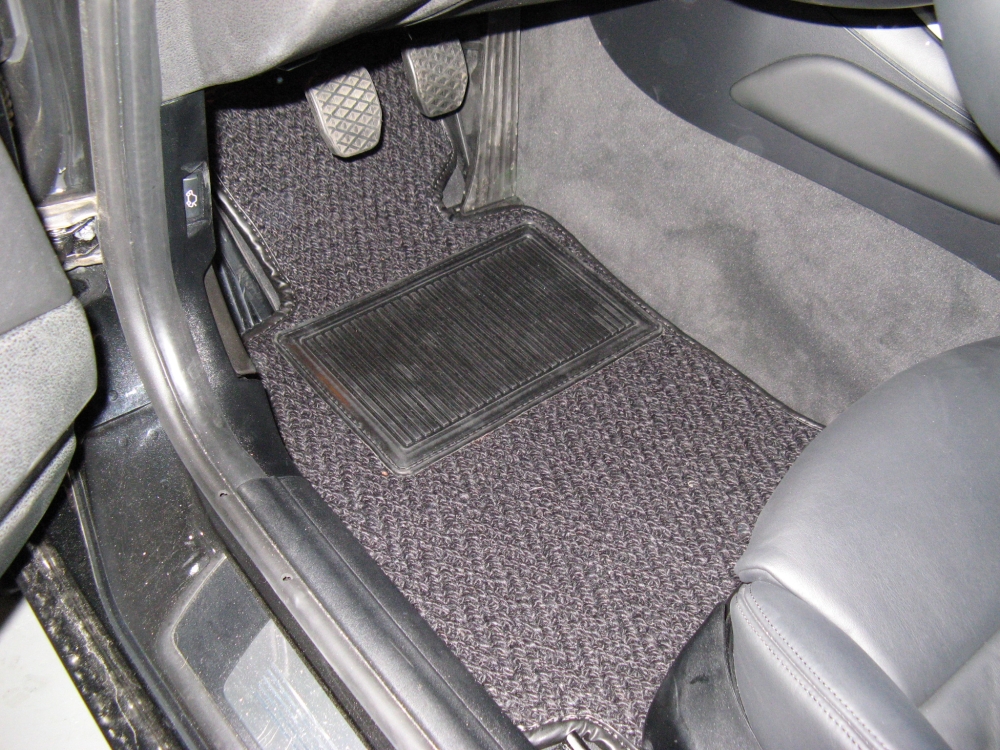
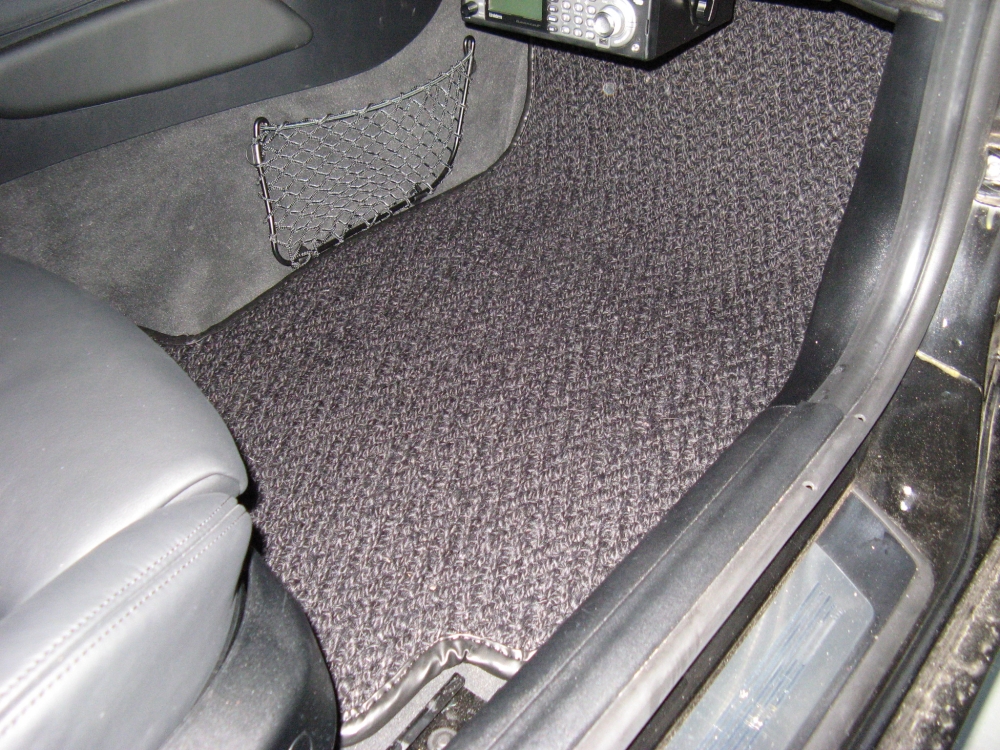
Nalley BMW was finally able to procure the correct ///M floor mats after two more tries (I even provided them with the correct part number the first time  ):
):
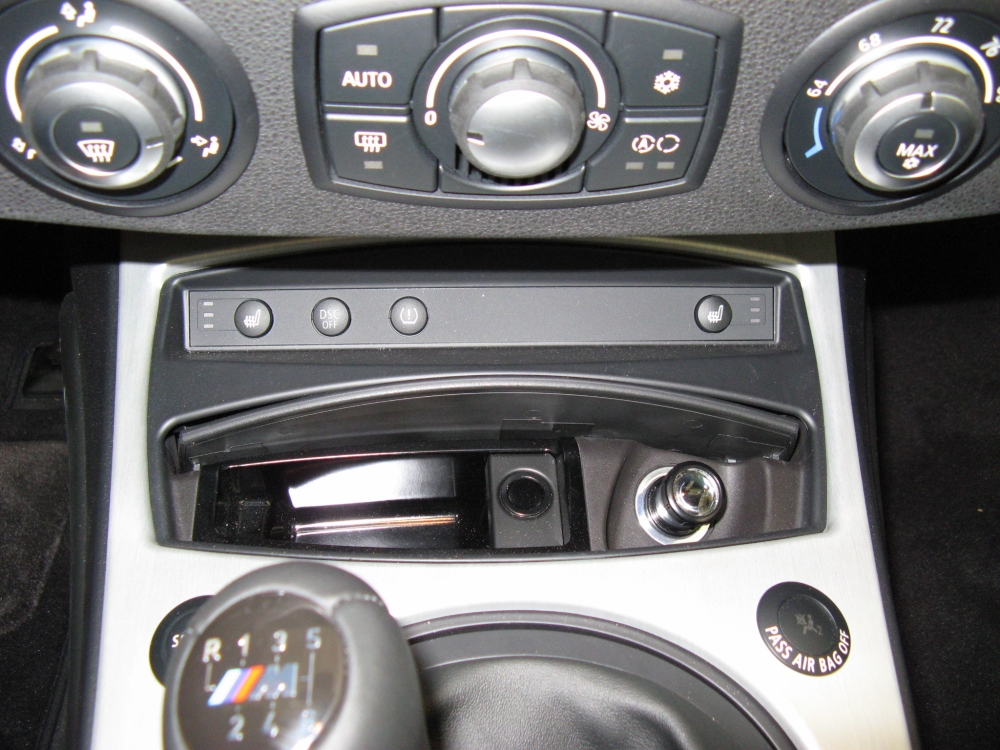
The first mod was replacing the cigarette lighter with my old Touareg "Torch" flashlight, fits perfectly and the ashtray door still closes. These LED flashlights are handy and bright:
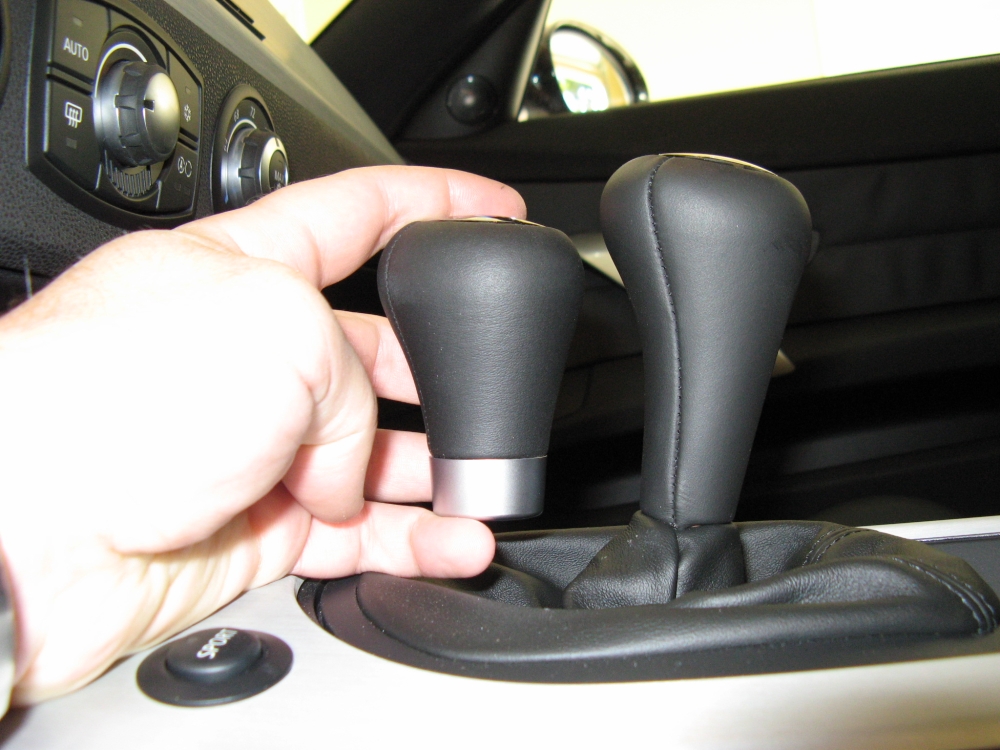
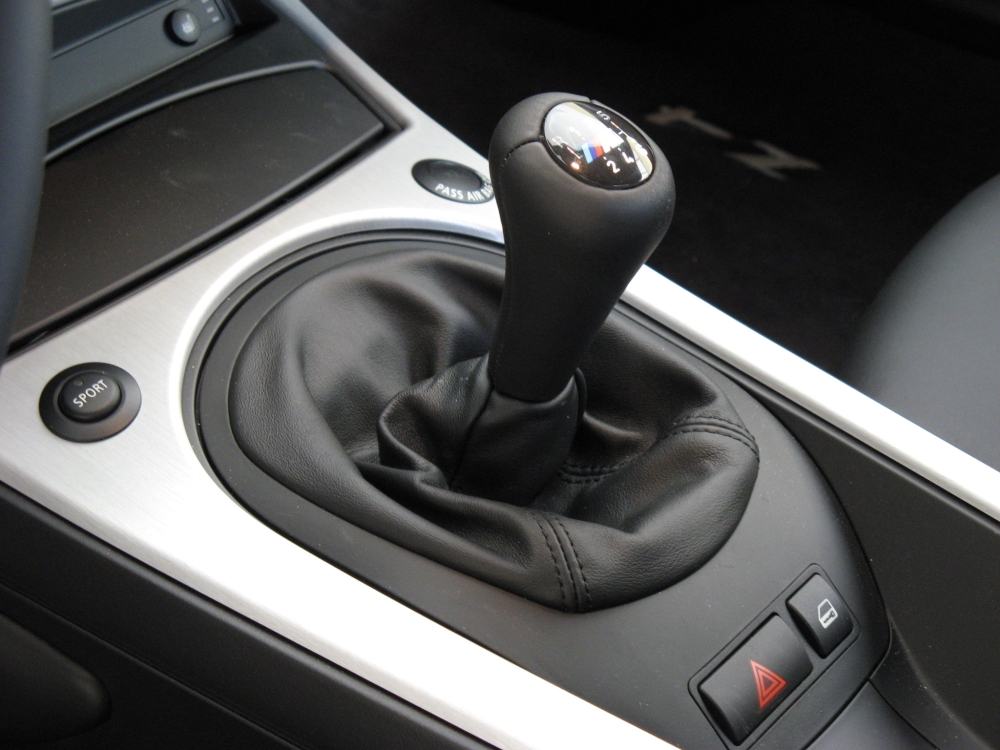
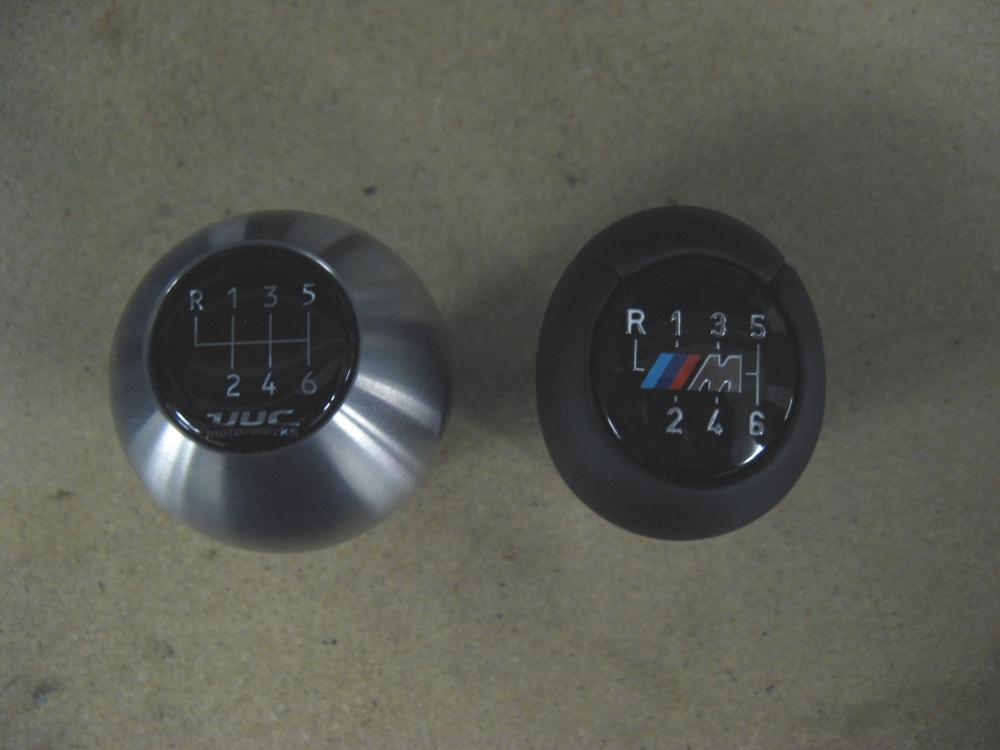
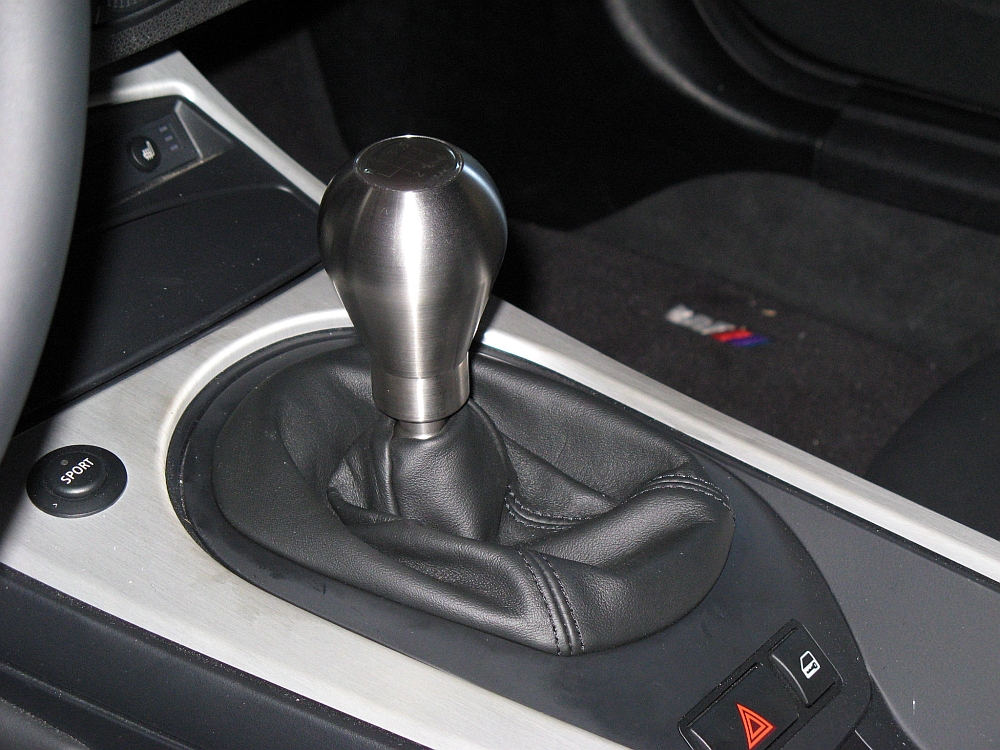
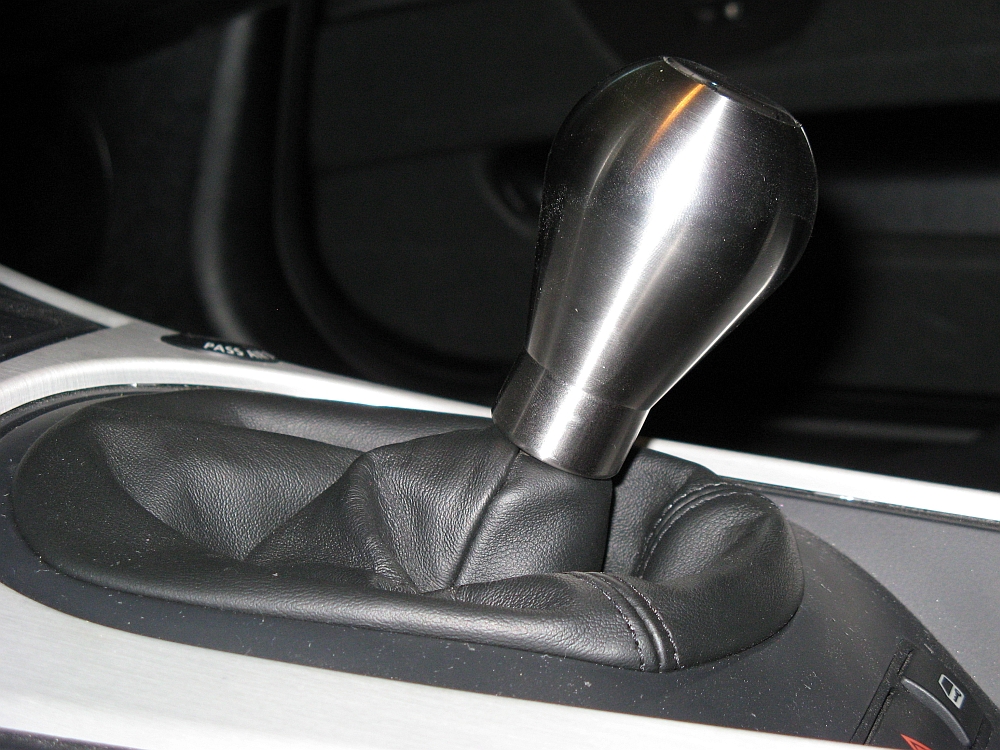
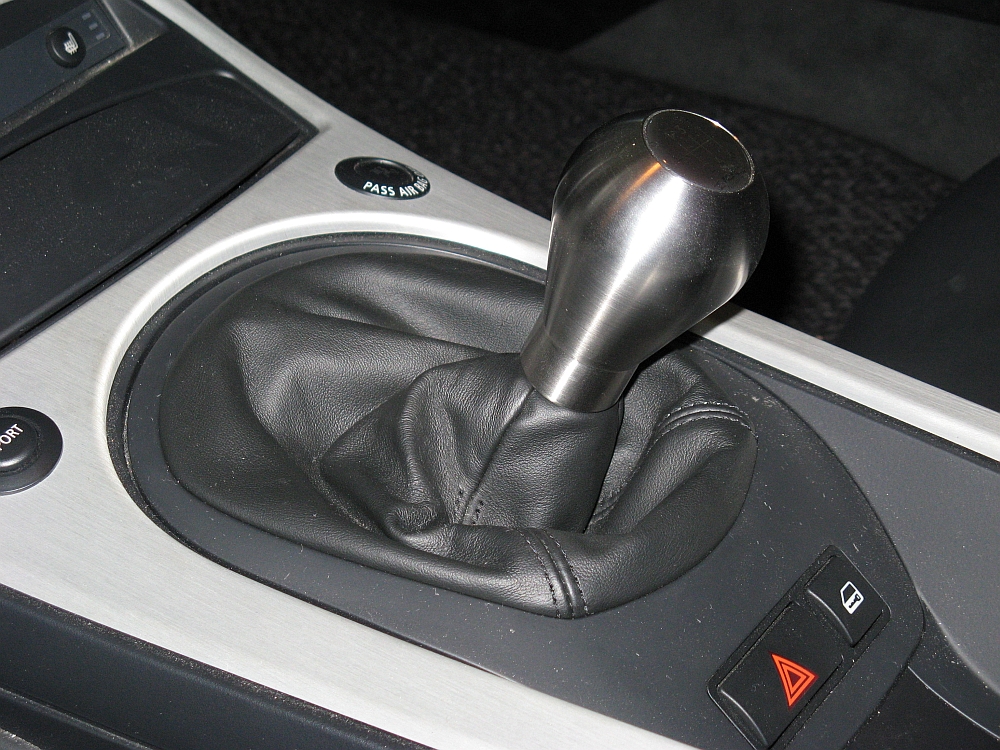
OE BMW ZHP short shift knob (P/N 25117896886) from Tischer BMW Parts installed.
This knob is weighted (5.5 oz vs OE 3 oz) and offers a shift feel superior to the OE knob, the shifter seems to put itself into gear. It is a little shorter than the OE knob too and provides a better shifting position
in my opinion. I did not mind giving up the lighted OE knob for this, lighted knobs seem kind of gimmicky to me anyway  .
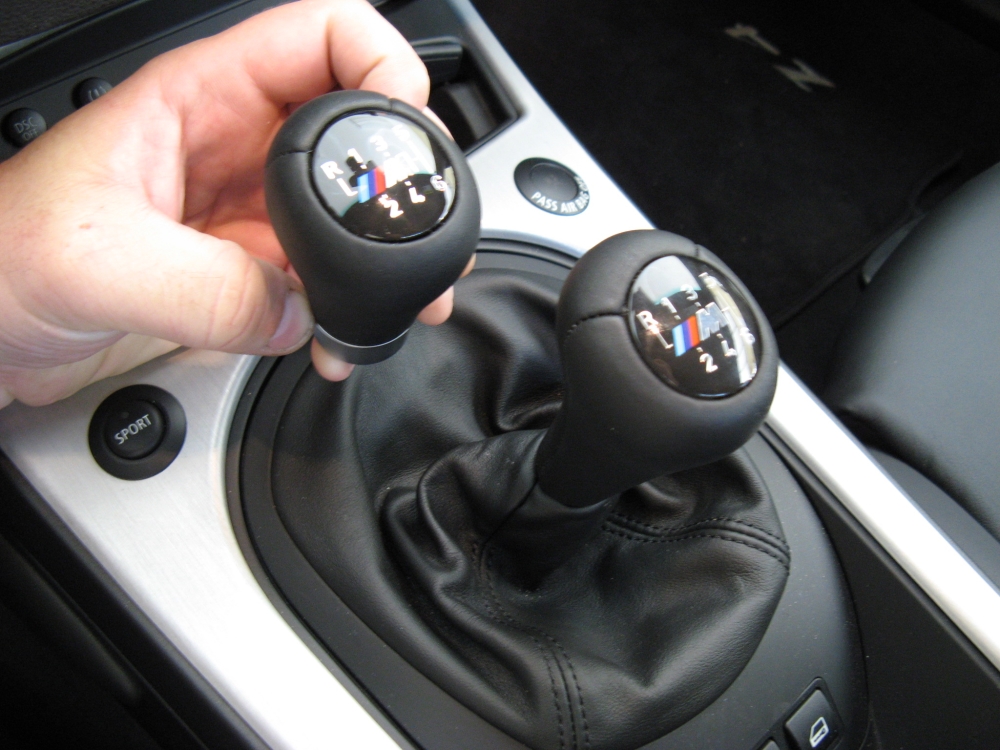
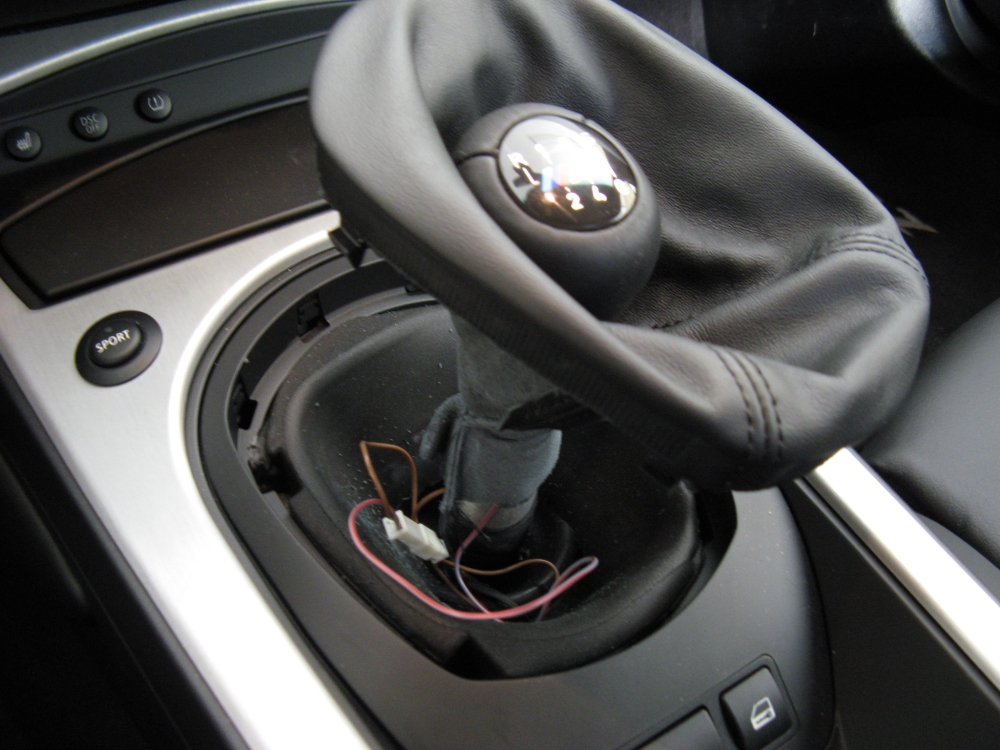
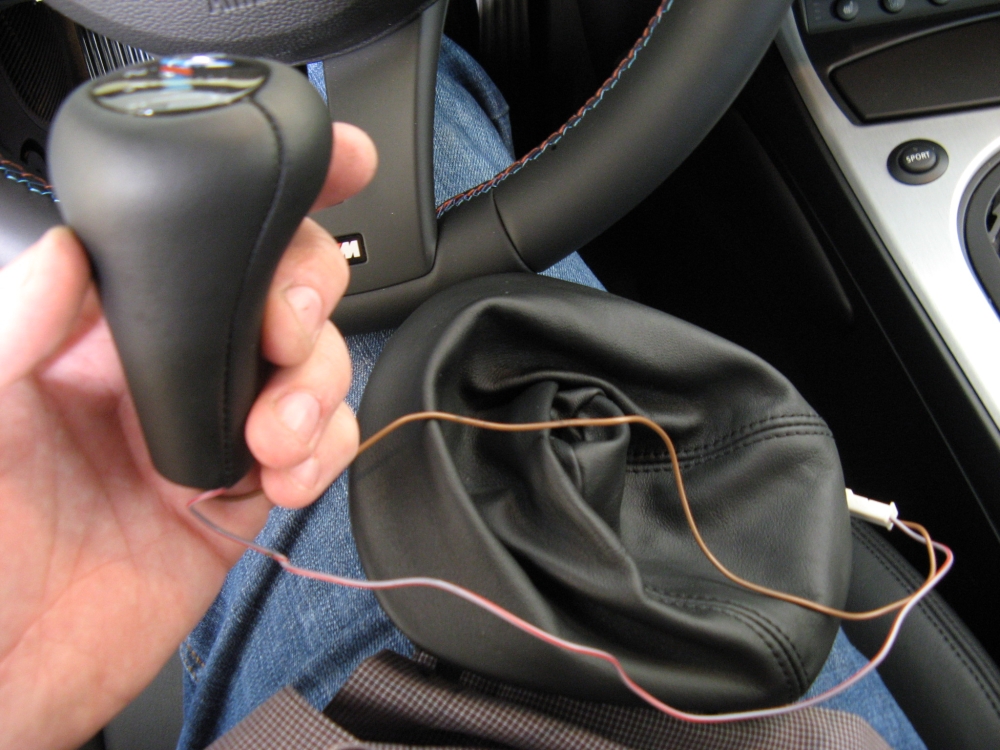
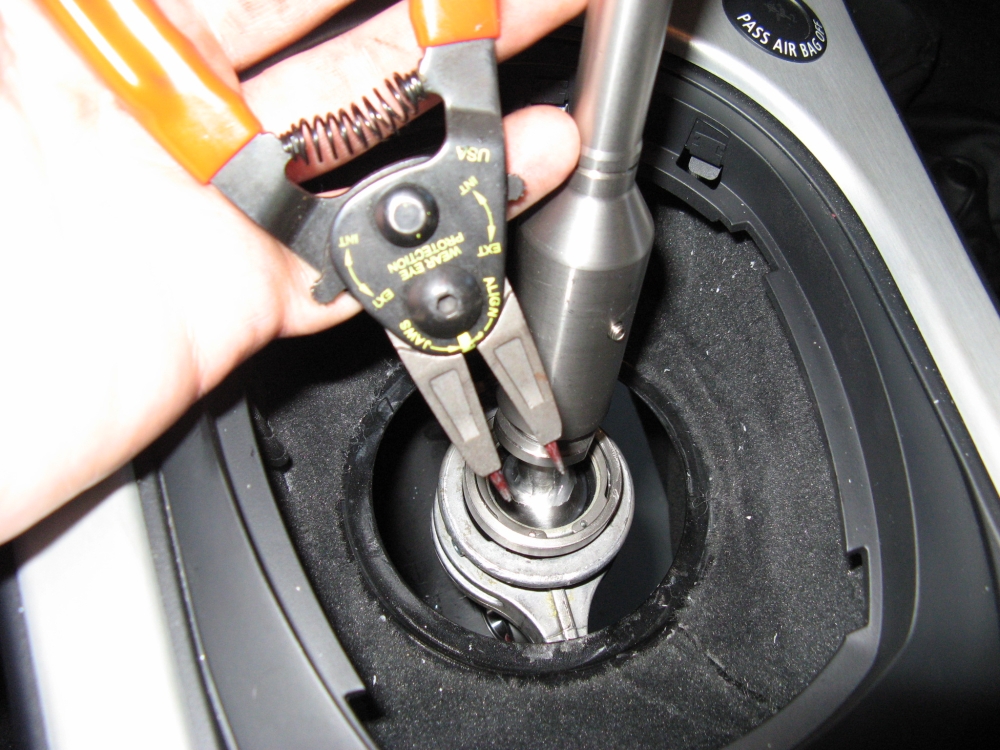
I started by removing the leather boot/plastic trim to access the plug for the lighted OE knob, it snaps out with some pulling on the boot around the edges.
After disconnecting this plug the boot and knob are removed with
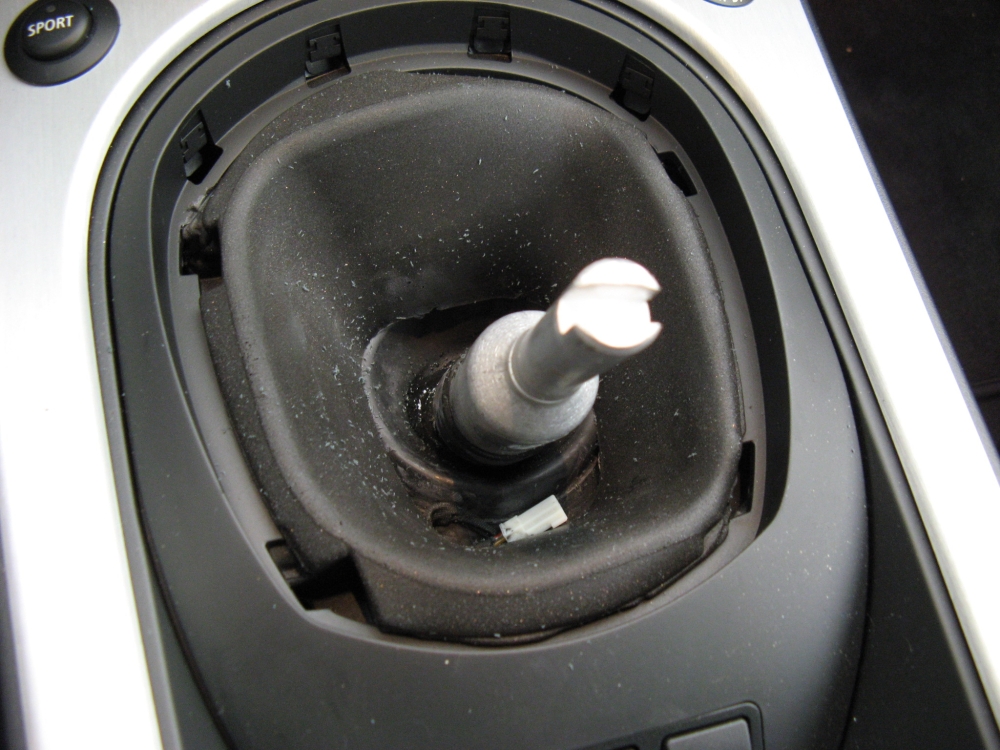
a swift upward jerk. The plug in the shifter well can be tucked back out of the way, the boot reinstalled, and the new knob pressed firmly into place.
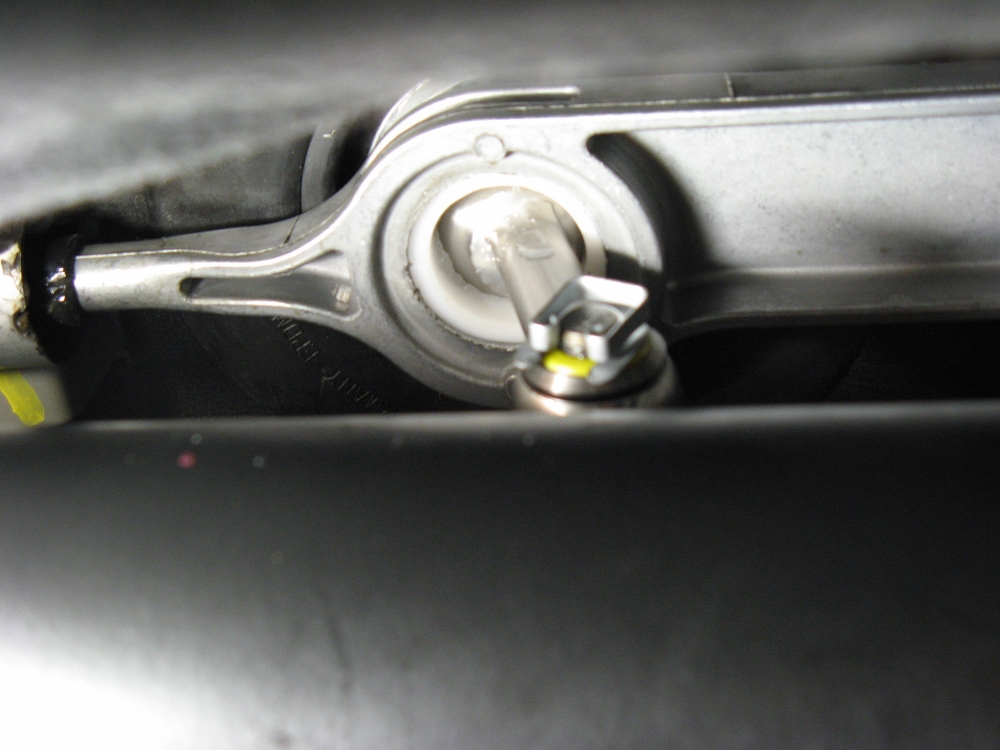
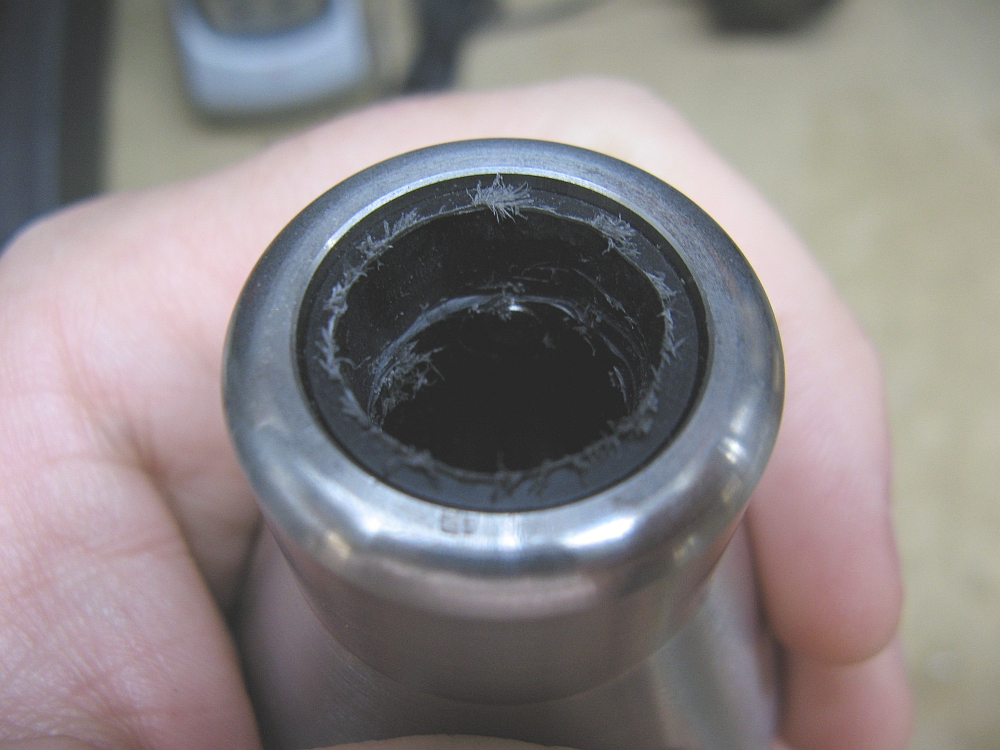
Be sure to align the shift knob with the notch in the shift rod before pressing it on:
.
I started by removing the leather boot/plastic trim to access the plug for the lighted OE knob, it snaps out with some pulling on the boot around the edges.
After disconnecting this plug the boot and knob are removed with
a swift upward jerk. The plug in the shifter well can be tucked back out of the way, the boot reinstalled, and the new knob pressed firmly into place.
Be sure to align the shift knob with the notch in the shift rod before pressing it on:

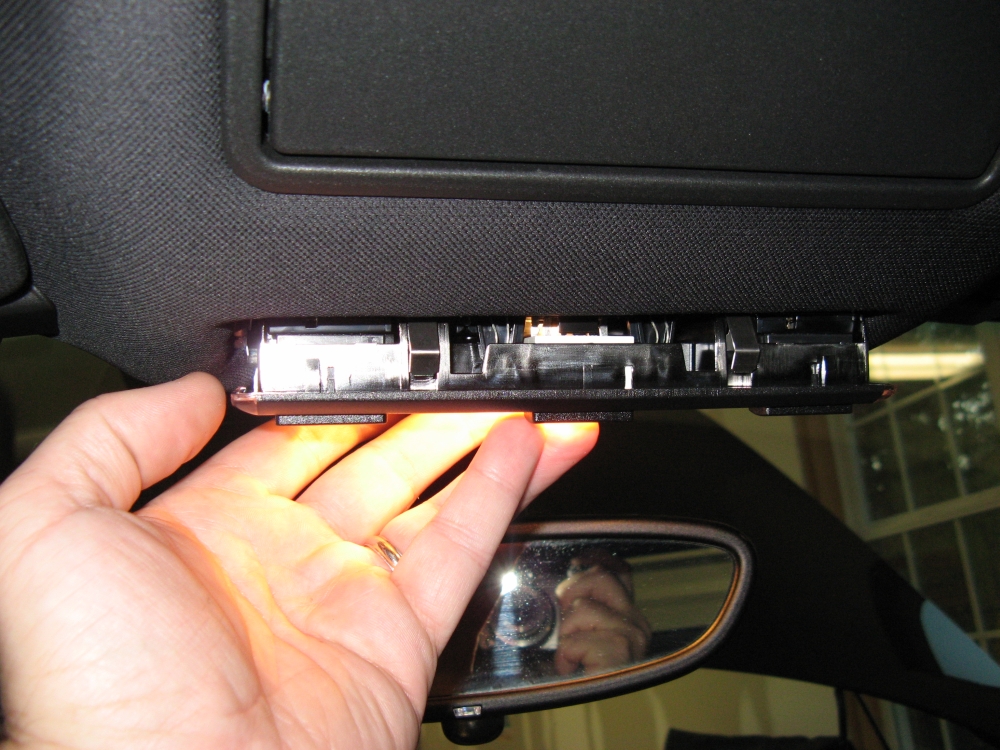
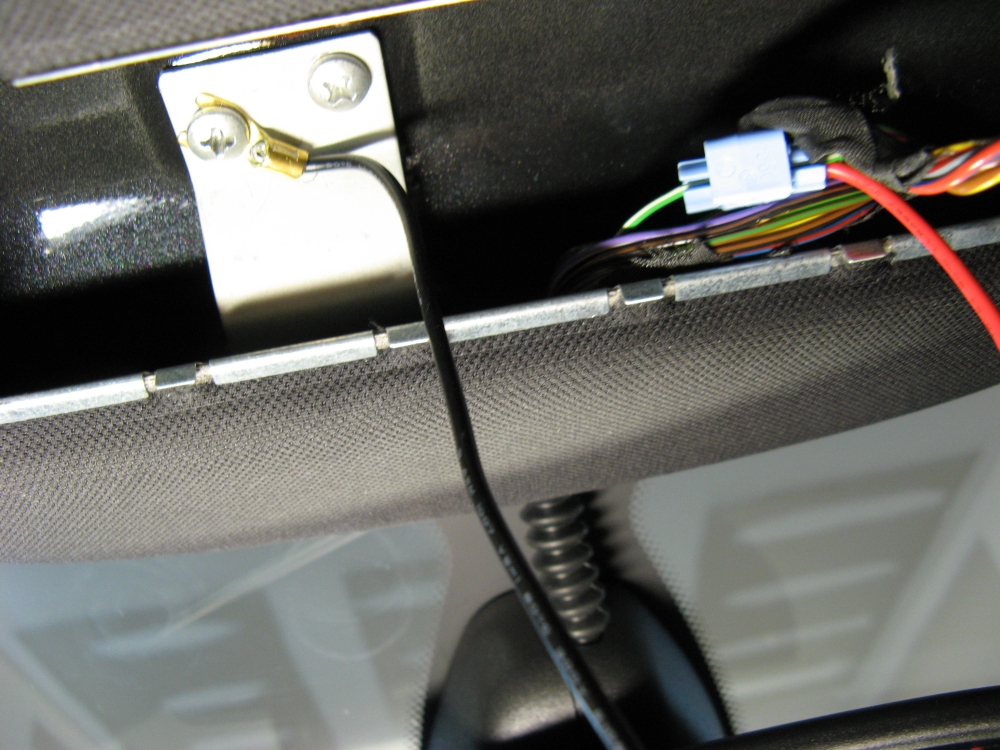
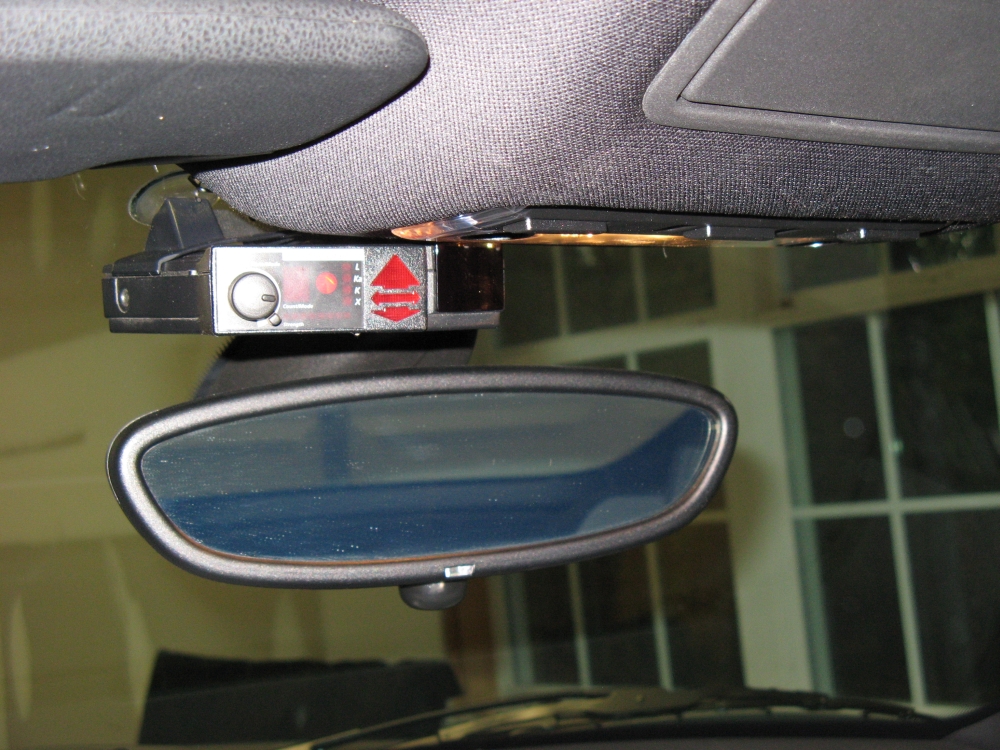
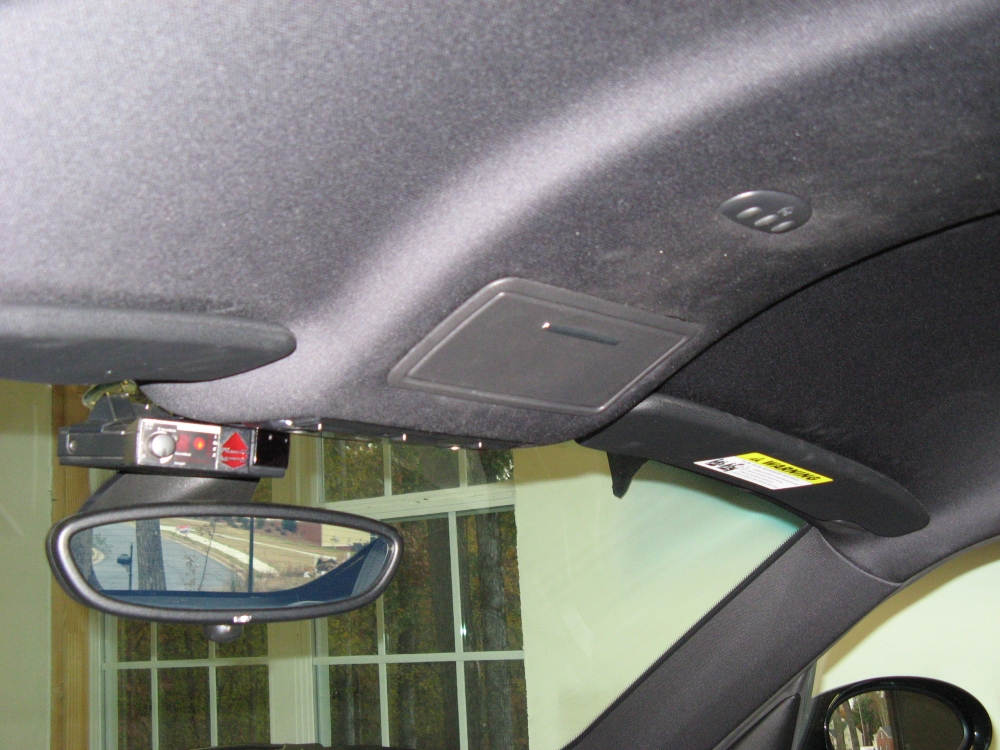
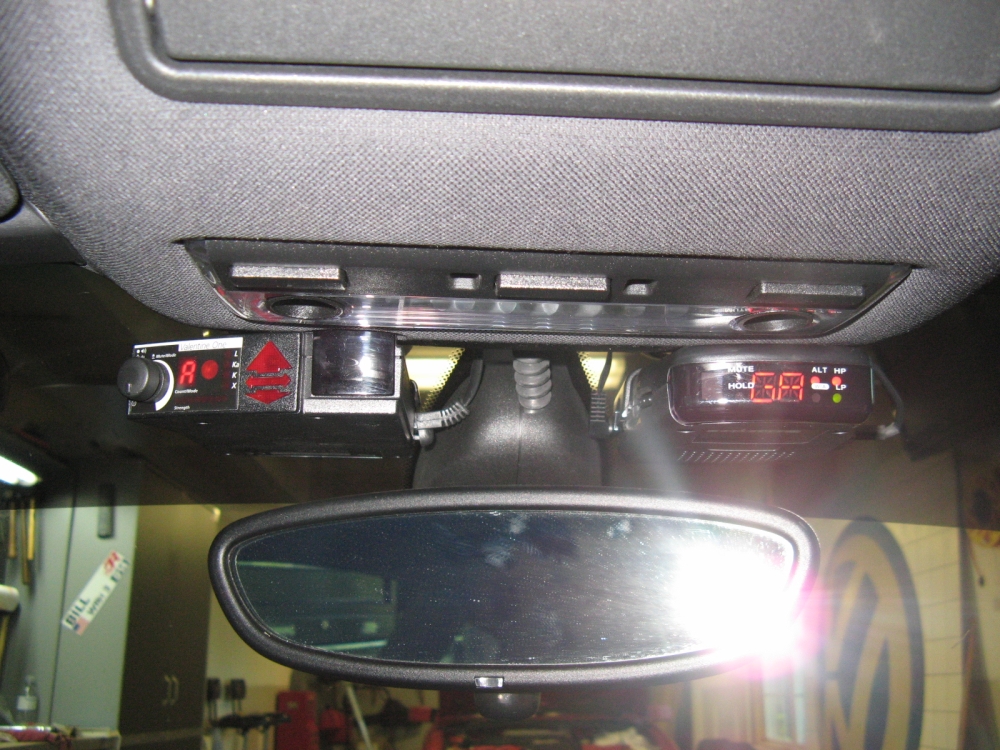
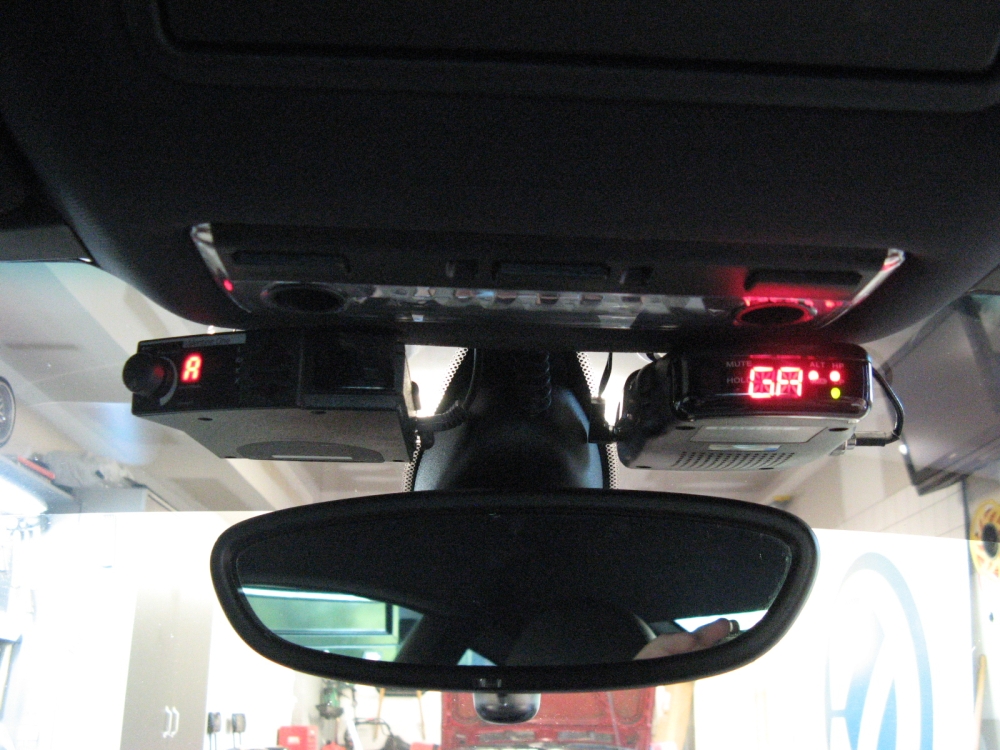
Valentine V1 installed above rearview
mirror and direct wired - (manual here). The upper lighting console is removed by carefully releasing
clips at the rear and unplugged, a tap is used to tap the green/white stripe wire for ignition 12v AFTER verification with volt/ohm meter and an existing screw is used for a ground lug, wire is routed between head liner
and front window and V1 installed using suction cup mount.
[NOTE: The wire used in my application for 12v + could vary for other cars with different options and should always be verified with a volt/ohm meter]
A good radar detector/speed detection counter measure forum: www.radardetector.net
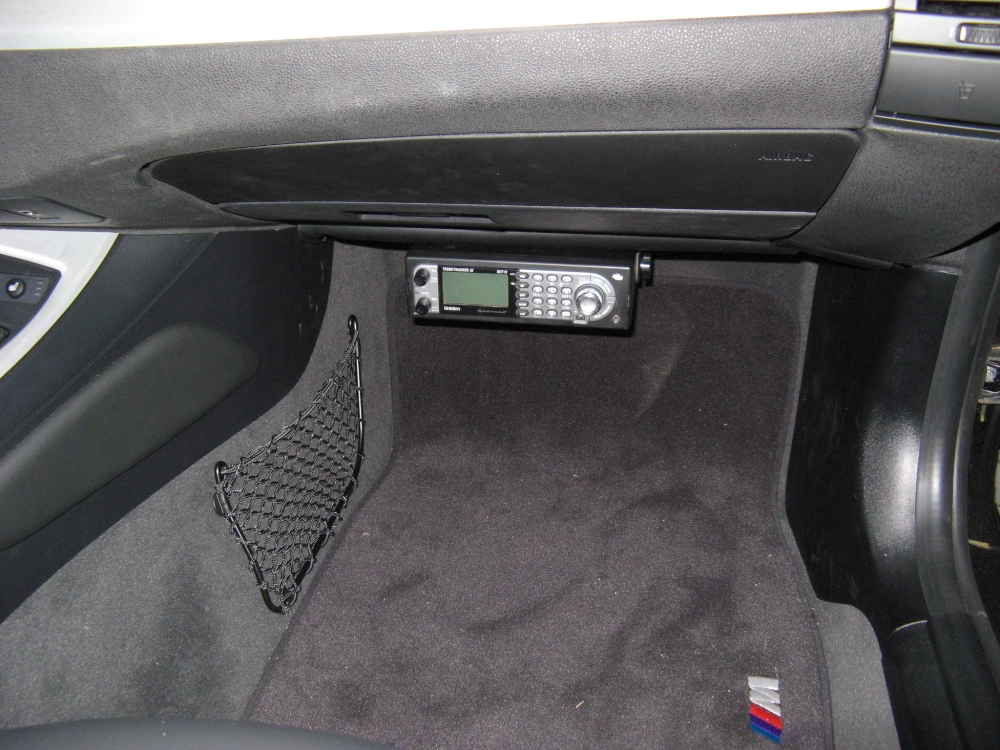
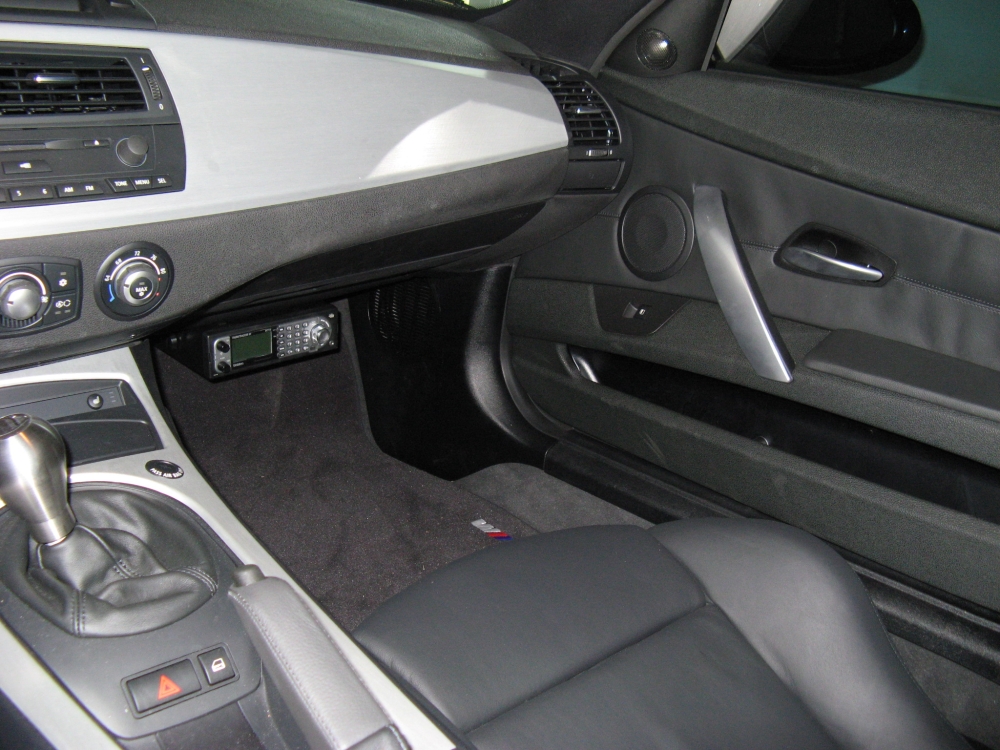
Uniden Beartracker BCT15 Scanner Installed- This acts as a pre-radar detector and lights up if any state patrol transponder is active within 3 miles. The
owners manual is available HERE. Mount is screwed to dash underside and scanner can be installed/removed utilizing
two small knobs on either side, similar to a CB. I have BCT12/had BCT7 scanners in my other cars and they are great for interstate travel and monitoring police activity
at the dead times late at night/early in the morning. Before installing I tried the ingress/egress test and it passed. I was able
to source accessory power from the fusebox. I used the included flexible wire antenna tucked up, around, and behind the passenger door seal. Scanner functions normally for local
police, DOT, and weather broadcasts (and has a trunk tracking feature that I have not used) and alerts via a light and a loud audible warning for state patrol,
state is selectable and is pre-programmed with state patrol frequencies.
A good radar detector/speed detection counter measure forum: www.radardetector.net
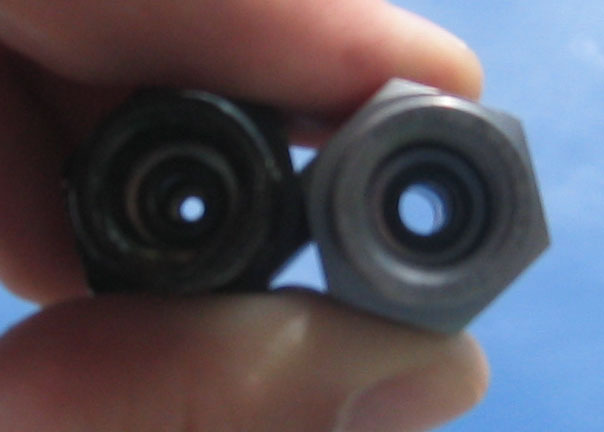
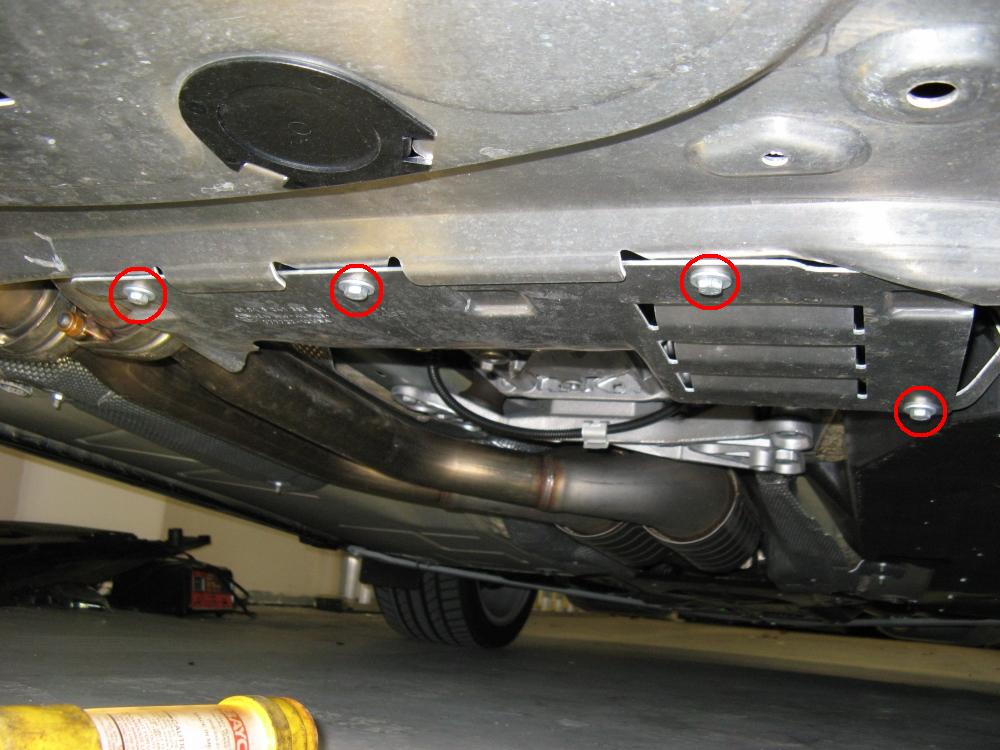
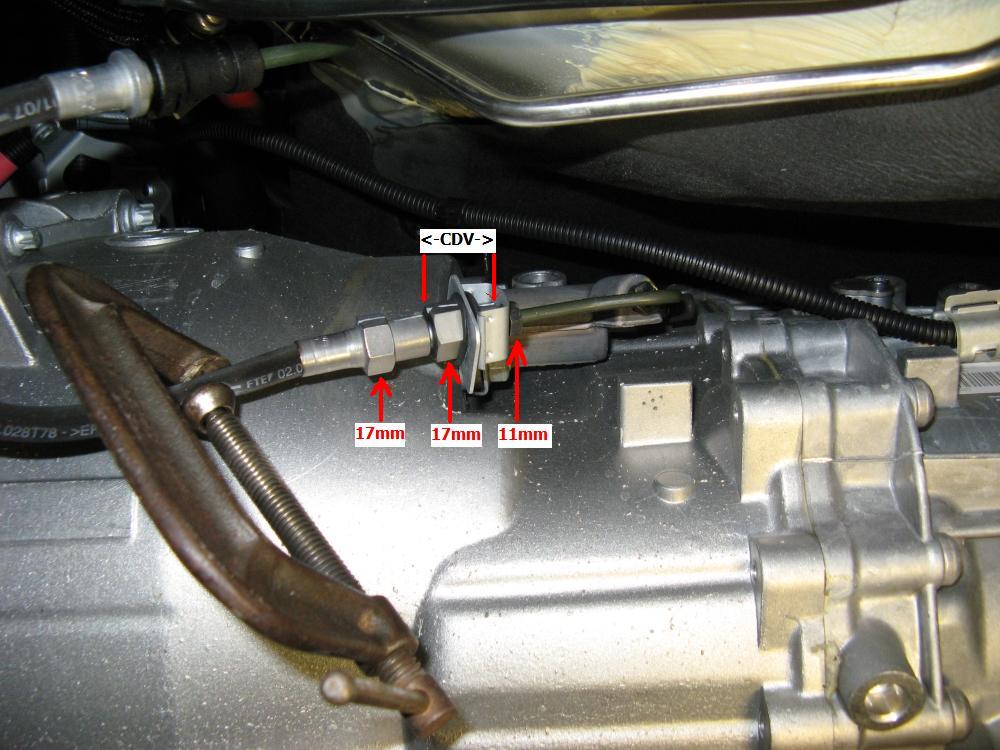
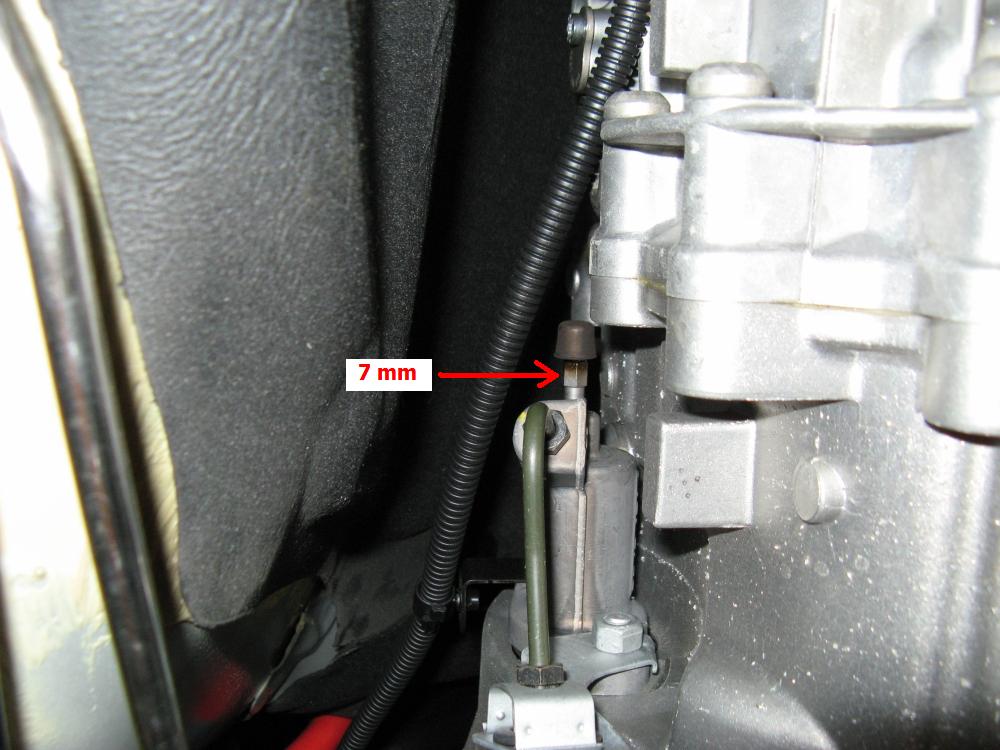
Modified CDV (Clutch Delay Valve) installed from Zeckhausen Racing. The OEM CDV delays clutch engagement and could accelerate clutch wear and cause jerky shifts due to this delayed clutch engagement. Zeckhausen has corrected this with their modified CDV that removes the restrictor and allows the clutch to engage as it should. Pics L to R: Lower Shield (cheese grater) is removed by removing 4-10mm bolts, Clutch line is clamped and CDV is removed by first removing hard line (11mm flare wrench) and then CDV from flexible line (17mm flare wrench), Clutch line is bled using pressure bleeder and 7mm wrench. Some of the information in my 335i write-up may be applicable (like the pressure bleeding process) found HERE. Also, if you want to modify your own CDV there is a write-up HERE that explains the process. Pics:
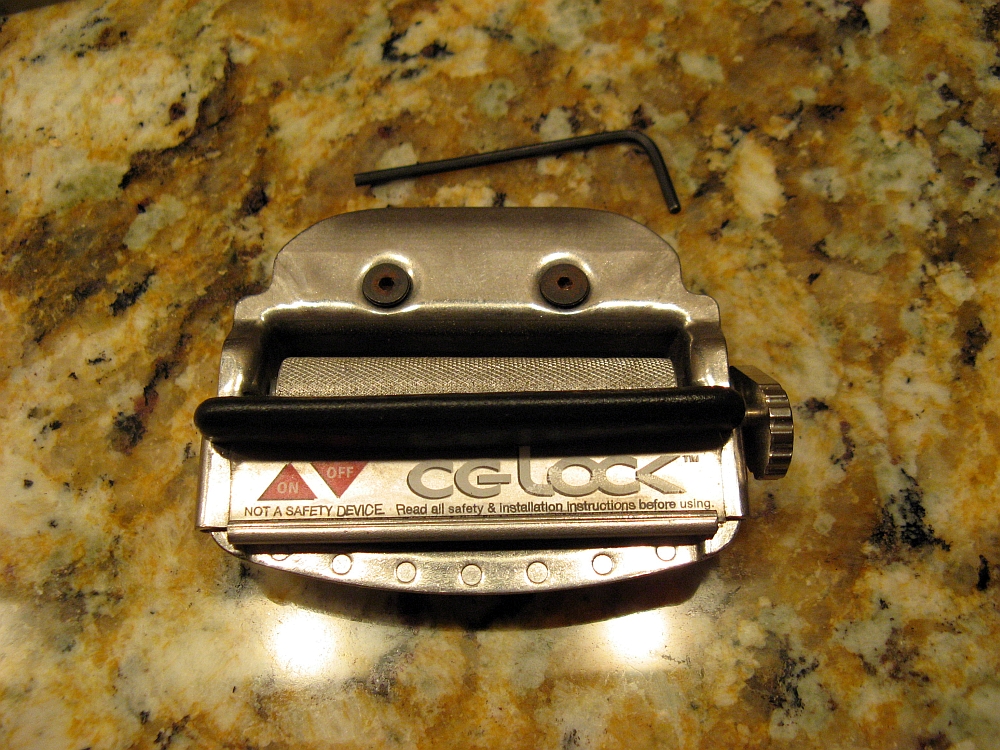
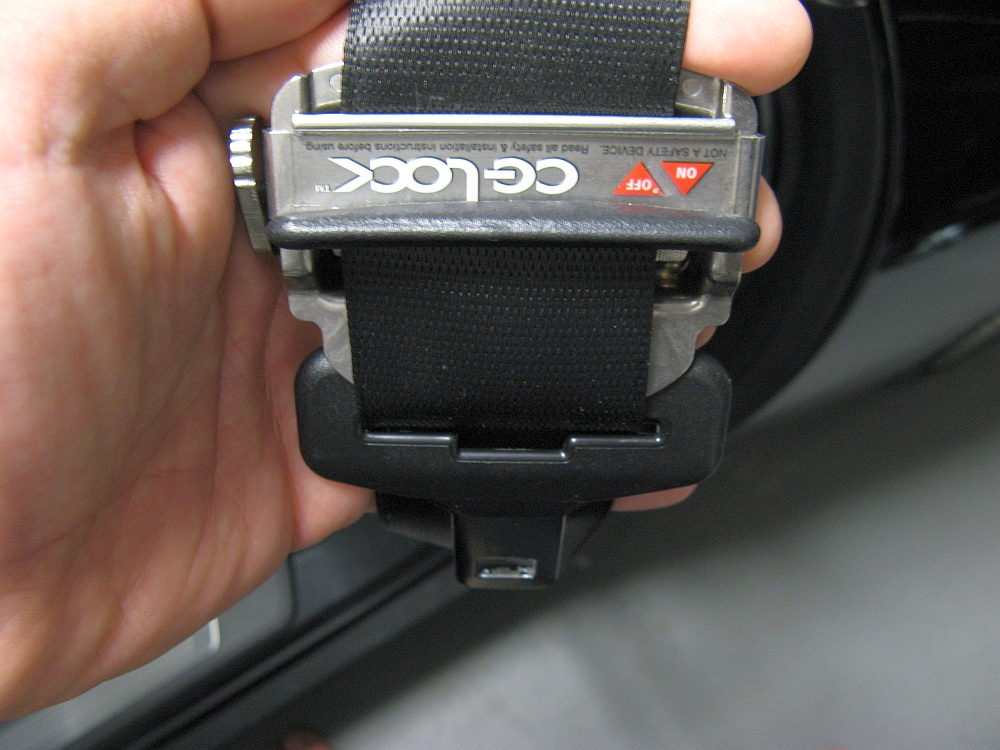
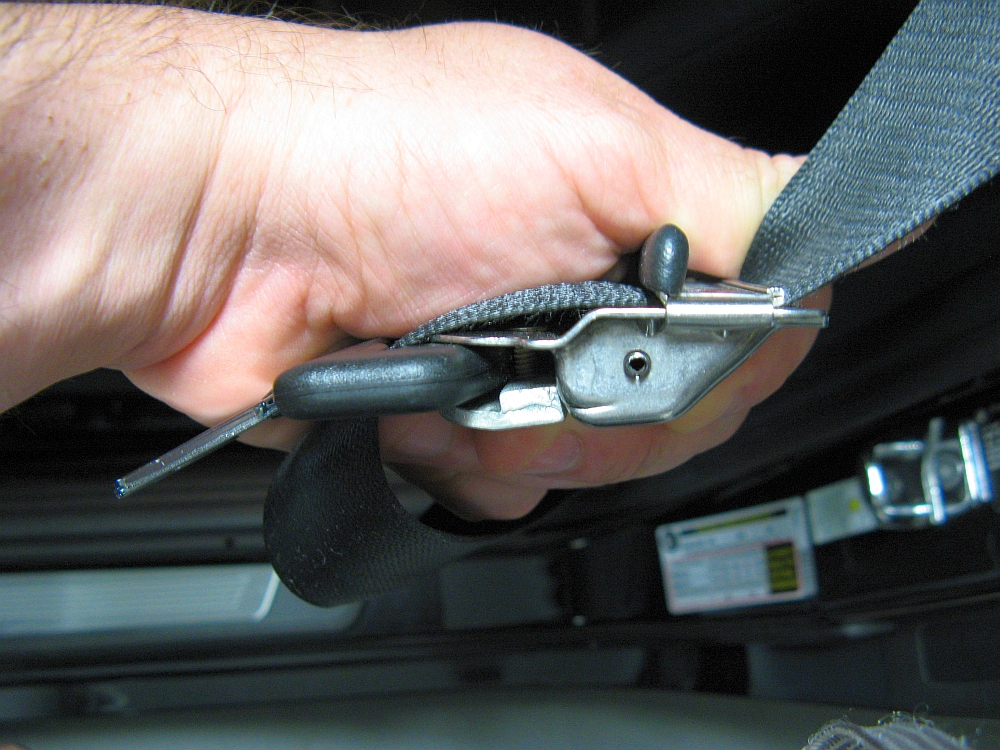
CG-Lock from a past car installed. Provides stability so there is less sliding and repositioning in seat, as seen in
the promotional video HERE.
Install instructions HERE, install video HERE.

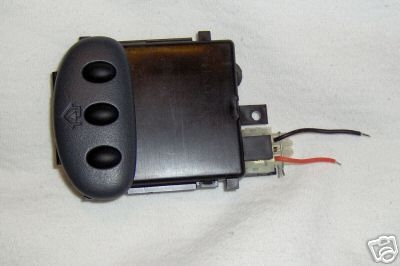
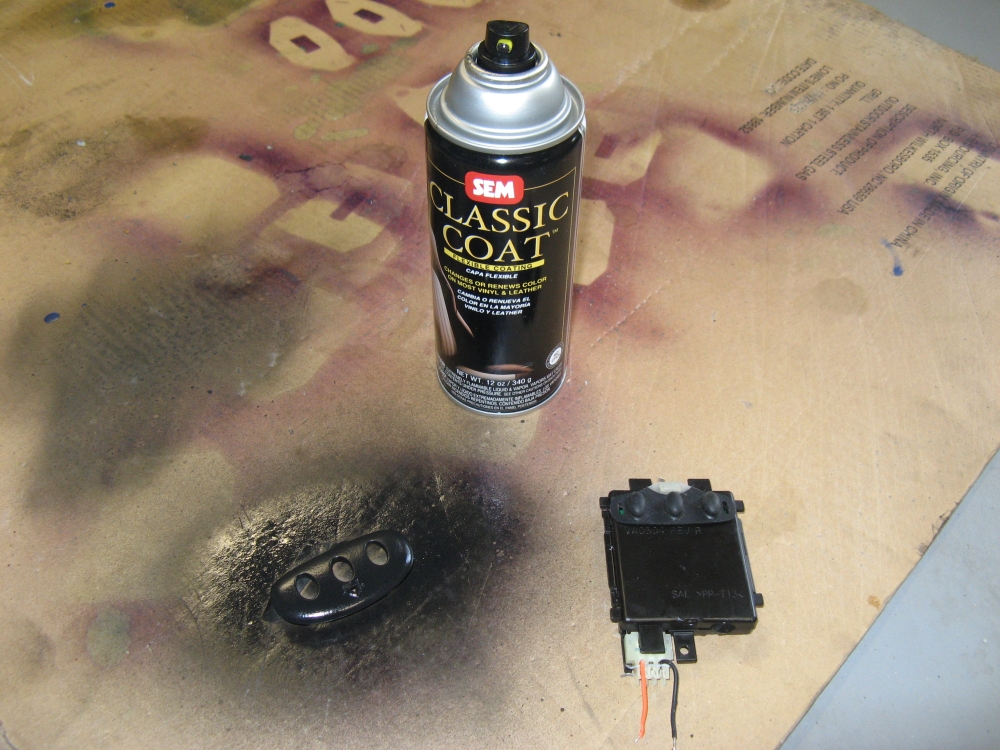
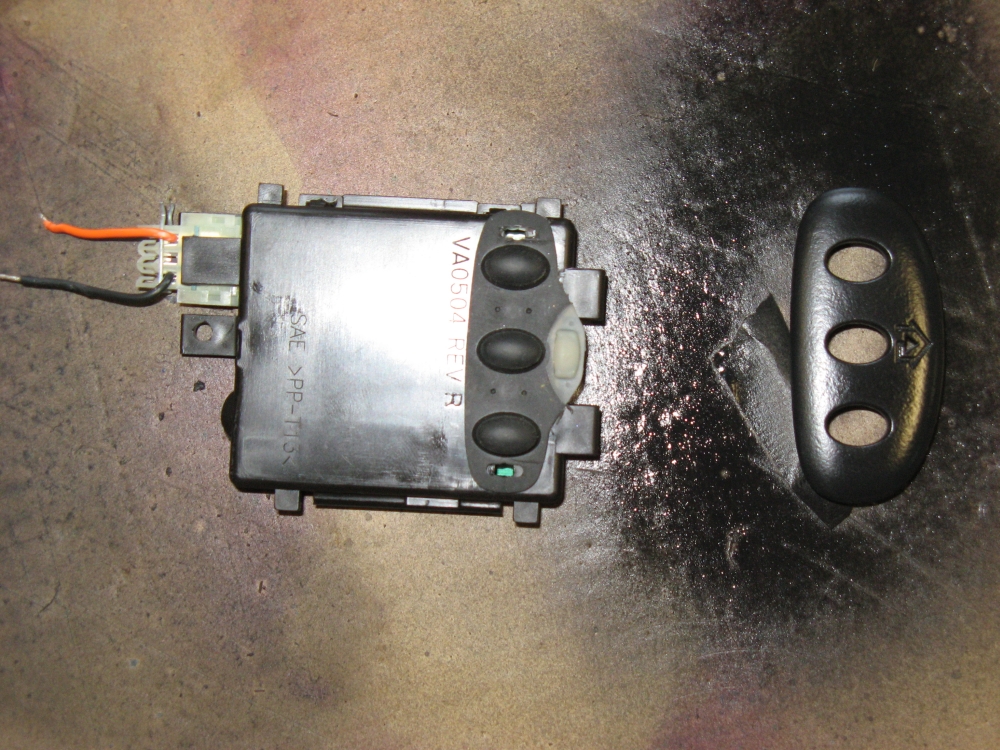
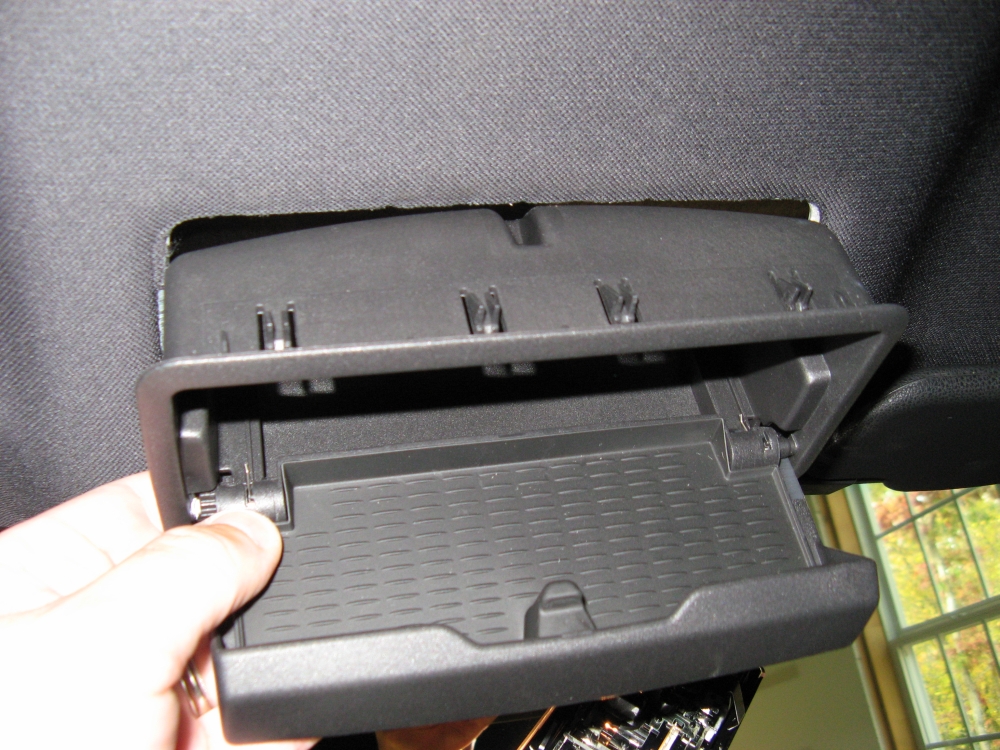
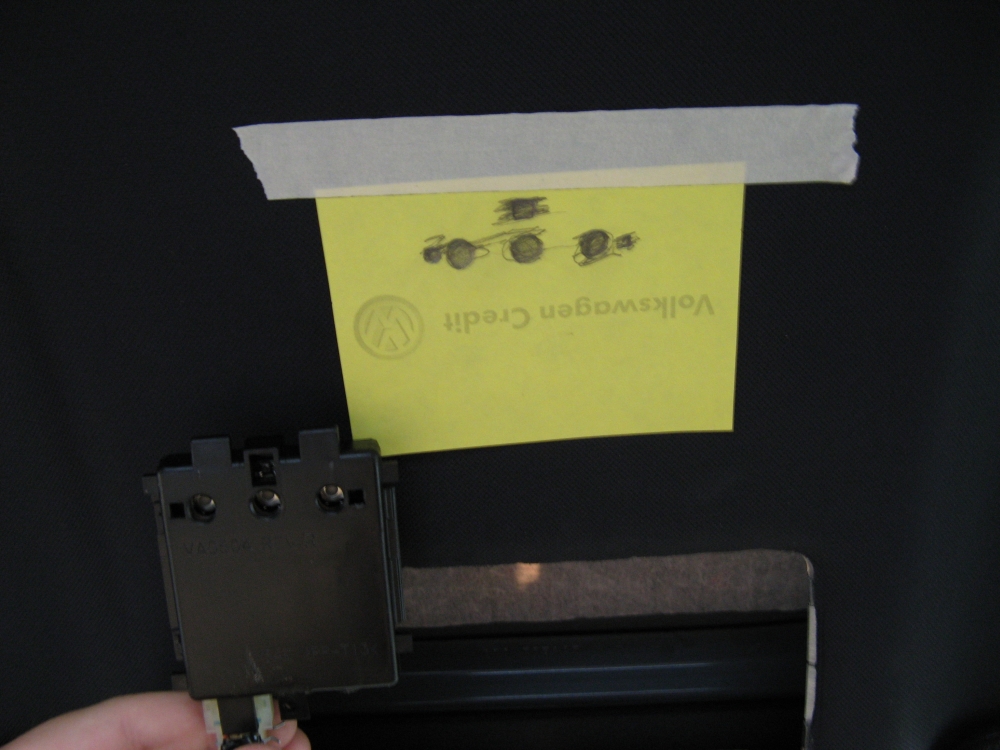
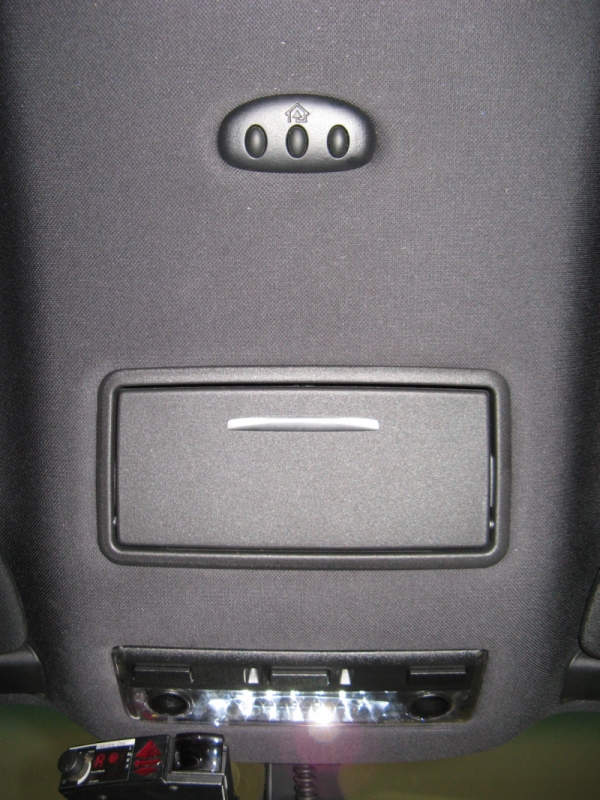
Homelink purchased on eBay and installed. This Homelink module was removed from an unknown source but was rolling code compatible. The first thing I did was disassembly which involved snapping the faceplate off, and then I spray dyed the faceplate with SEM black spray dye. The best candidate for mounting position was beside the sunglass holder which was removed for ease of installation- accessory power source from earlier radar detector installation was used for Homelink power source. I made a template using pencil and tracing the holes, then used a drill to make holes in the headliner (Careful not to drill through the roof). Due to the thick nature of the headliner some work with a razor blade was required to insure it was thin enough to snap the Homelink module together and superglue was used to make sure that it would remain that way. Homelink programming instructions HERE and programming video (Quicktime format) HERE. Bimmerfest's DaveZ had a different approach and mounting solution which can be found HERE.
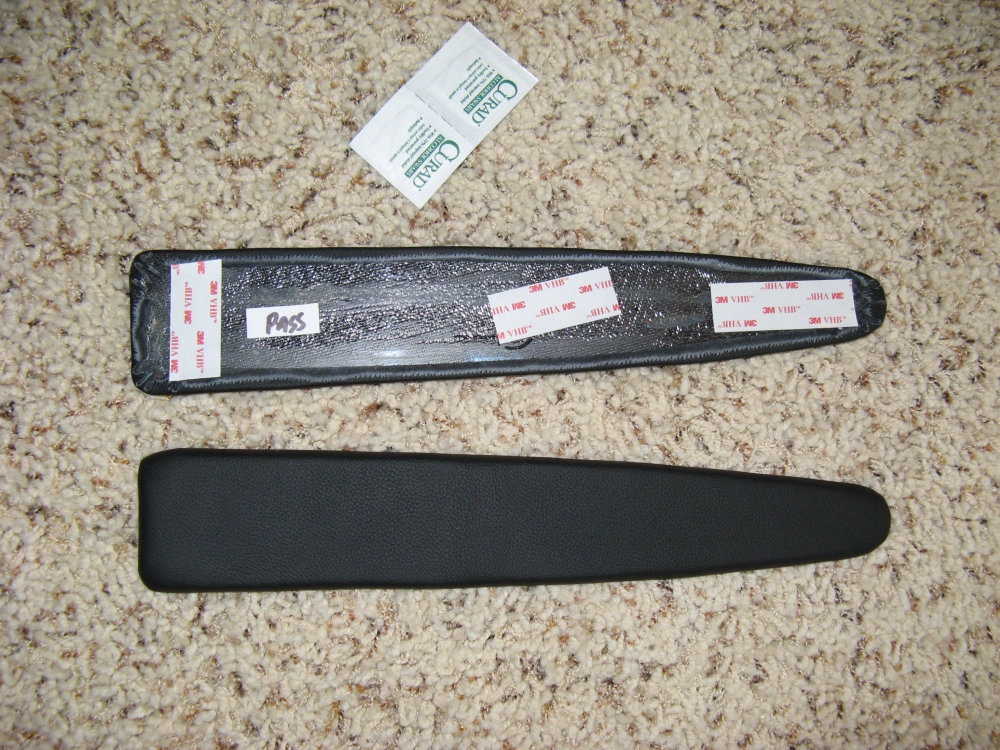
Leather Z door armrests installed. The armrests are upholstered in leather and attach to the OE plastic with 3M double sided tape. After cleaning the plastic with the supplied alcohol wipes, the armrests are installed by removing the tape backing. They provide a more finished look IMO. Installation instructions HERE:
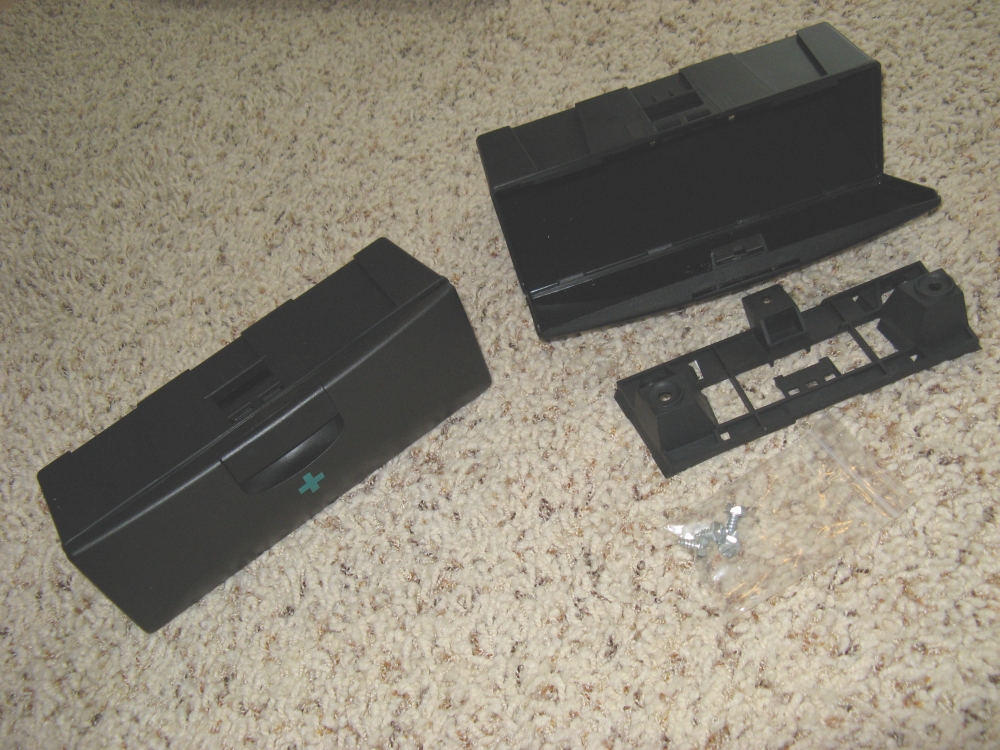
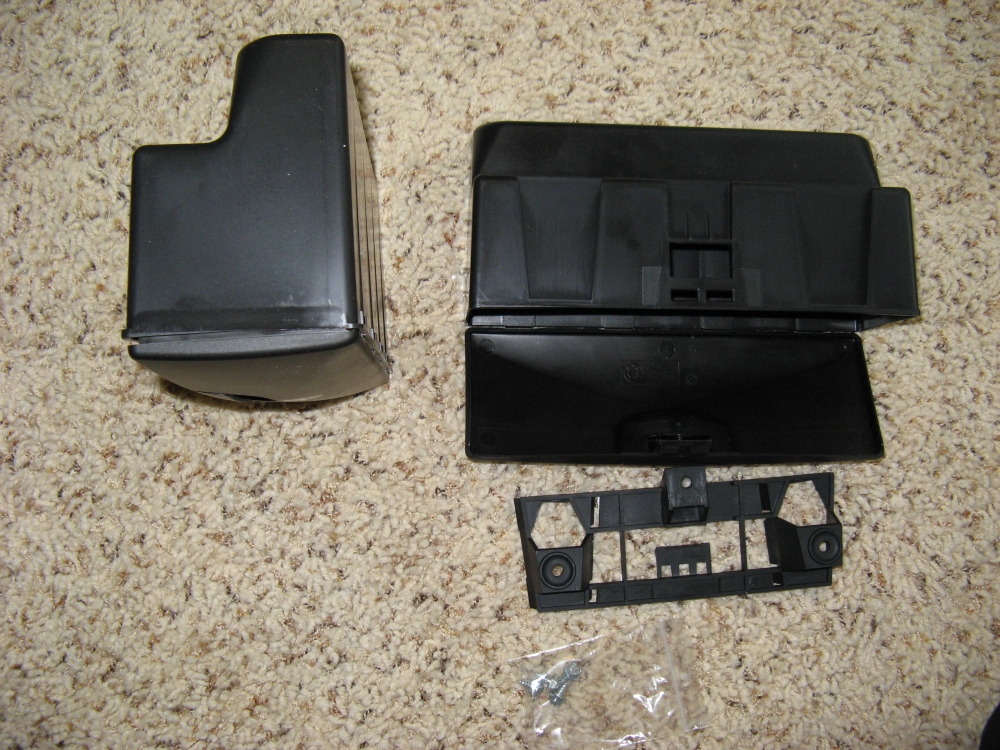
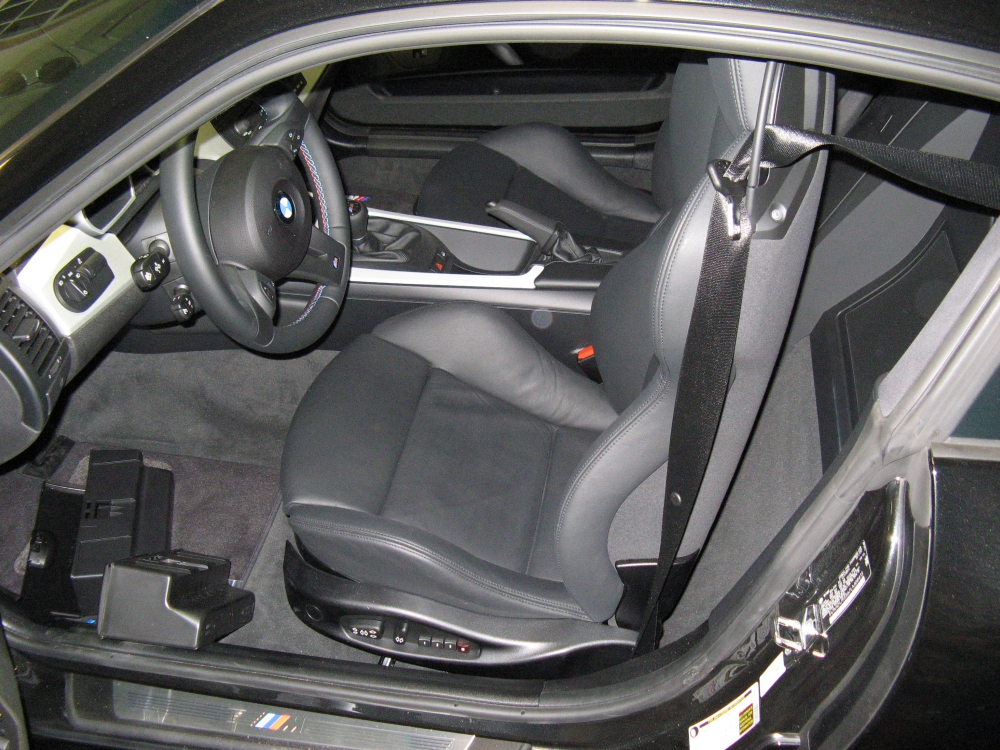
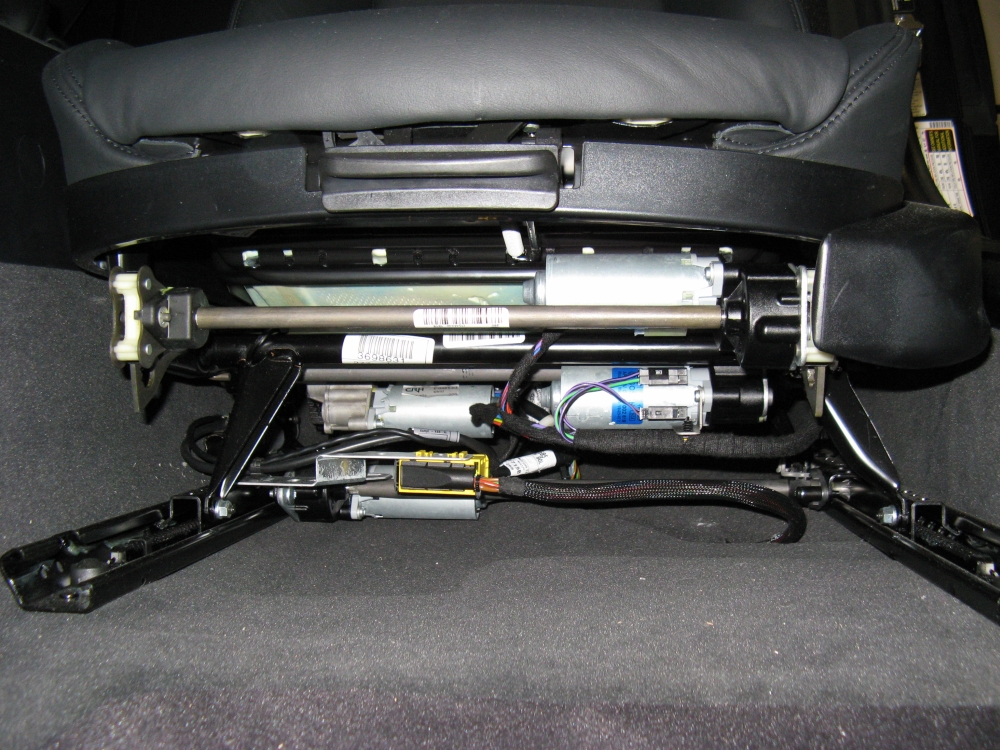
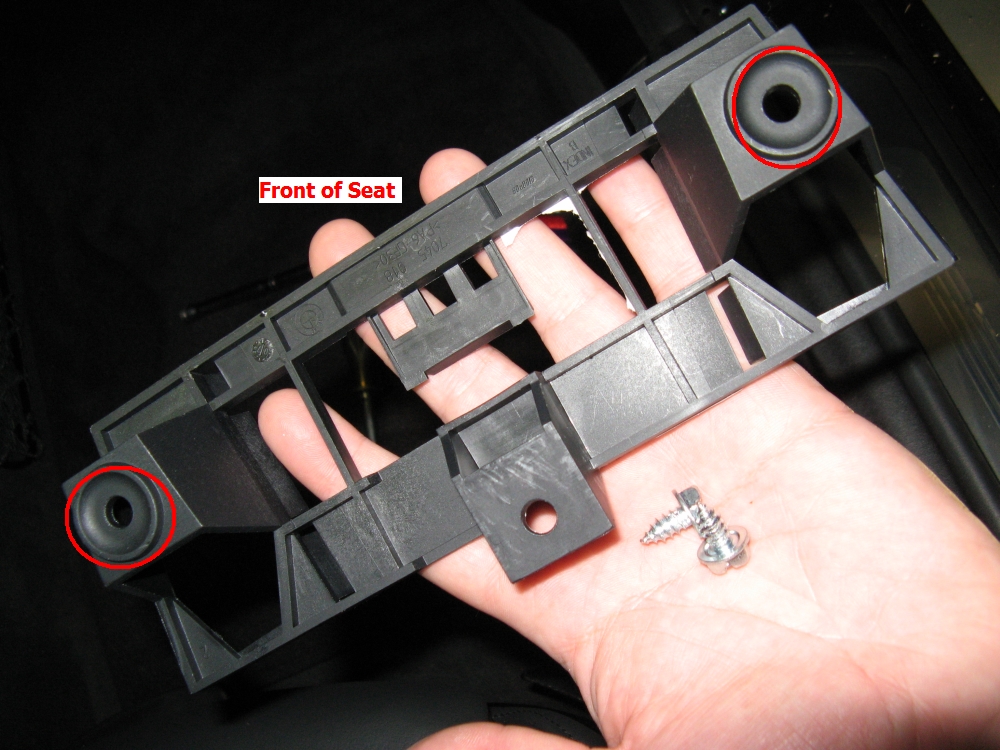
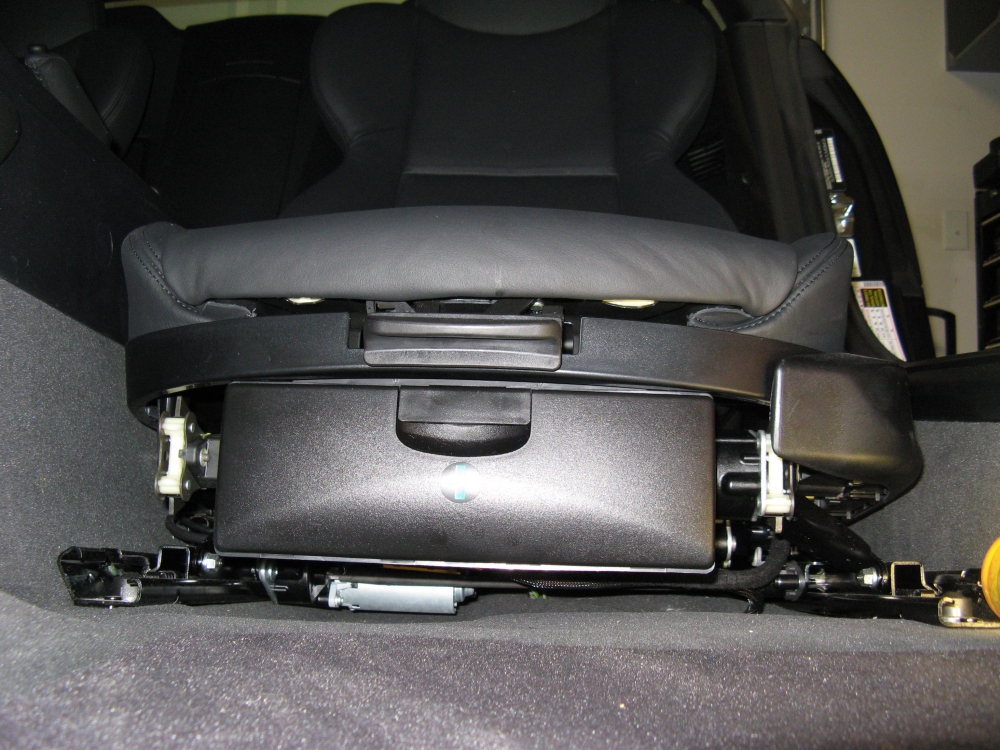
OE European first aid boxes sourced from Leather Z. The under-seat first aid boxes provide a little more discreet storage space. Using the supplied machine screws and a 10mm socket handle/wrench, the bracket is mounted to the seat using existing holes. Once mounted, the first aid box is installed by sliding it over the mount flanges. Installation instructions HERE:
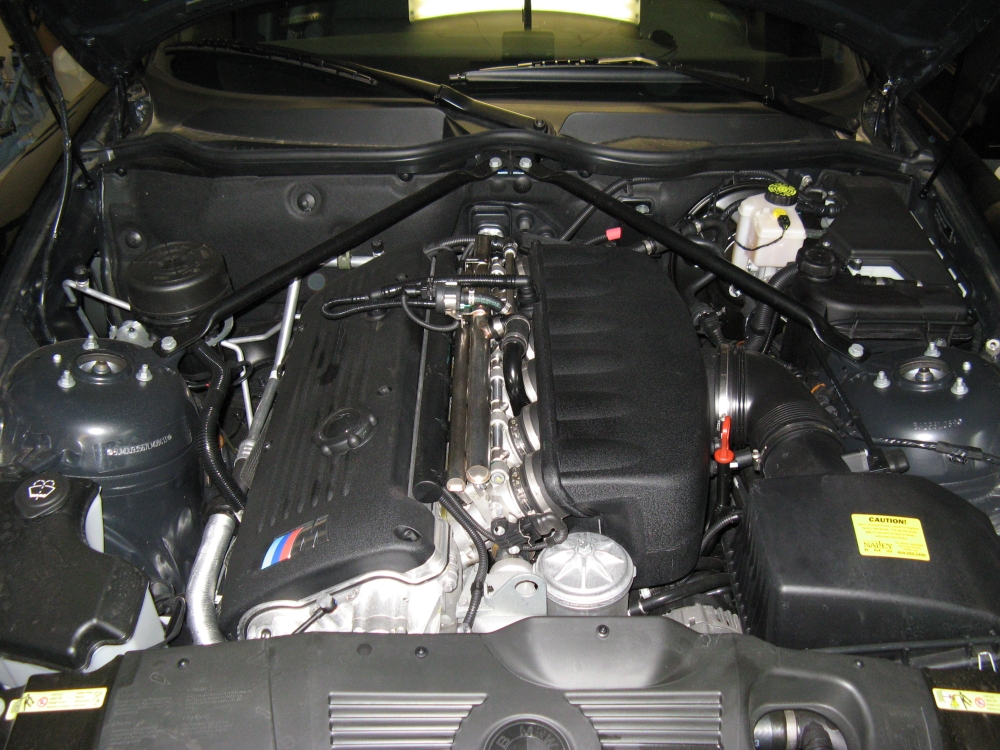
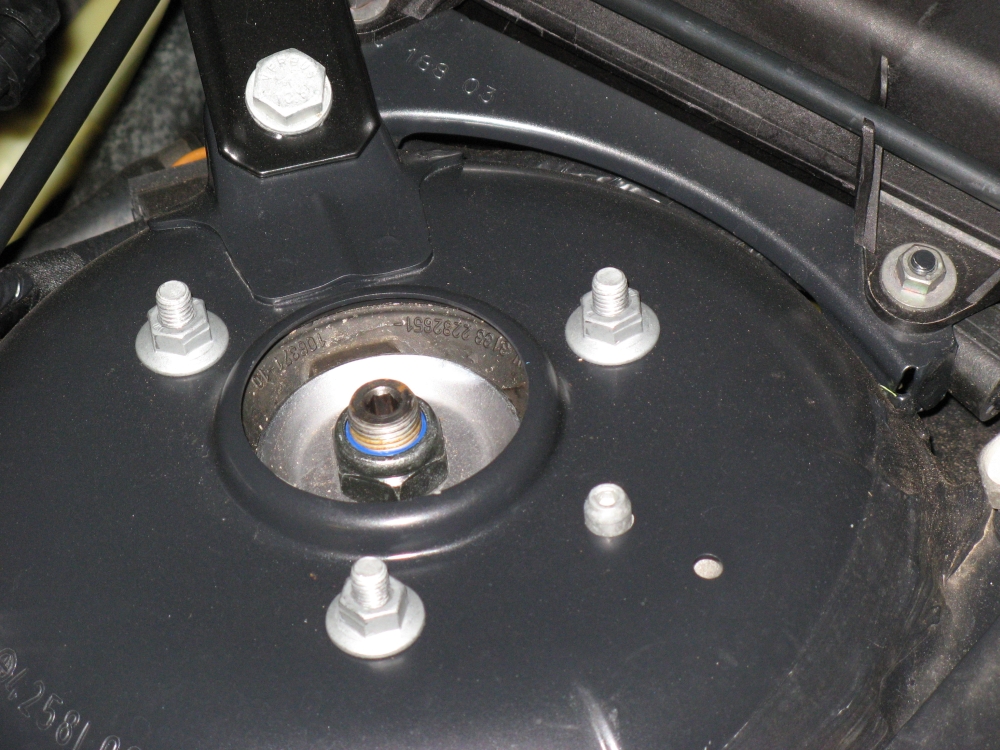
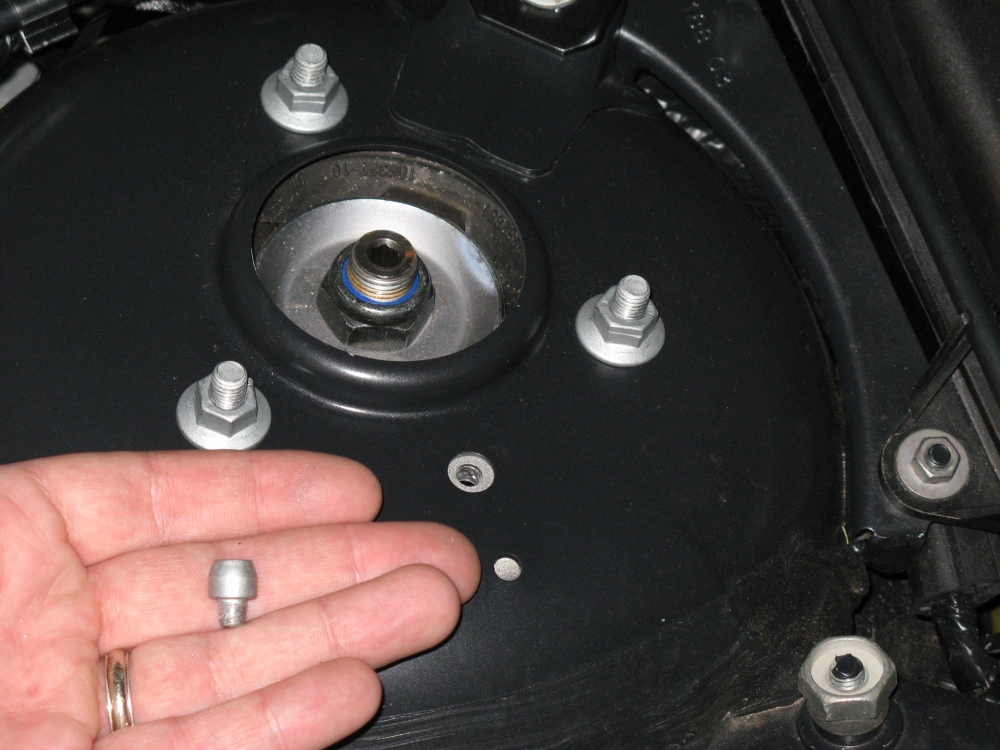
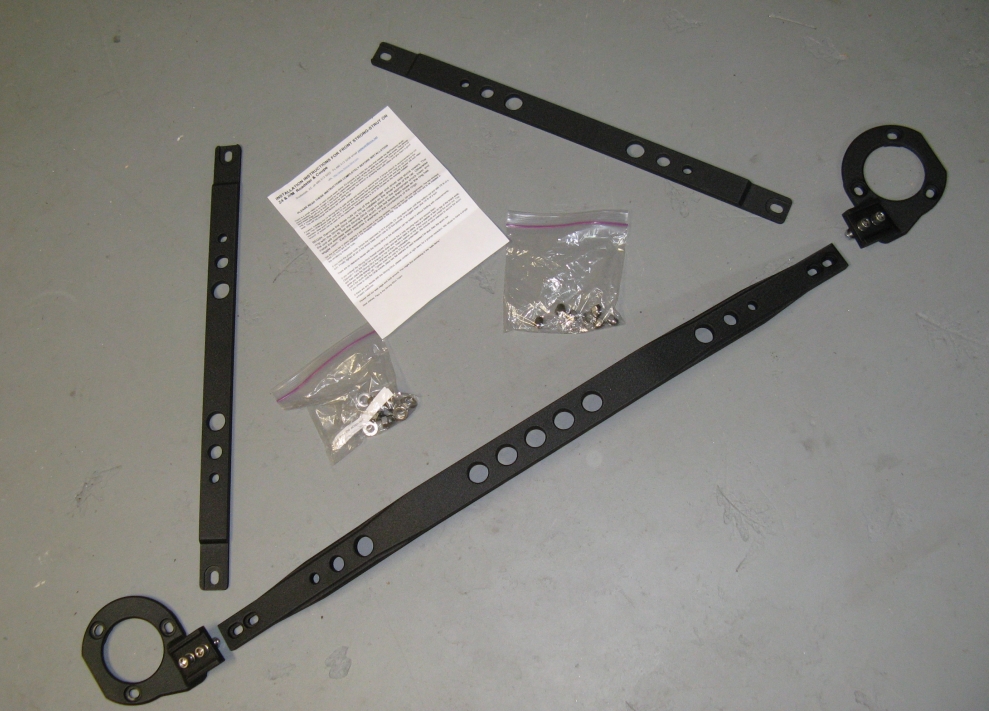
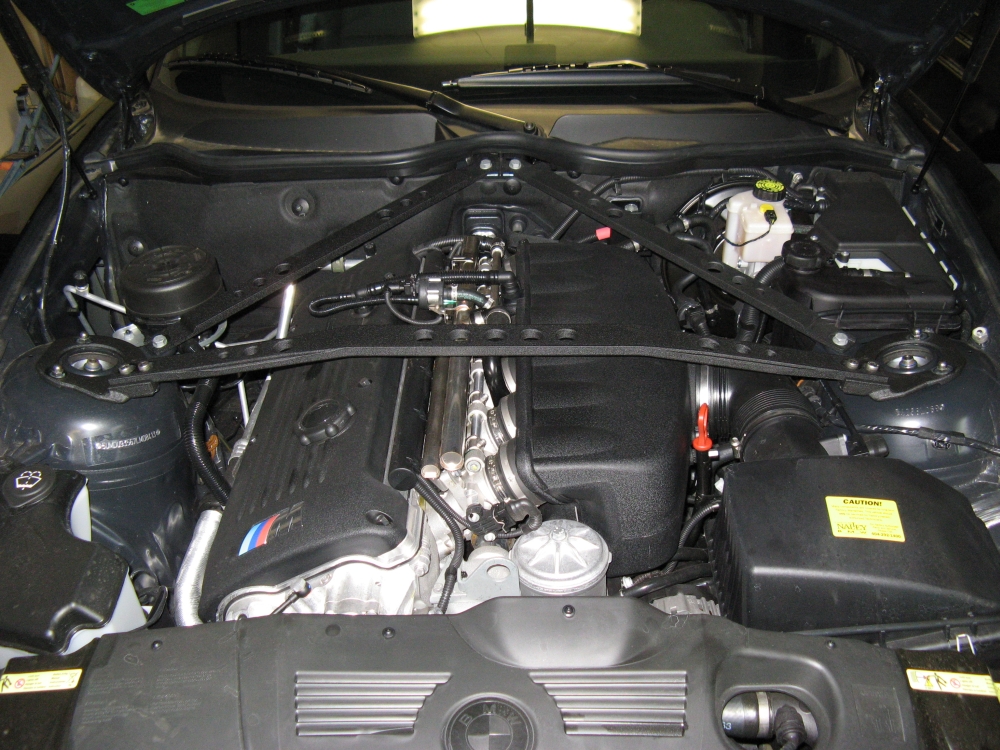
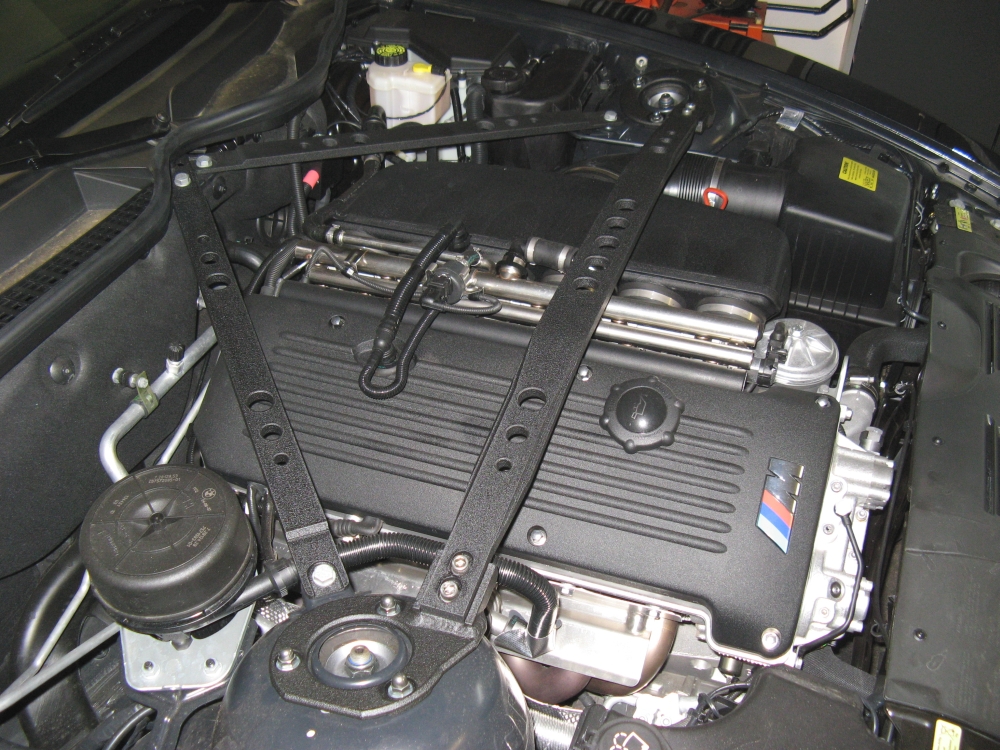
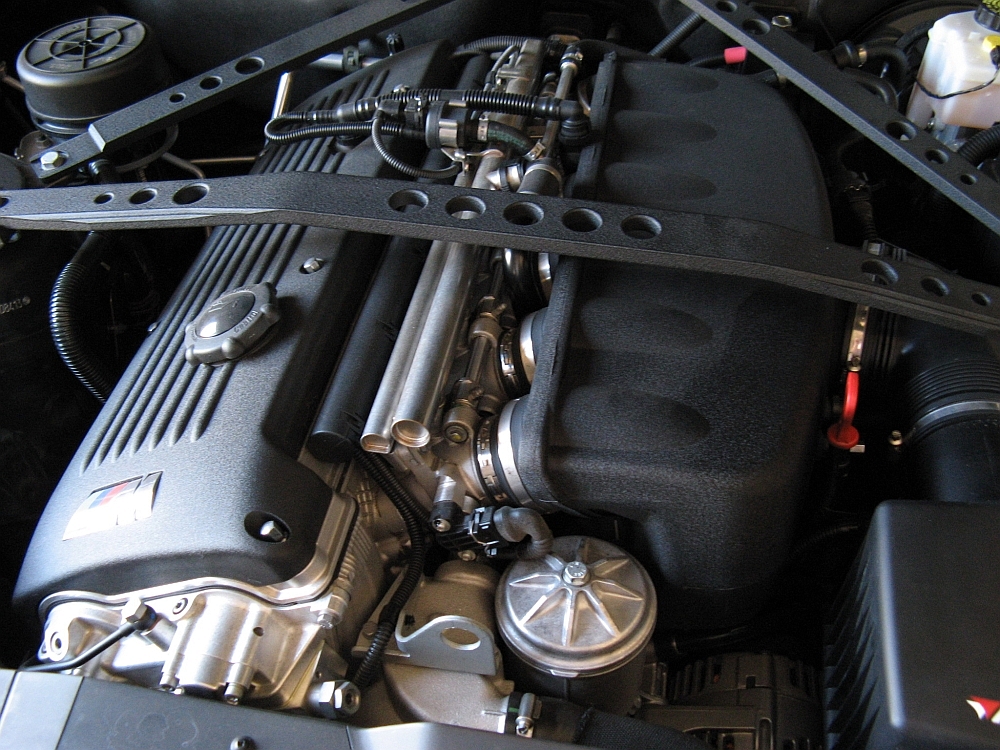
Strut and firewall braces from Strong Strut installed. There seem to be some variances between build dates but the supplied instructions worked for my car for the most part- the one key difference being the use of bolts to secure the OE firewall braces in place of the studs/nuts used earlier. I chose the powder coat wrinkle black finish to better match the OE finish under the hood. These braces are MUCH more solid than the OE braces. The first step was to remove the locating pin for the strut assembly using a 4mm hex wrench. Next all of the bolts and nuts were removed. Finally, the new brackets and braces were mounted and torqued to spec. They center brace does not look like it has a lot of room between it and the motor but it has plenty. Installation instructions HERE:
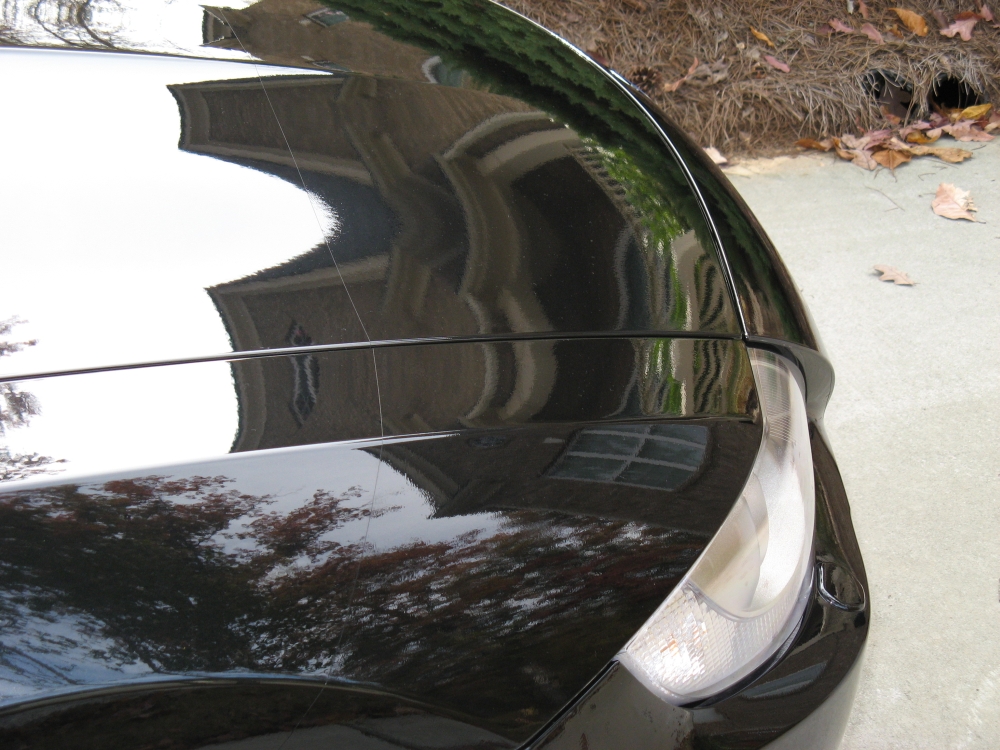
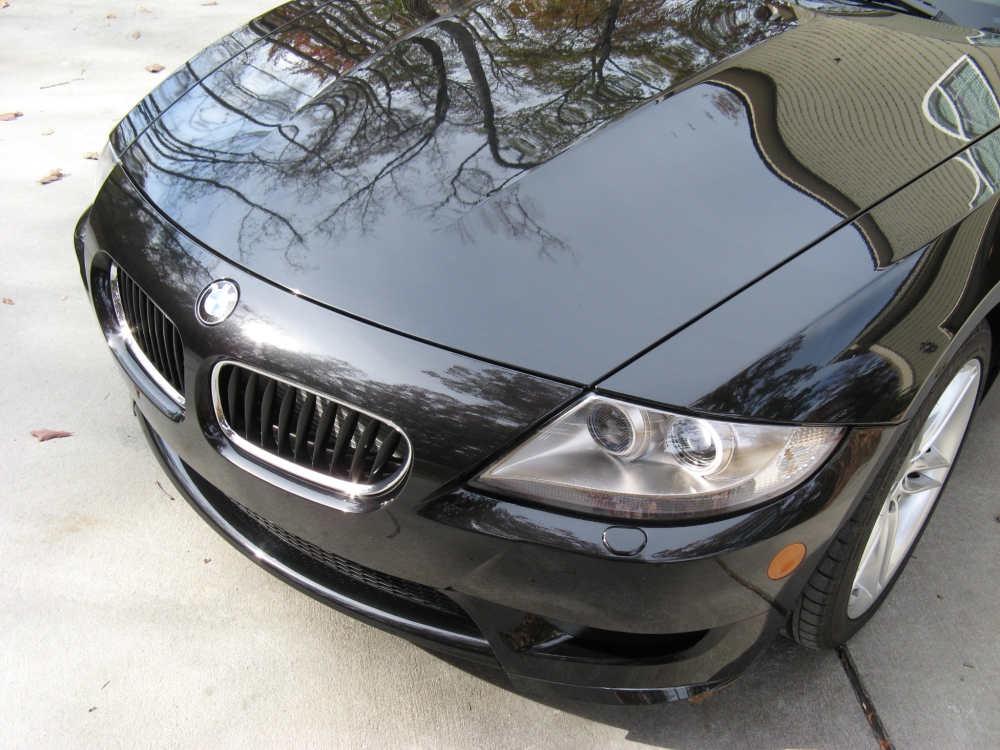
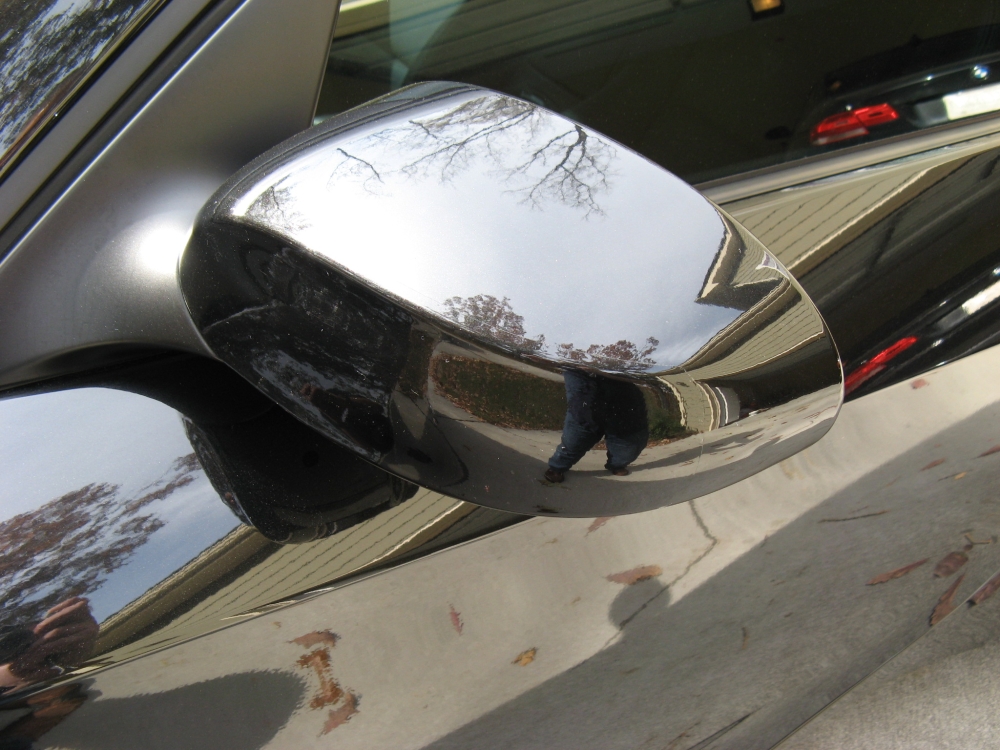
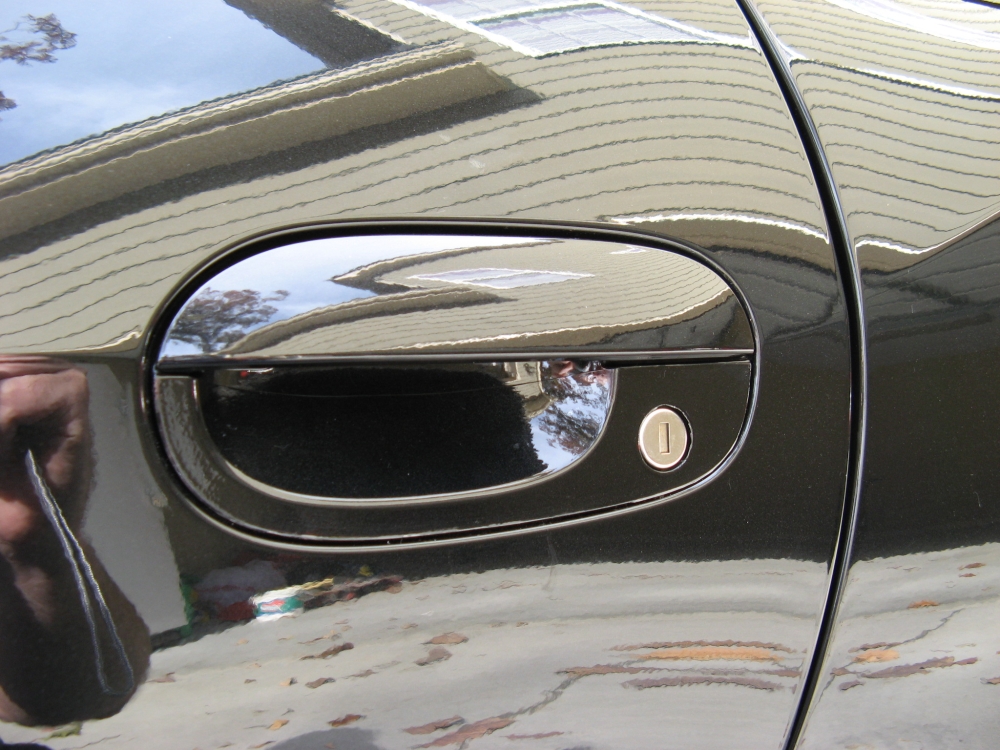
StoneX Clear Bra (3M) installed at United BMW in Duluth. The clear bra is warrantied for 5 years and covers the front bumper, front part of fenders, lower hood, mirrors, and lower door handle pieces. This was not a pre-cut kit but cut during installation to fit- completely transparent in most light from most angles:
Windows Tinted 35% by Mr. Tint (aka Barry Wood, H:(770)963-7924 C:(404)392-8007) :

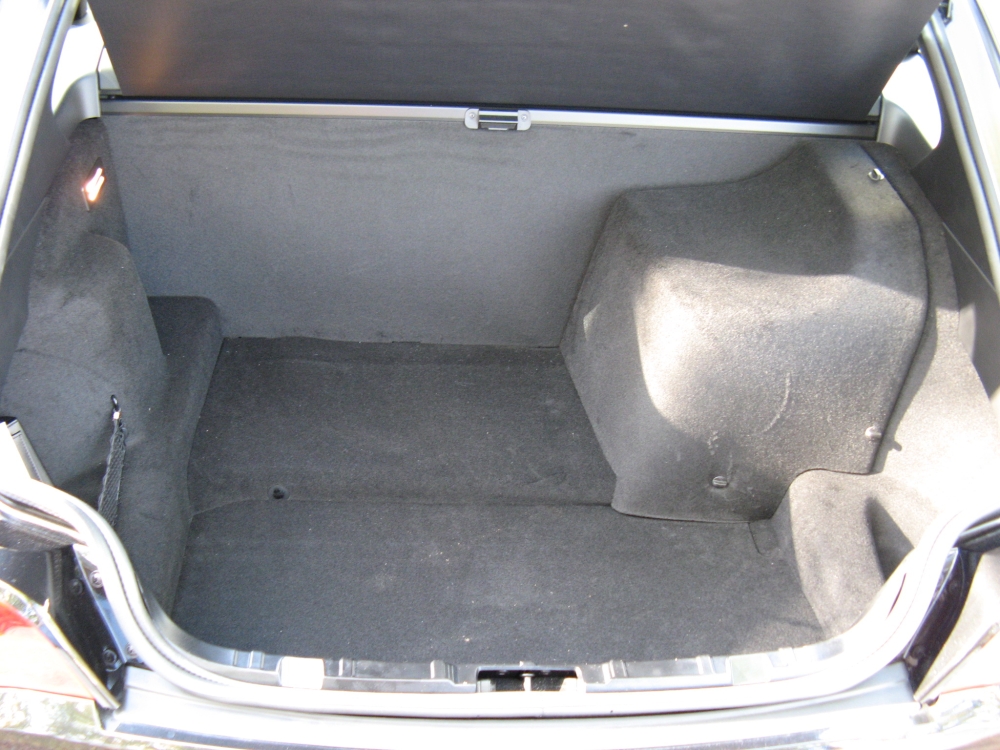
BMW ///M Carpeted Trunk Mat (P/N 82110417601) and BMW Trunk Liner (P/N 82110420508) purchased from Circle BMW. The carpeted trunk mat works for everyday use while the trunk liner is for carrying items that might leak or are otherwise unsuitable for direct placement on the carpet:
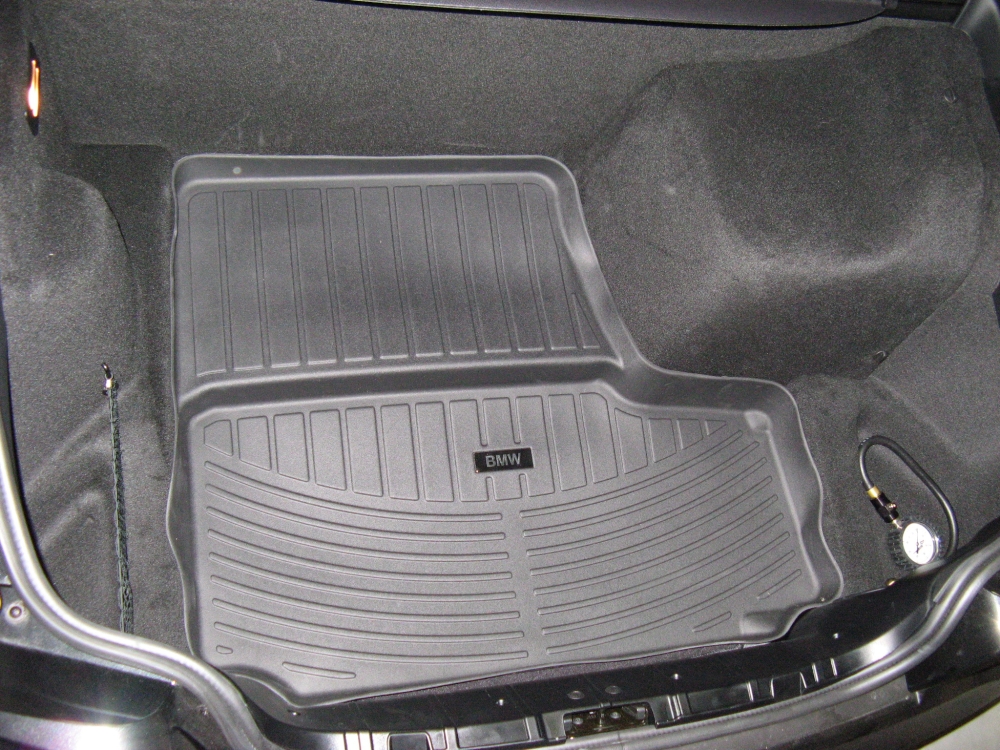
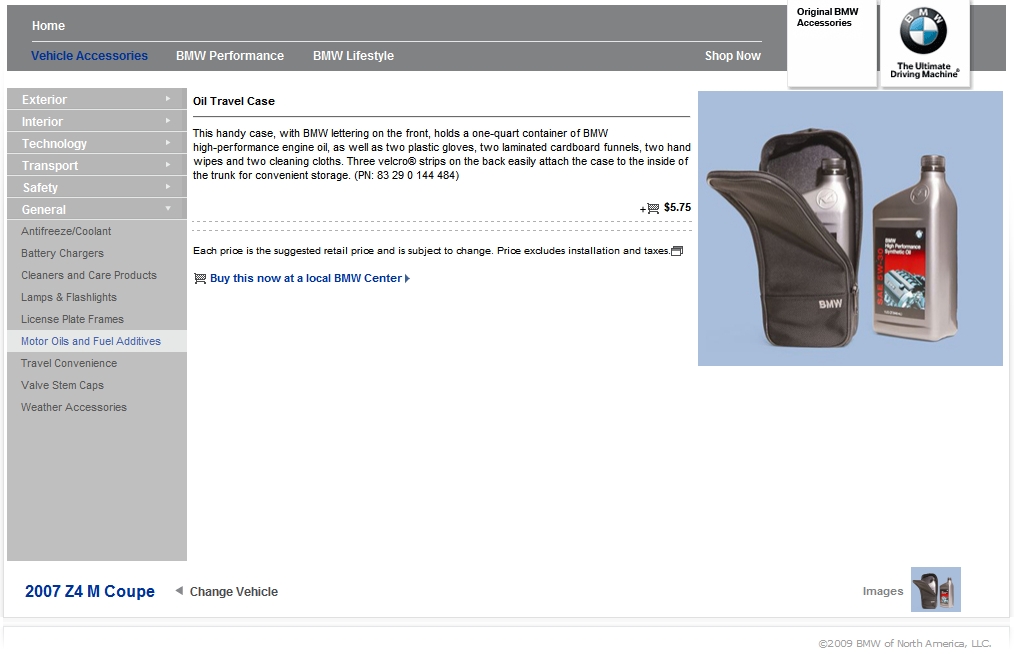
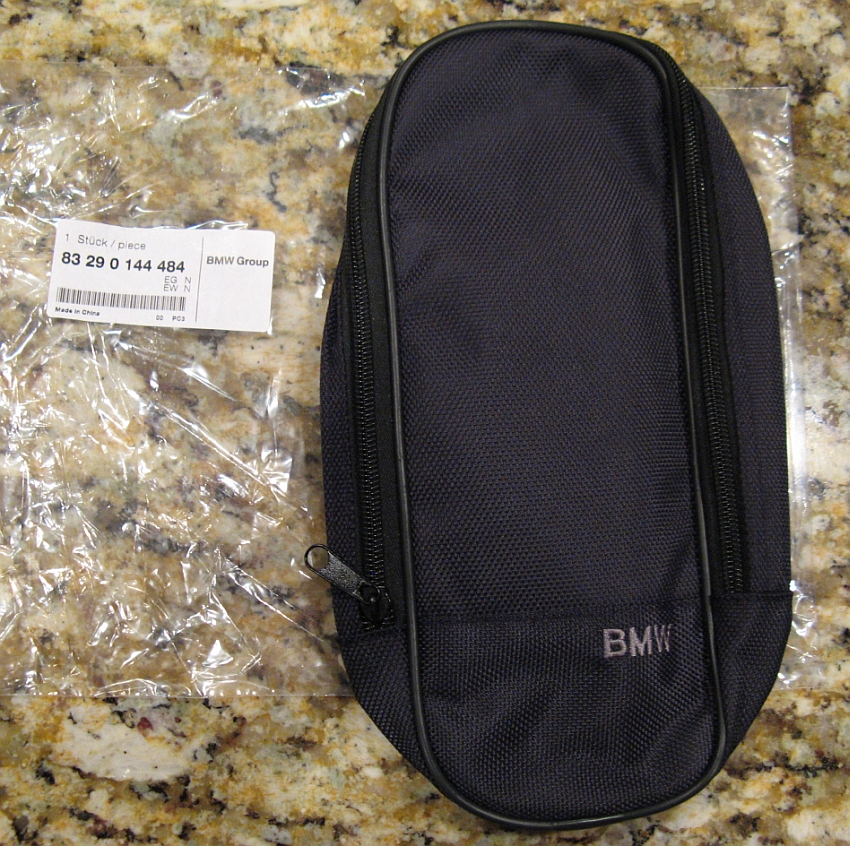
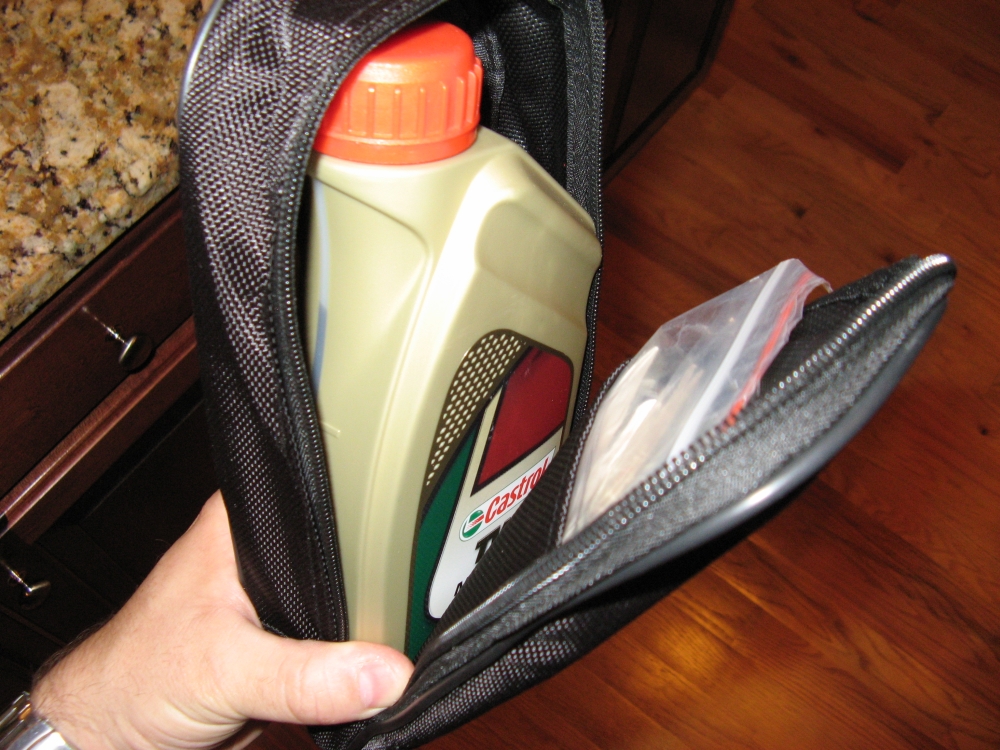
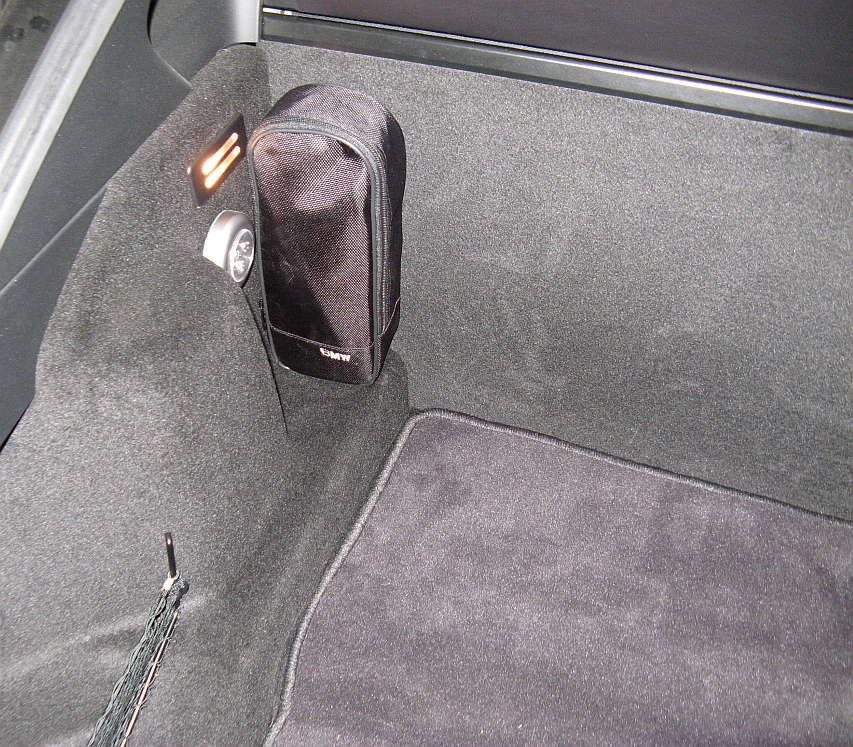
BMW Oil Travel Bag (P/N 83290144484) purchased to hold extra liter of oil in the trunk. The bag has Velcro on the back so that it can "stick" to the carpeted trunk surface anywhere you wish to place it- I found a place out of the way of cargo. Has room for one liter of oil and contains 2 each of: cardboard funnel, plastic gloves, hand wipes, and cleaning cloths.
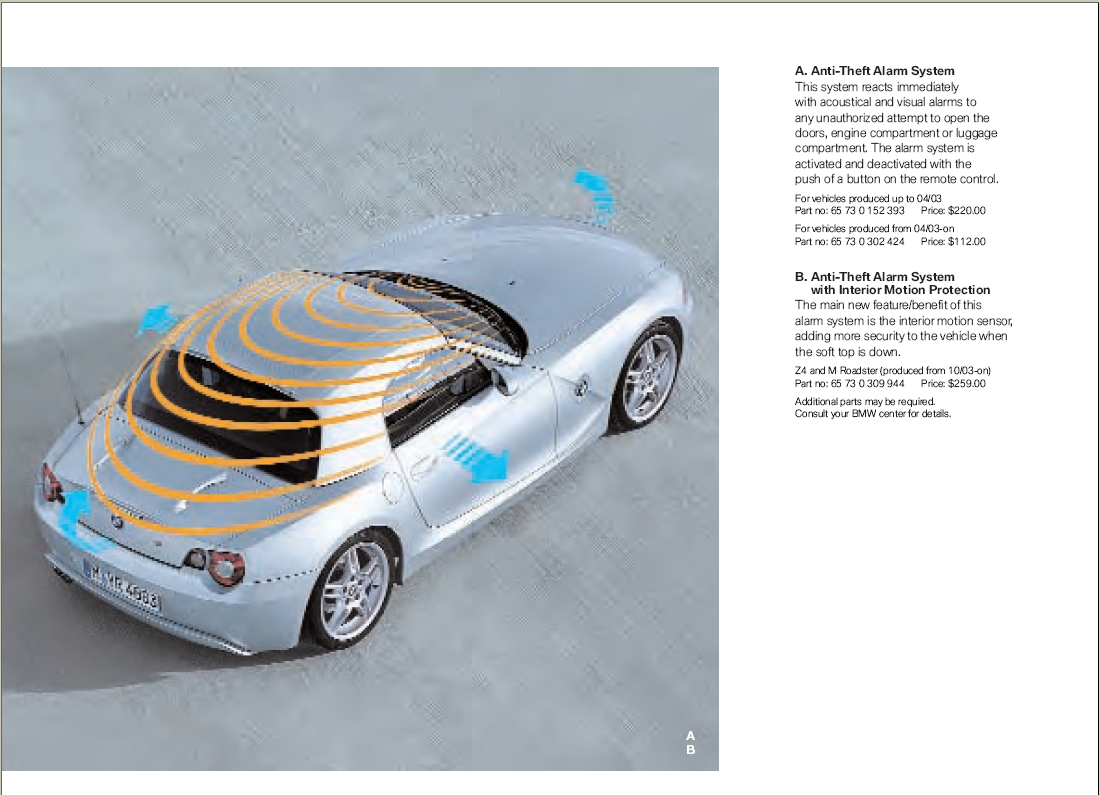
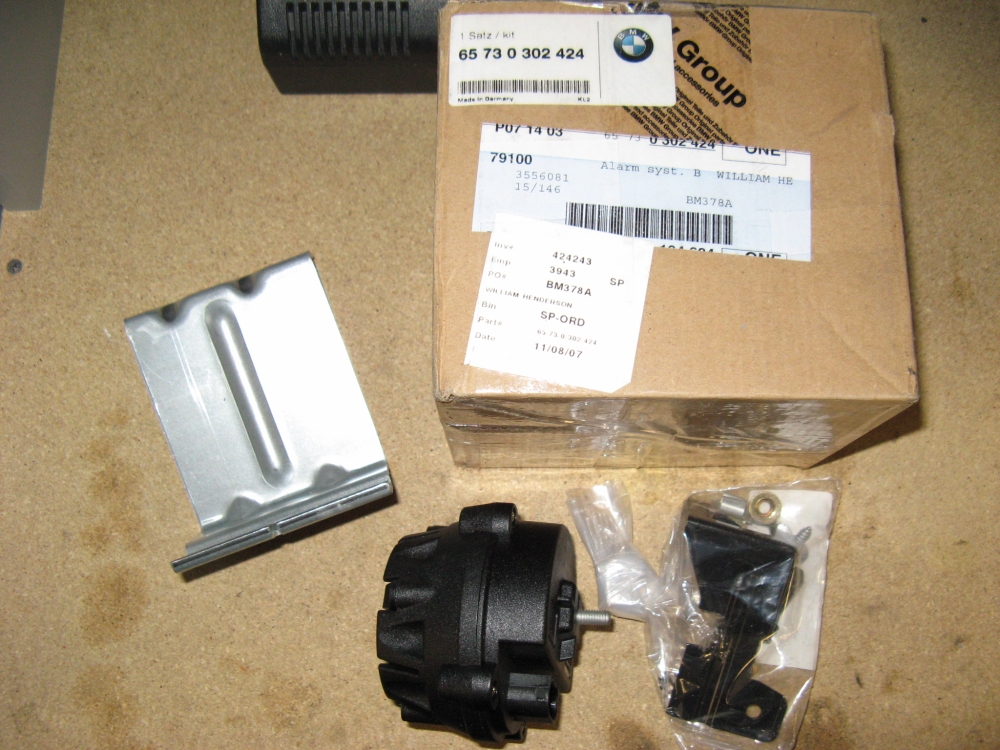
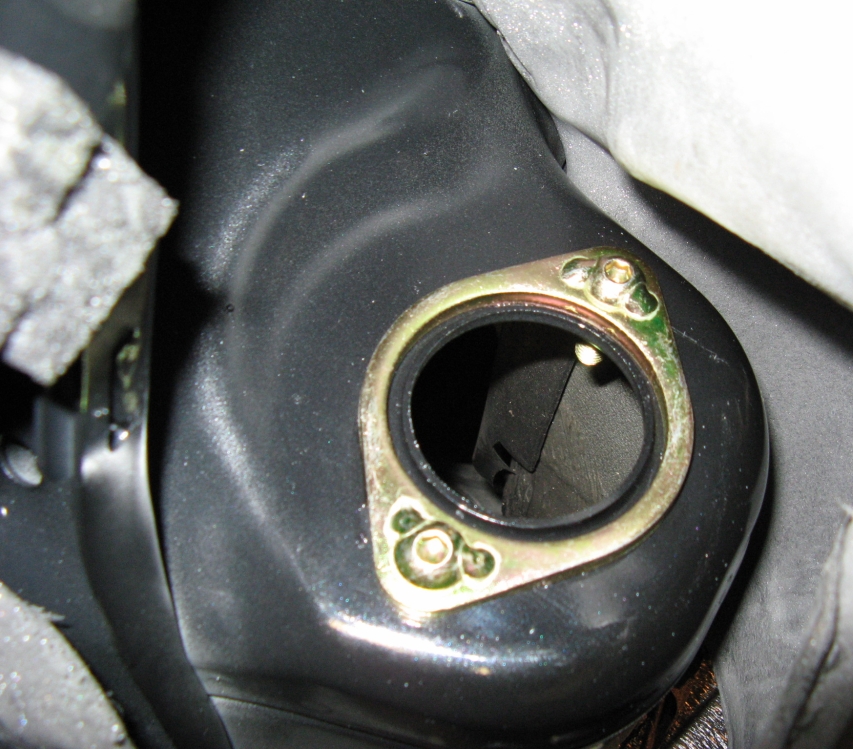
OE BMW M Coupe Alarm (P/N 65730302424) from Tischer BMW Parts installed.
These cars come pre-wired from the factory so installing the alarm is pretty much plug-and-play, the car comes activated for it as well. The kit consists of
the hood pin switch, alarm siren, and mounting hardware. I followed the BMW dealer installation instructions HERE (alarm schematic for reference
HERE).
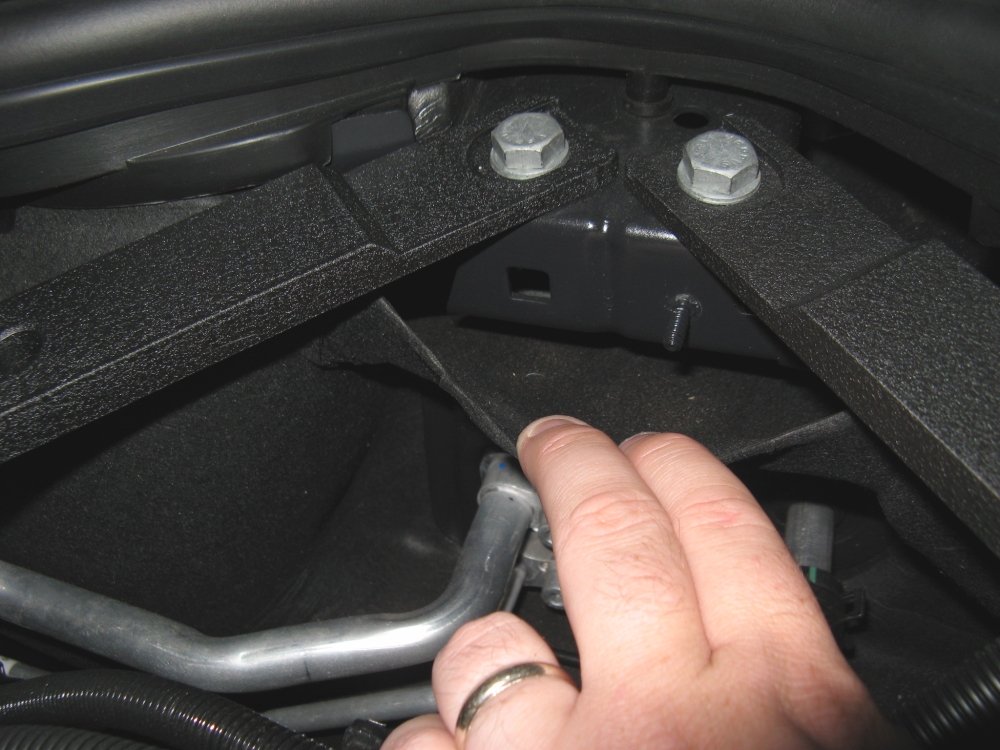
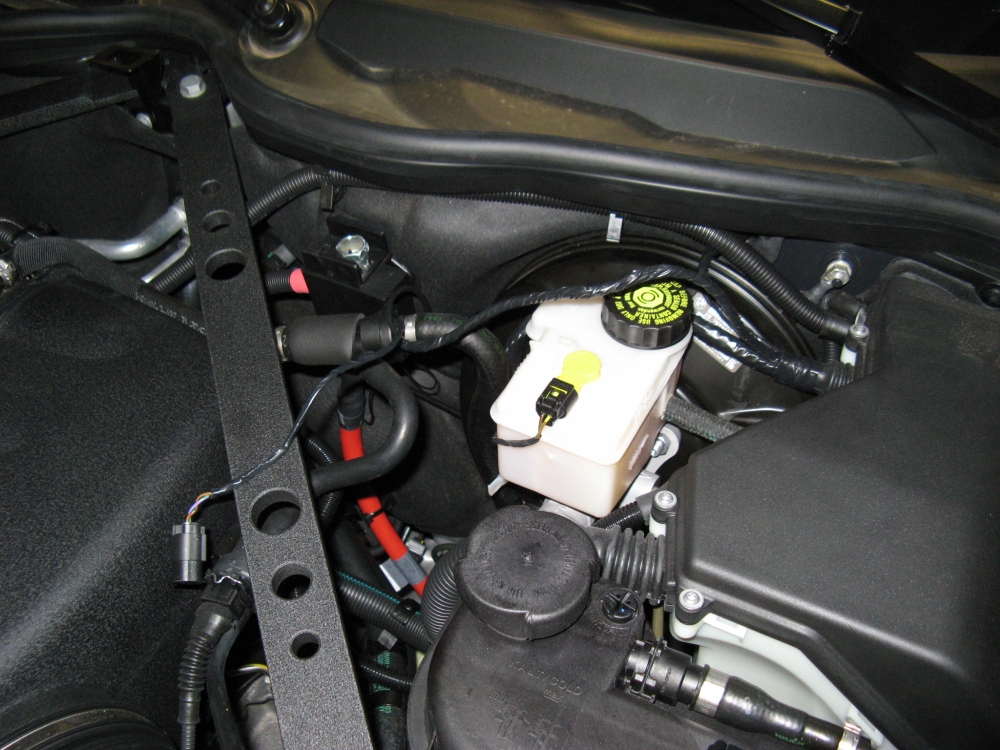
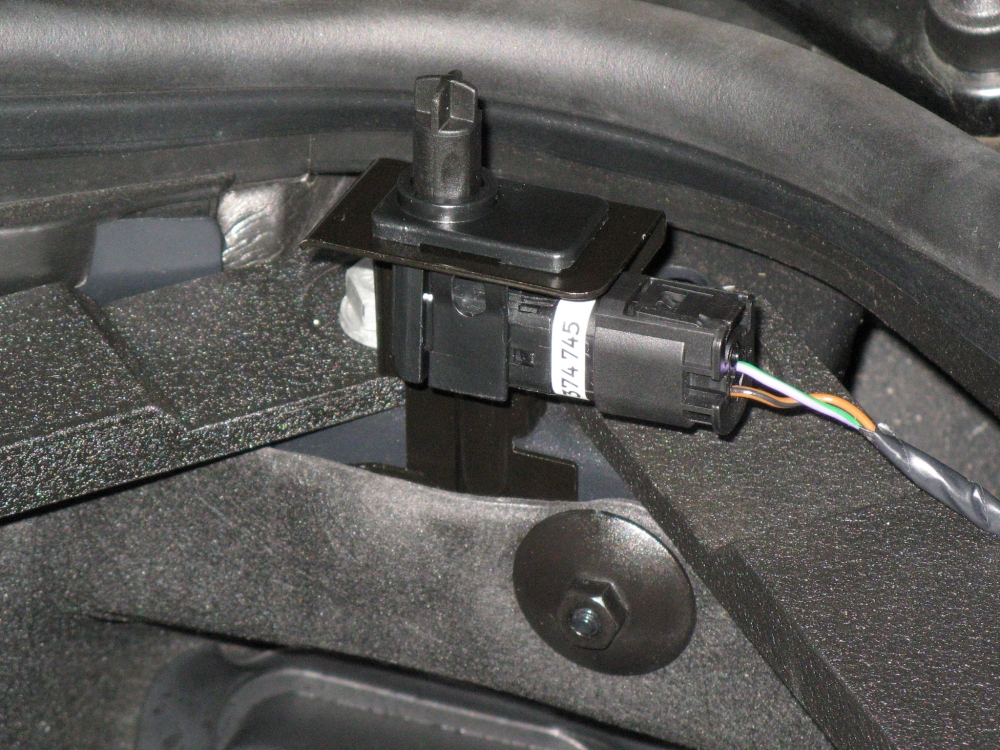
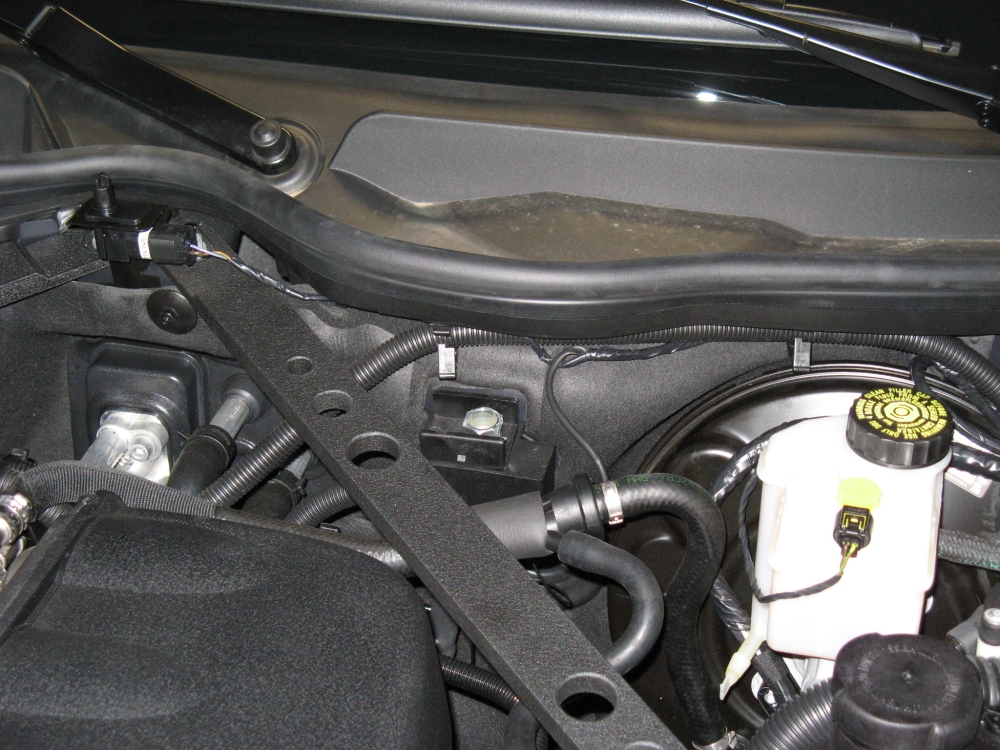
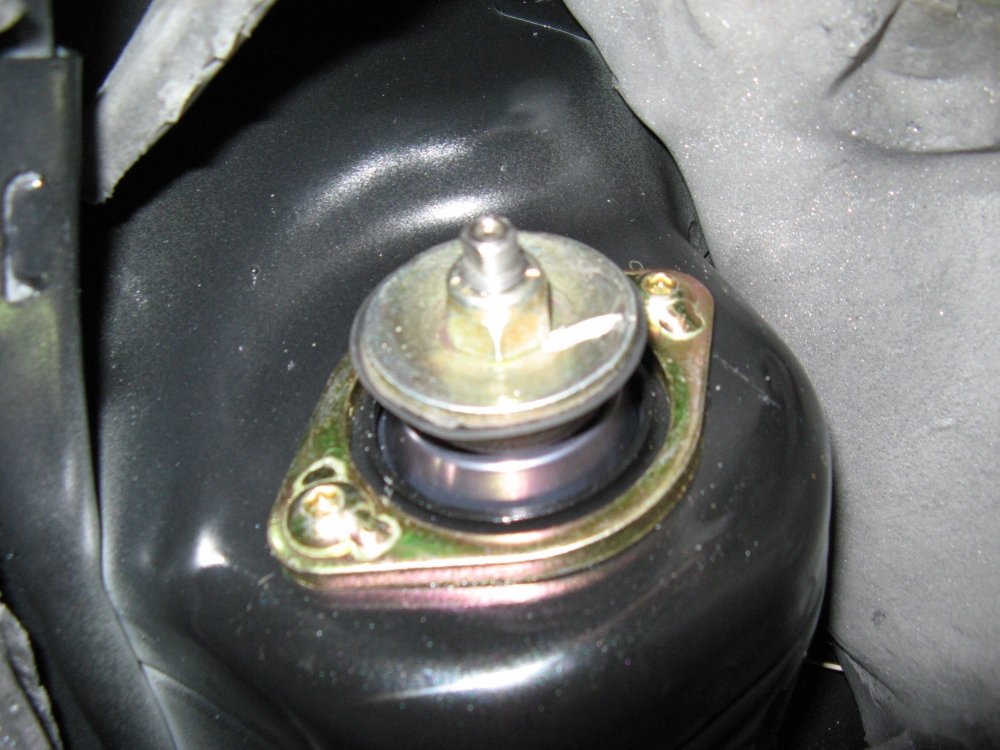
The plastic firewall blanket retainer was removed to reveal a square hole, the metal tab provided snaps into this hole and then the bracket is mounted. The hood pin
switch snaps into this bracket. The plastic retainer nut can then be reinstalled. The wiring for the hood pin switch is tucked behind the master cylinder, you may have to feel/look for it if it is not visible.
Once found, the tape securing it to the wiring harness and the plastic dummy plug is removed. This plug is then snapped into the hood switch connector
and the wire routed back with the conduit.
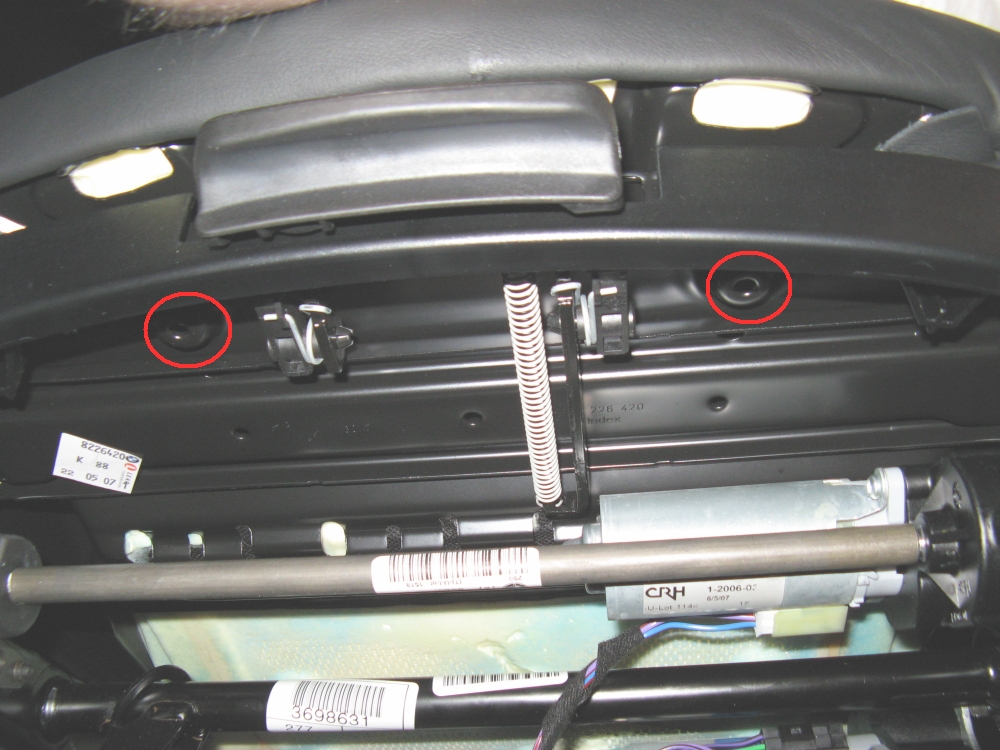
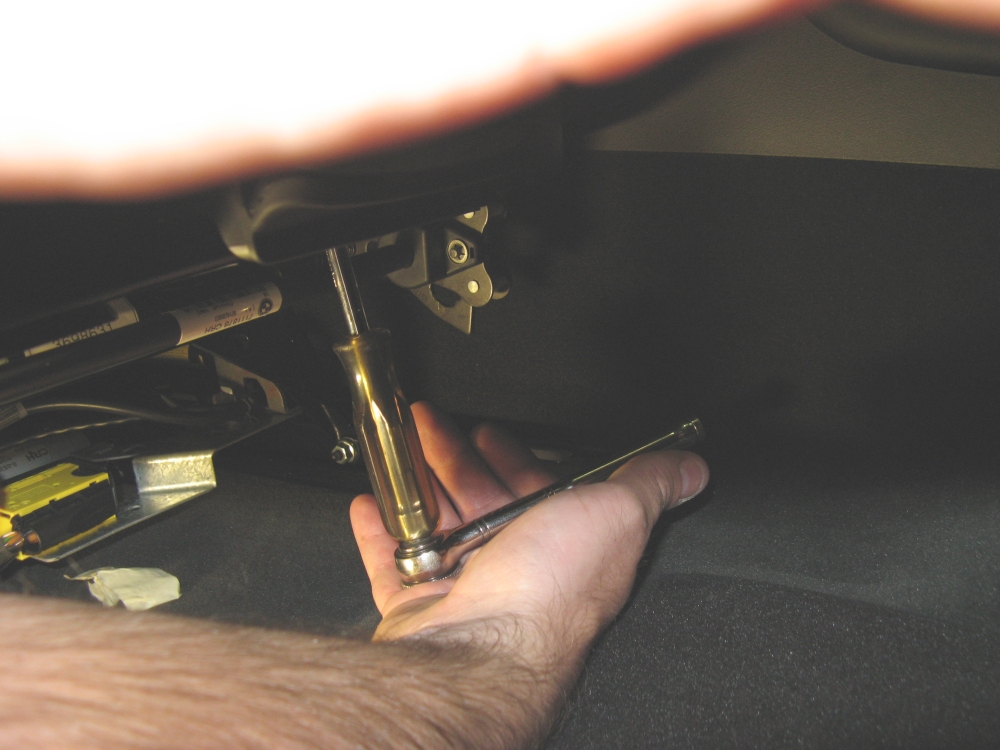
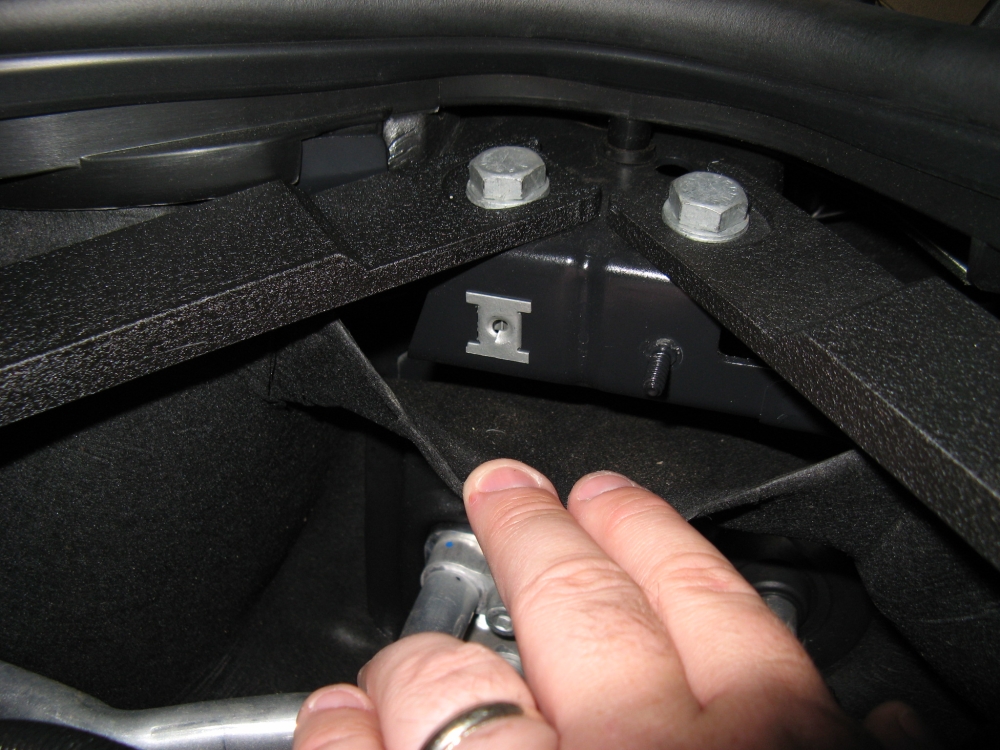
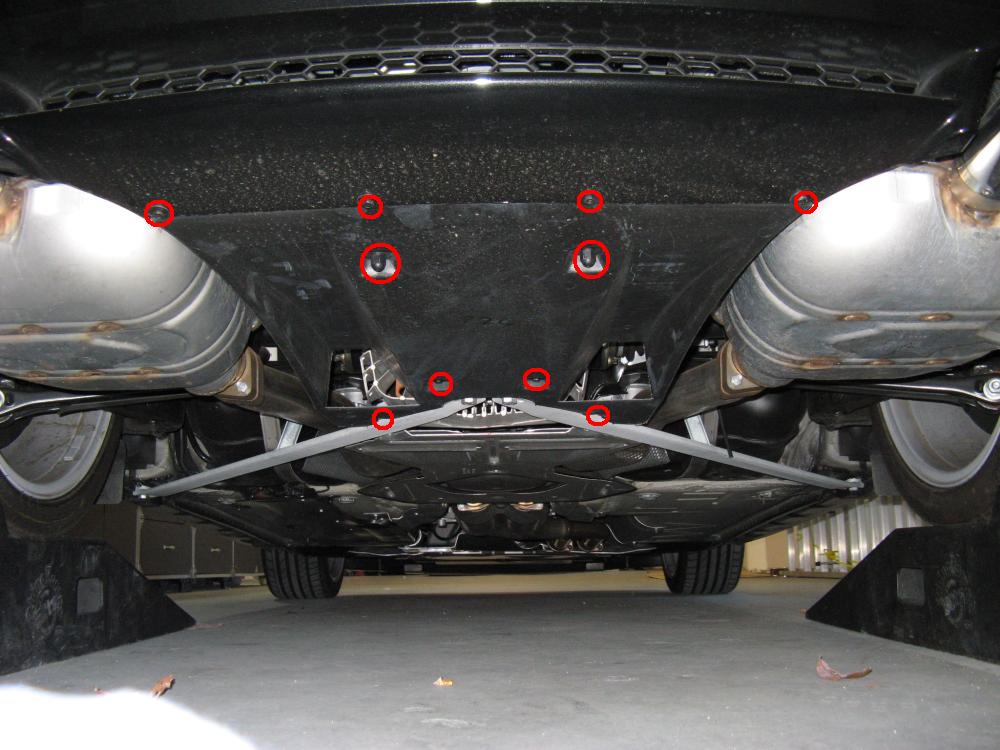
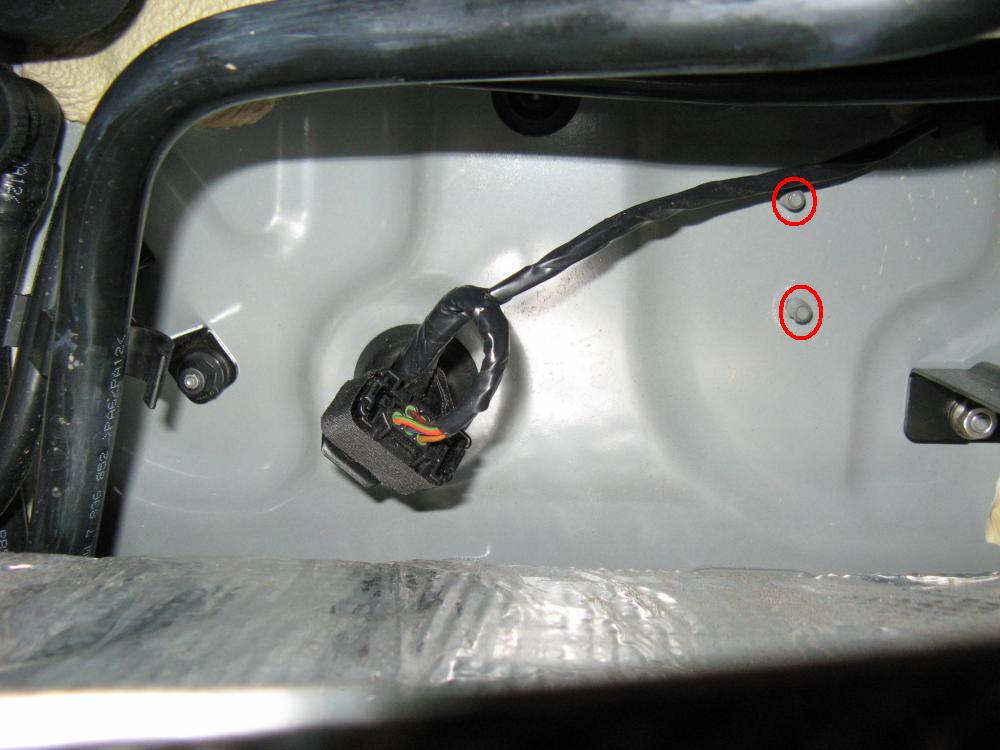
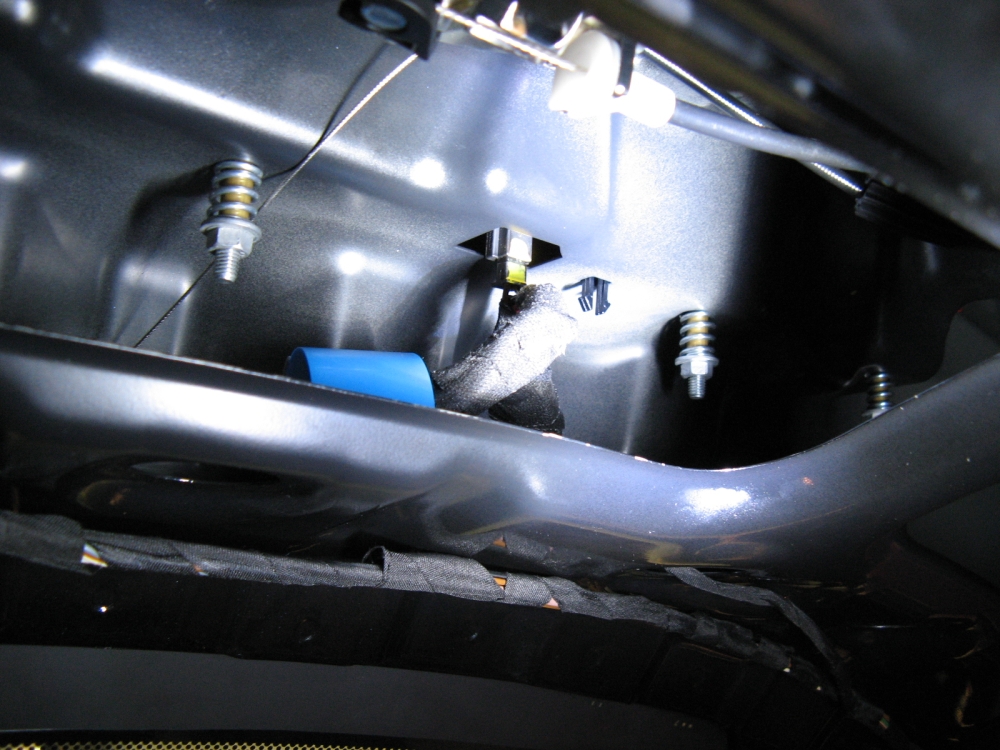
Moving to the rear of the car for the siren installation, the cover is dropped for access by removing 8-8mm bolts and 2-12mm acorn nuts. Once dropped the plug can be
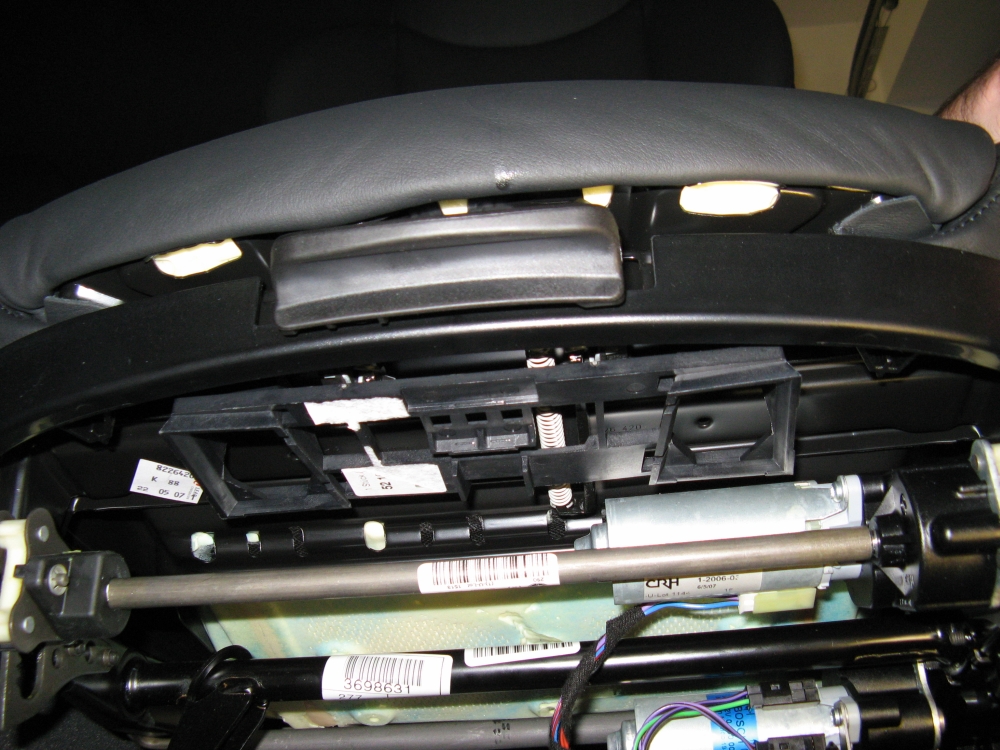
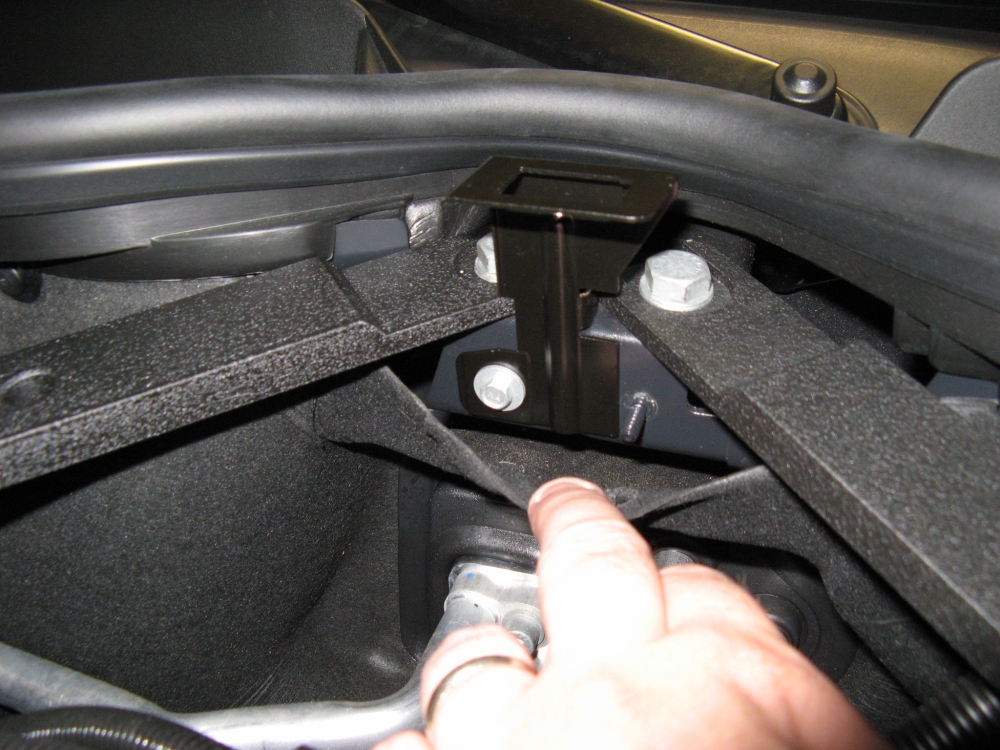
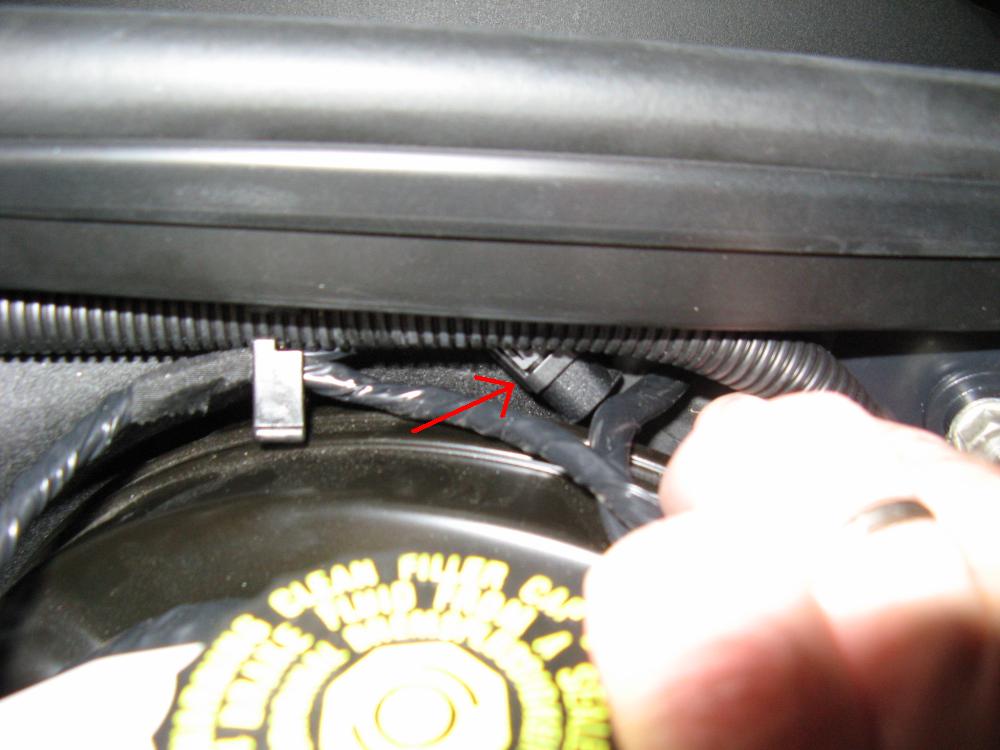
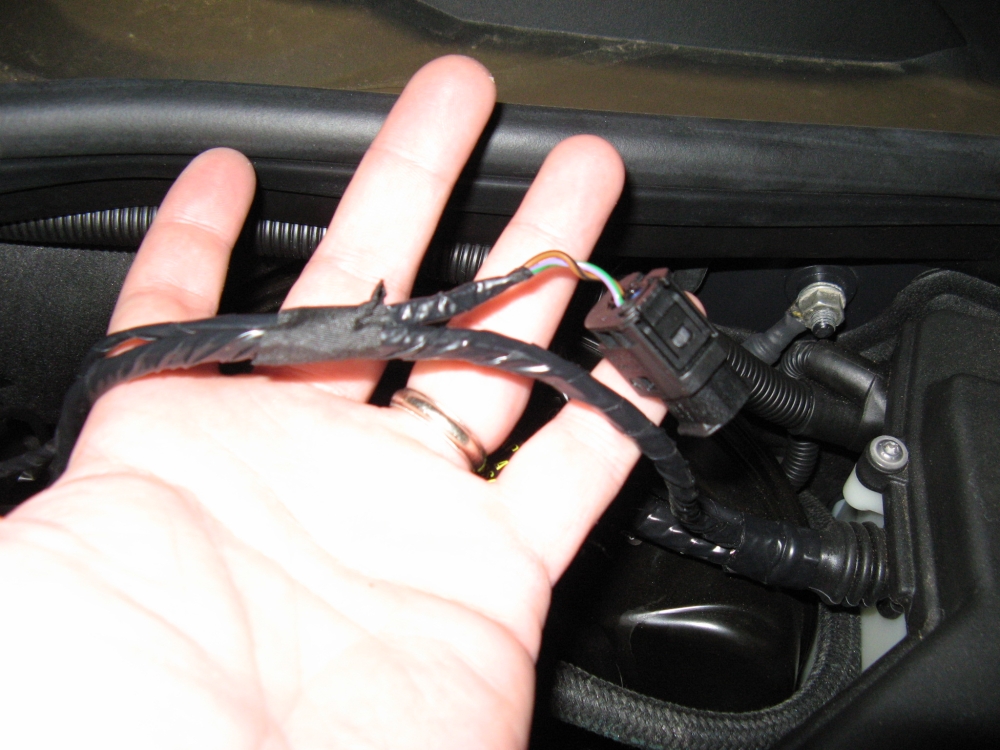
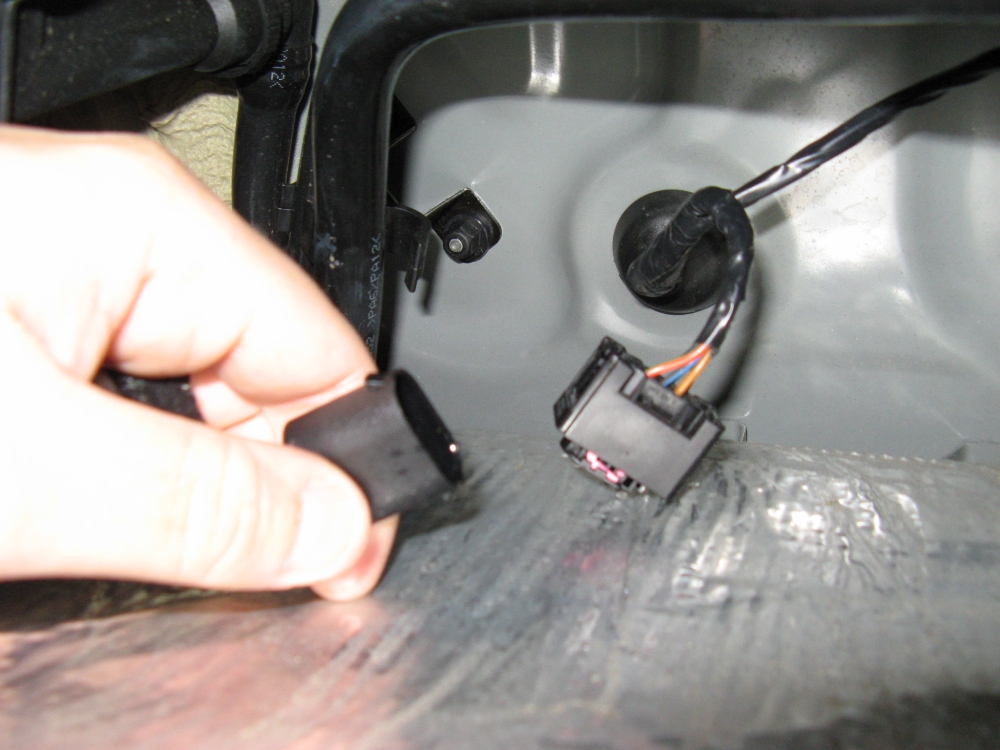
seen taped to the wiring harness. Assembling the siren and mounting bracket is next, it has an alignment tab and the plug connector should be visible when bolting together.
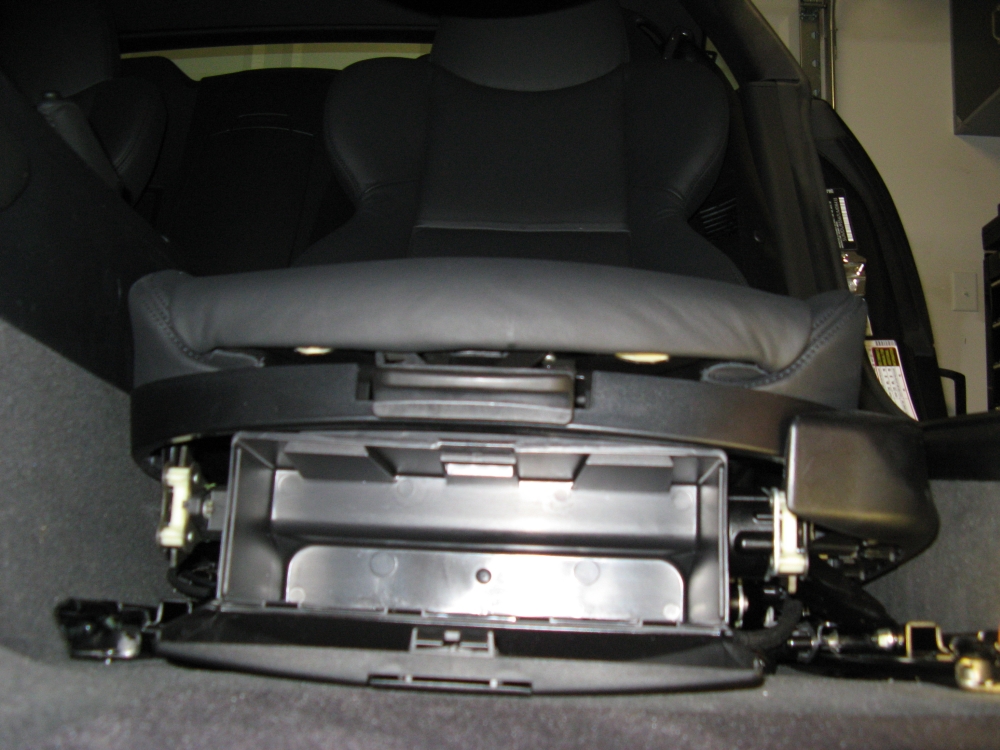
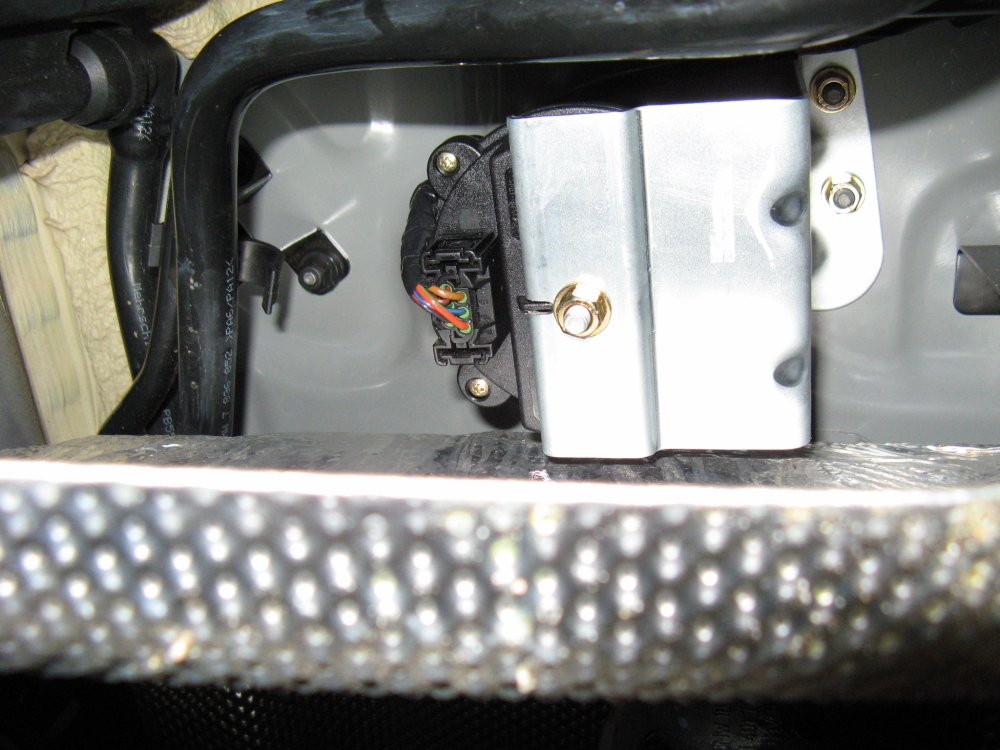
After the wiring harness tape and dummy plug are removed, the siren assembly can be plugged in and installed onto the two studs with the supplied nuts. The plastic cover is reinstalled
and you now have a functioning alarm once you have the dealer recode for it:


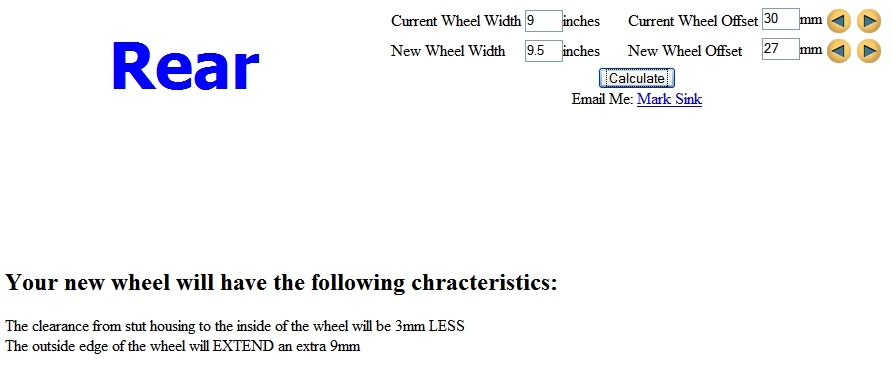
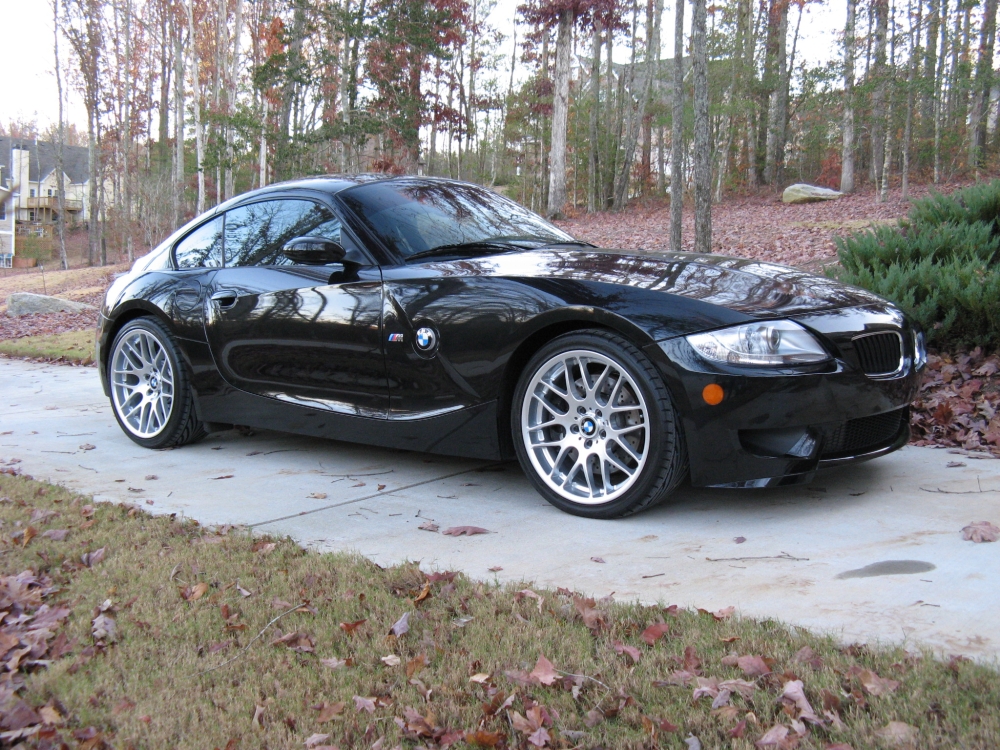
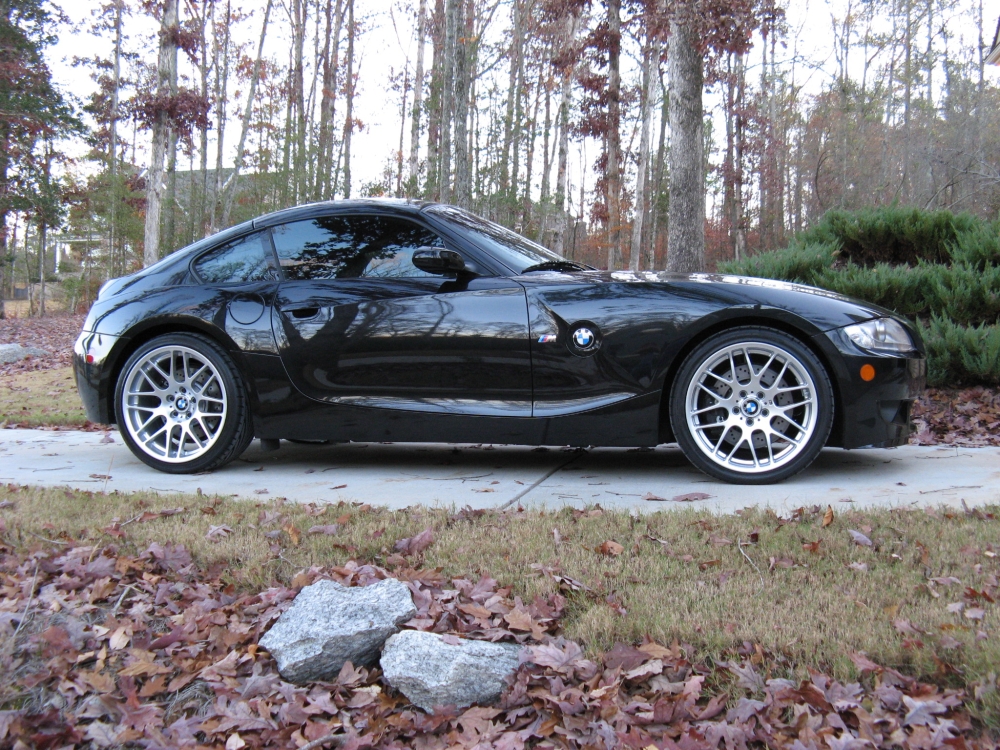
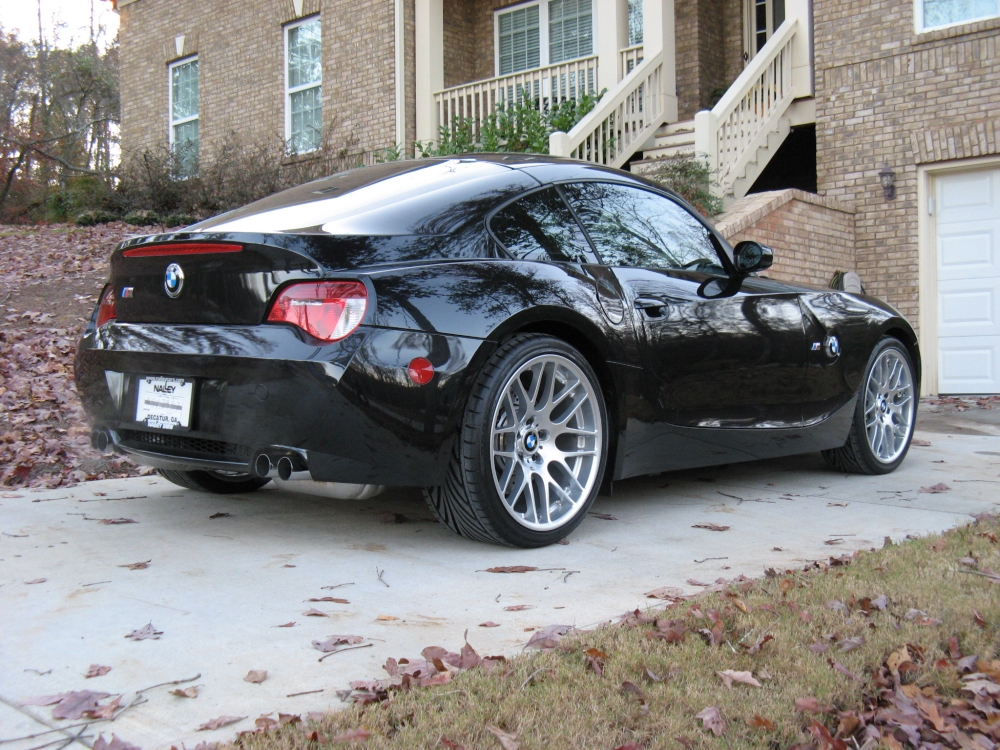
OE BMW E46 M3 Competition (ZCP) Wheels (19"x8" F, 19"x9.5" R- P/N 36112282895 for the front and 36112282999 for the rear) from Turner Motorsport
and Toyo T1R tires (245/35ZR19 F,275/30ZR19 R) from Kauffman Tire, big THANKS to Robby Hudson for getting me in/out the day before Thanksgiving. The only difference between the ZCP and CSL wheels are the front size: 8" vs 8.5"
wide with a different offset: ET47 vs ET44, the CSL front wheel is P/N 36112282650.
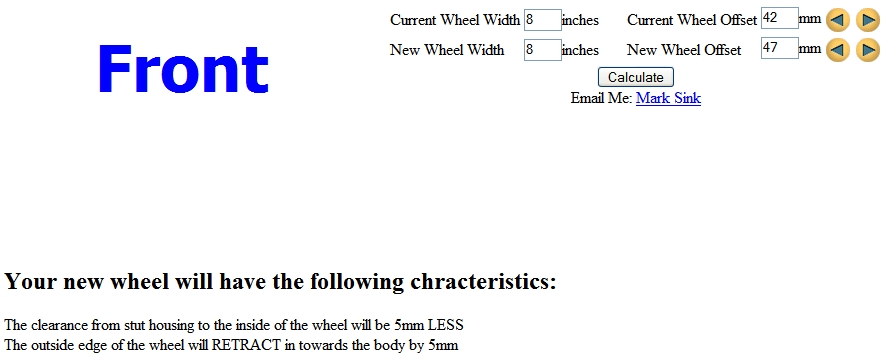
The offsets on these wheels are
different than OE, the pics below reflect the calculated difference between the OE 18"s and the new Competition 19"s from the Wheel Offset Calculator, wheel offsets obtained from the
BMW Wheel ID Catalog with specs (German):

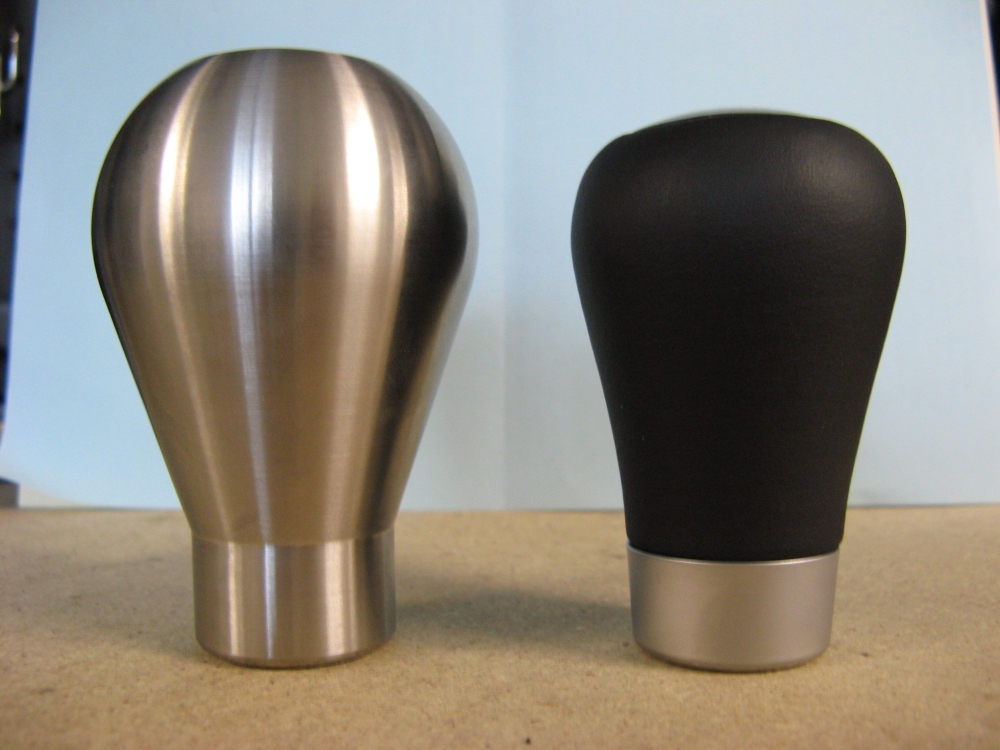
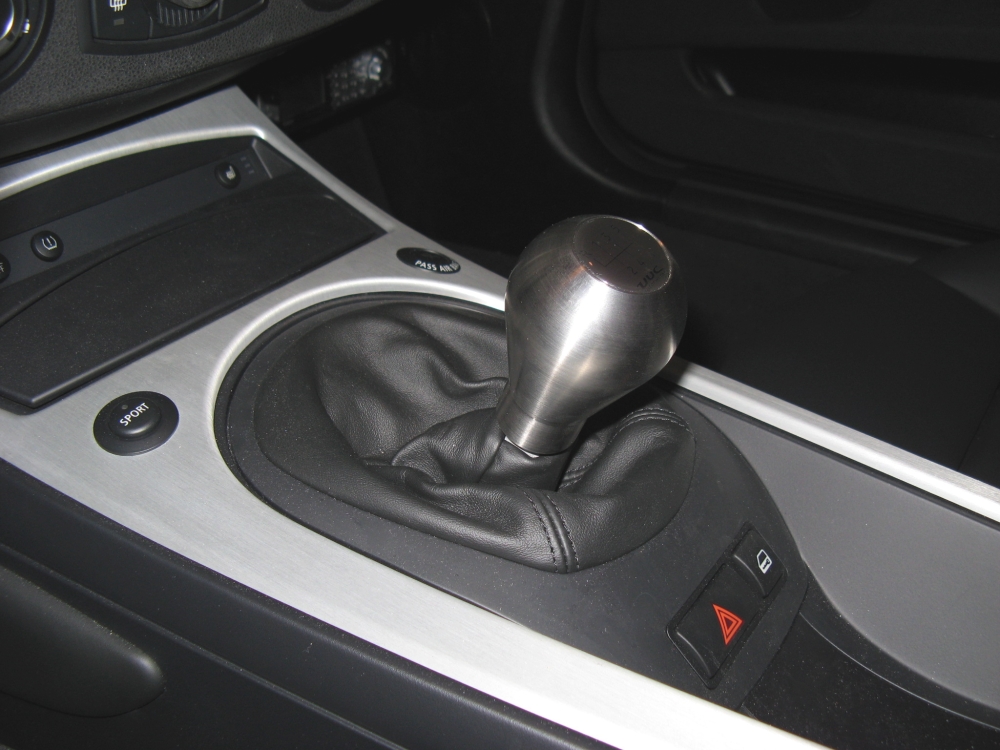
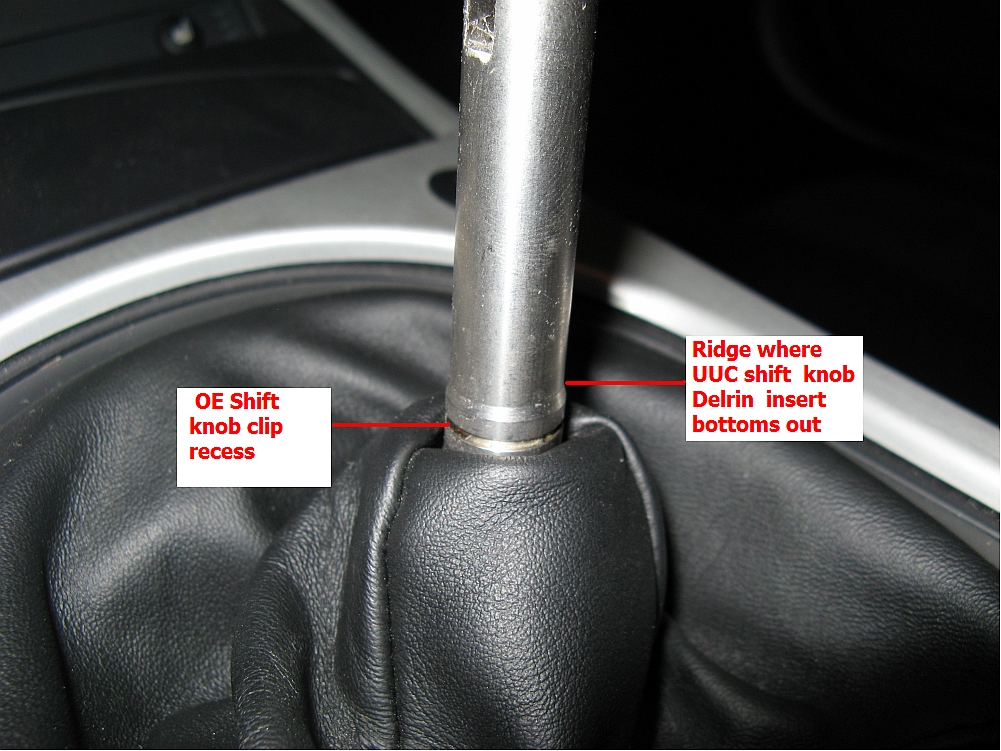
UUC Motorwerks RK MAGNUM (Stainless Steel) Shift Knob installed (P/N RKMAGSS-B5). I couldn't wait until the UUC Evo3 short shifter was installed so I went ahead and installed this shift knob on the factory shifter. WOW is all I can say, the heft of this shift knob (27.6 oz vs 5.5 oz ZHP/3 oz OE) makes the OE shifter smooth as butter but does highlight the flimsy nature of the plastic used in the OE shifter construction. UUC installation instructions HERE. Following are some comparison pics of the UUC vs the BMW ZHP shift knob I installed a few weeks ago. I also decided to modify the Delrin insert to allow the shift knob to sit flush with the boot after I installed the UUC EVO3 SSK, pics in my SSK write-up a little farther down:
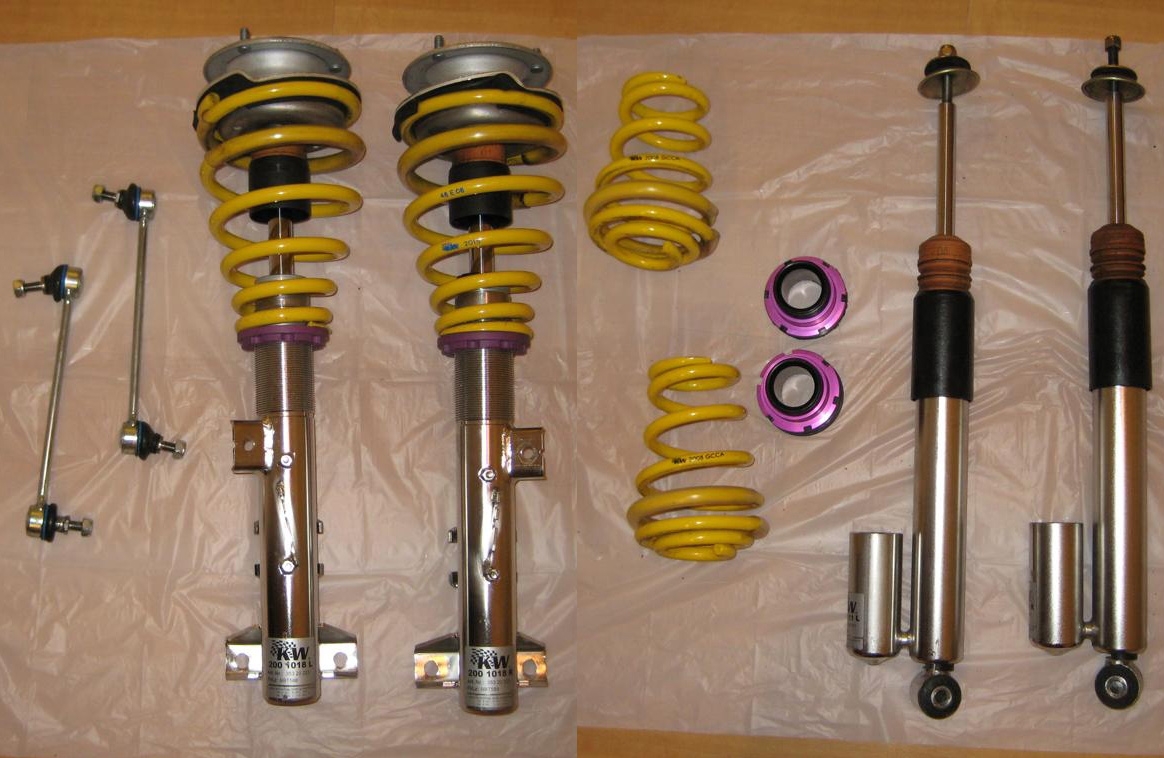
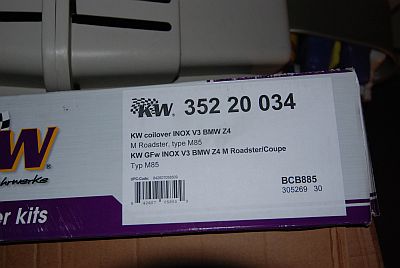
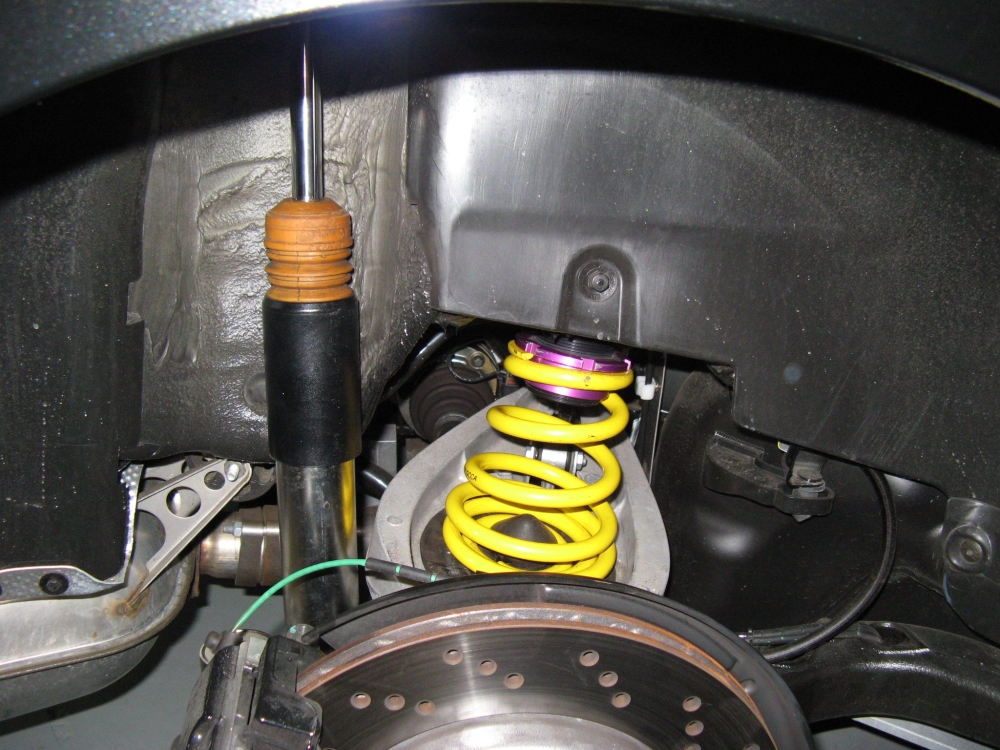
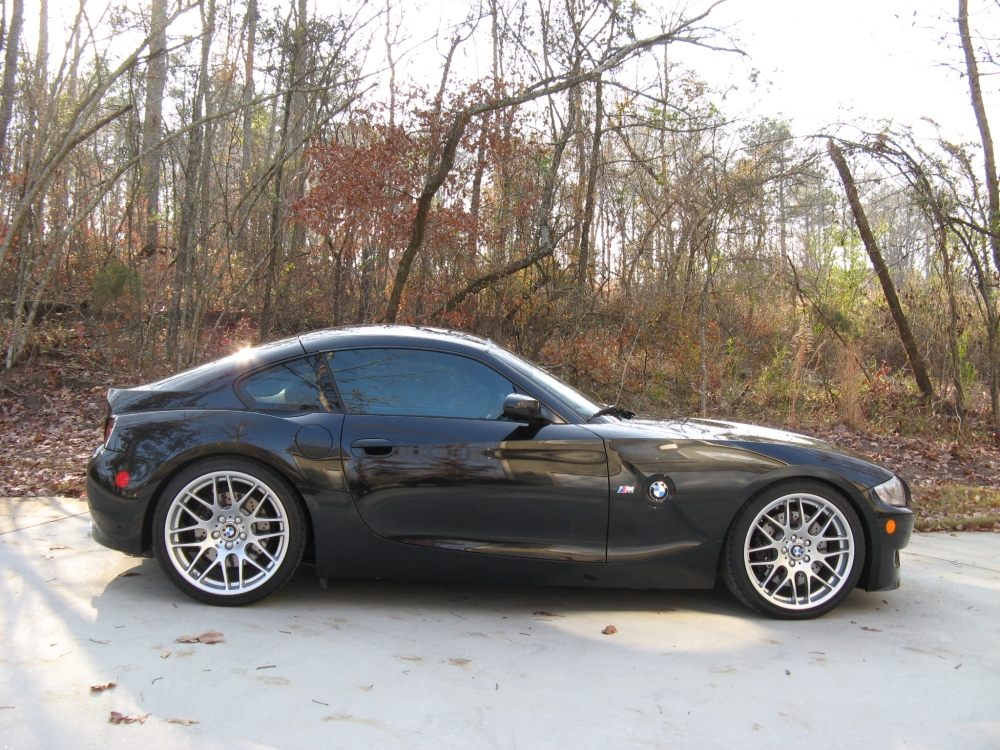
KW V3 Coilovers
purchased from GP20 on BimmerForum classifieds.
KW Installation instructions HERE,
setup manual HERE, TUV certification HERE.
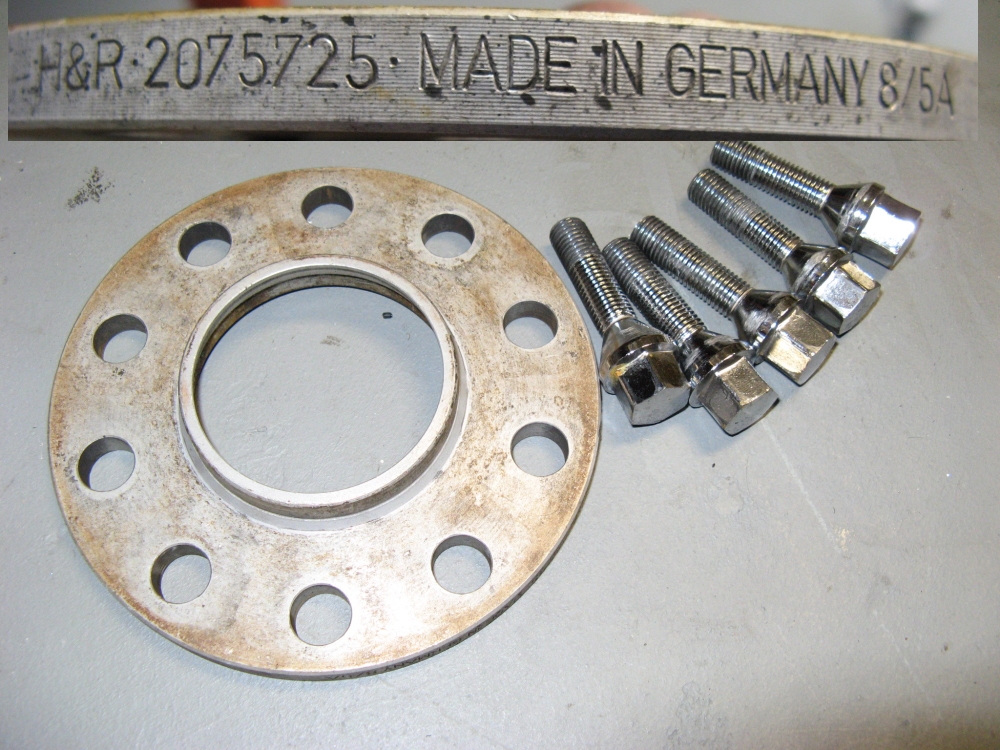
A set of 10mm H&R adapters with 40mm lug nuts was required for the front ZCP wheels to clear the front KW V3 struts (BIG Thanks to Geordie at Butler Tire for
selling me your takeoff set).
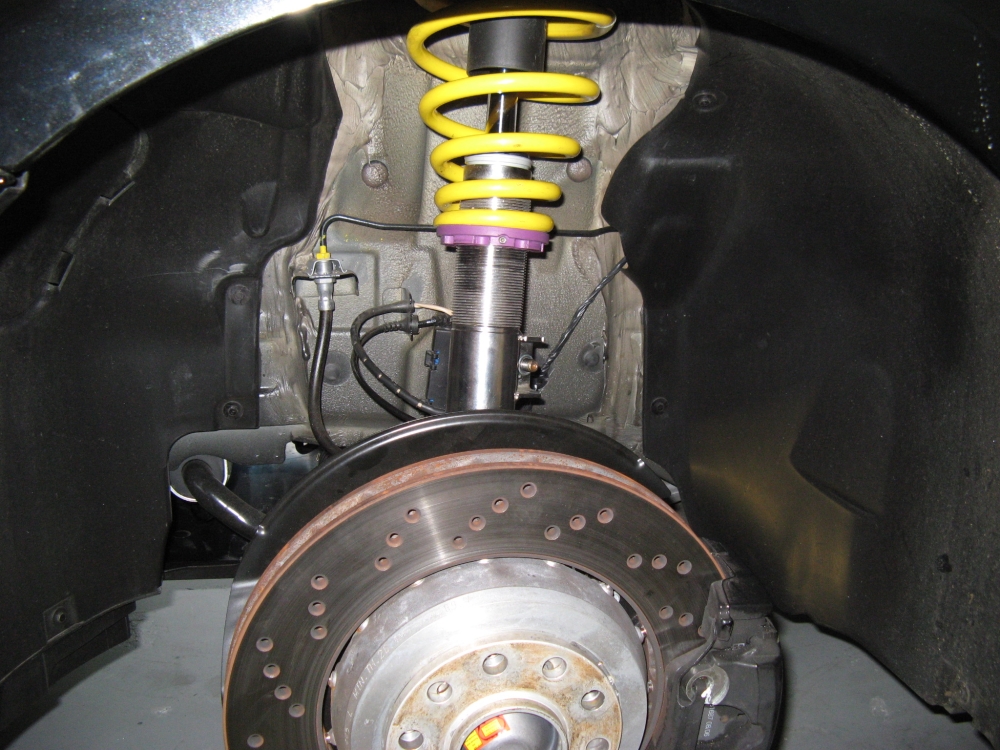
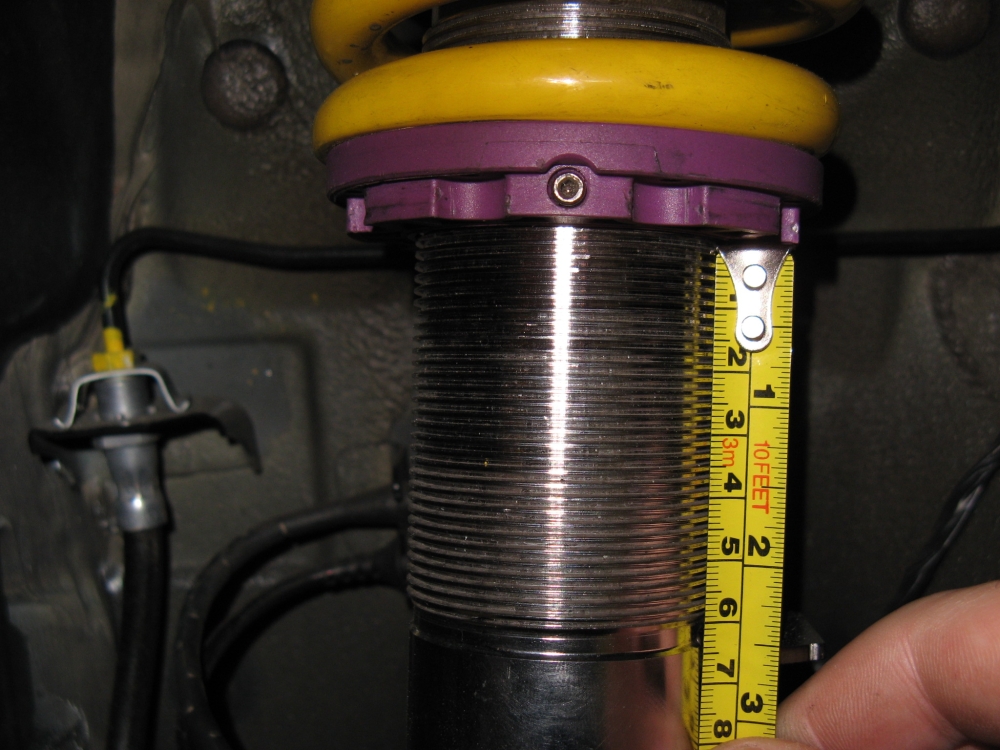
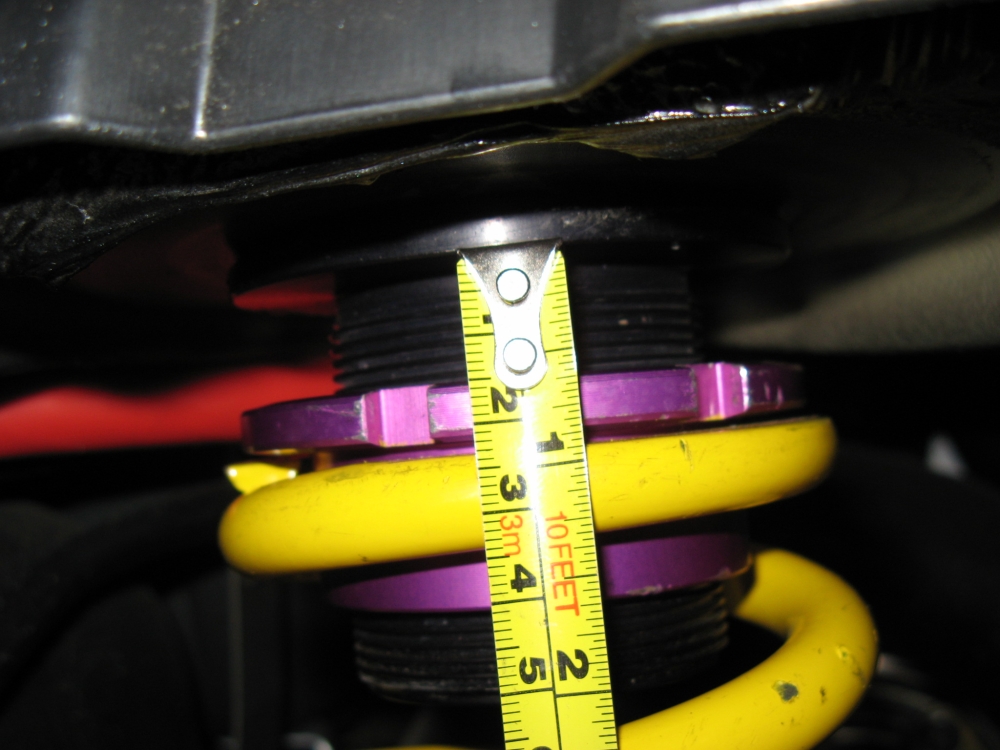
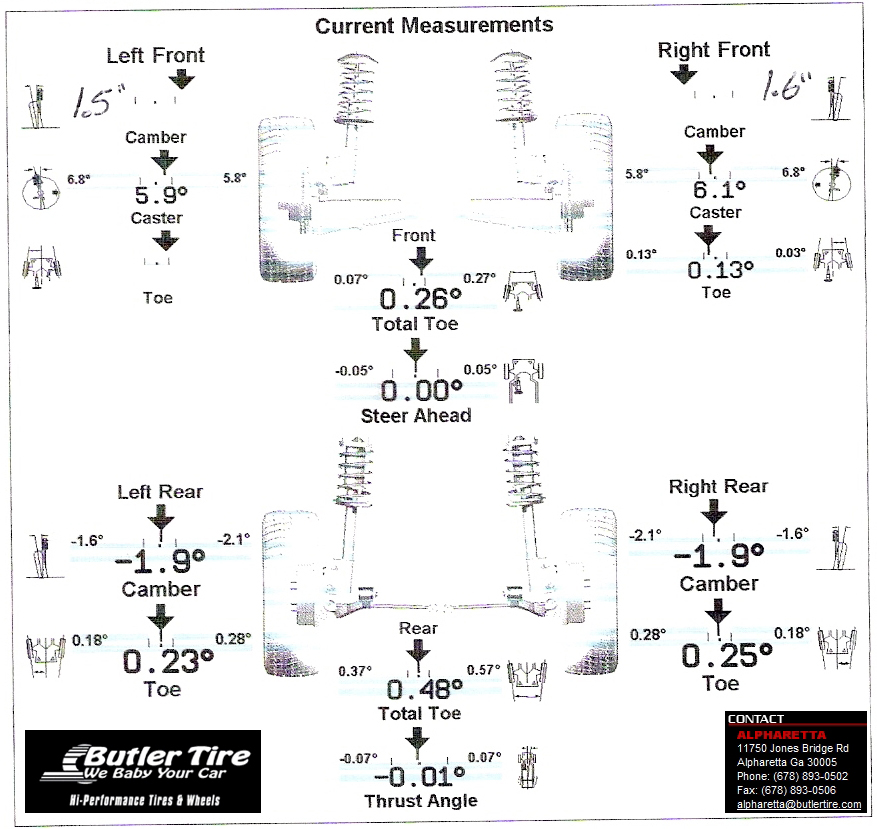
I detailed the removal and installation process
HERE in a DIY guide. The measurements shown below are where my final adjustments were,
Butler Tire in Alpharetta raised the front another 5mm due to some slight rubbing when performing my alignment
(THANKS to Craig for getting me in/out and Jeff for doing a thorough job on my alignment):
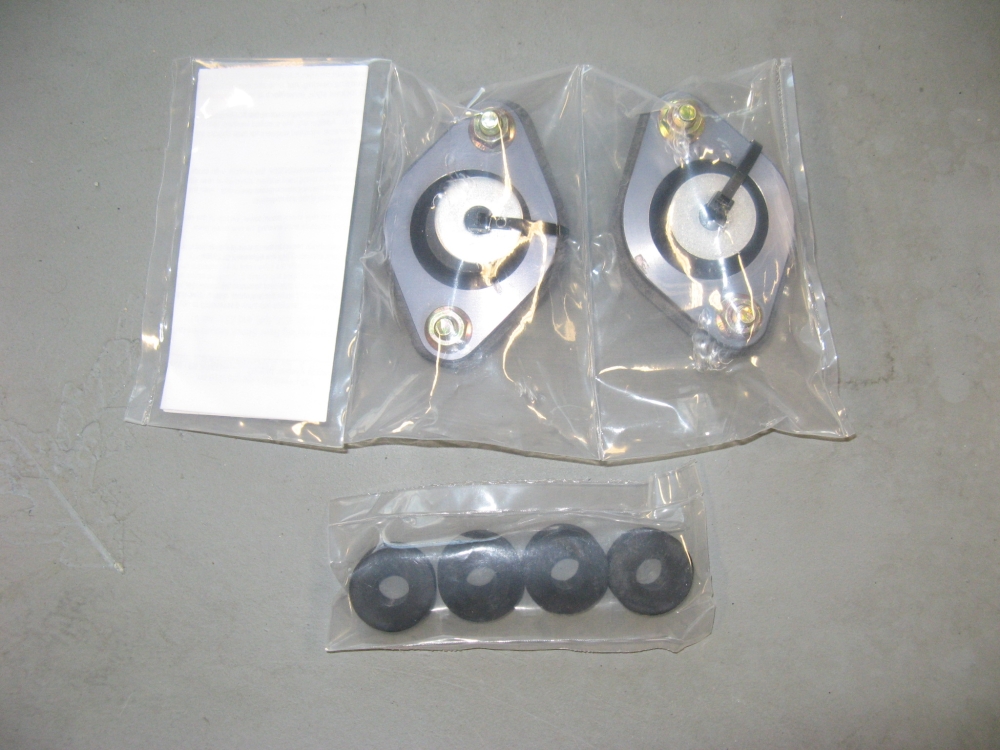
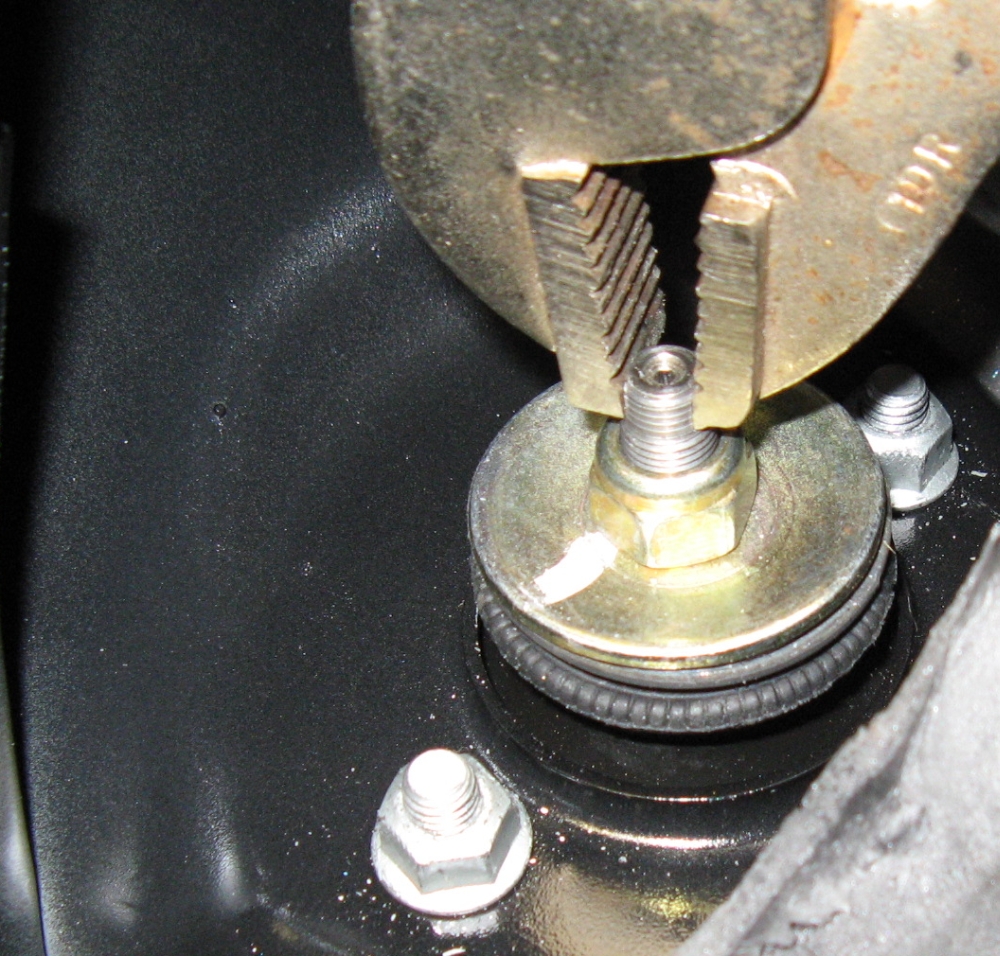
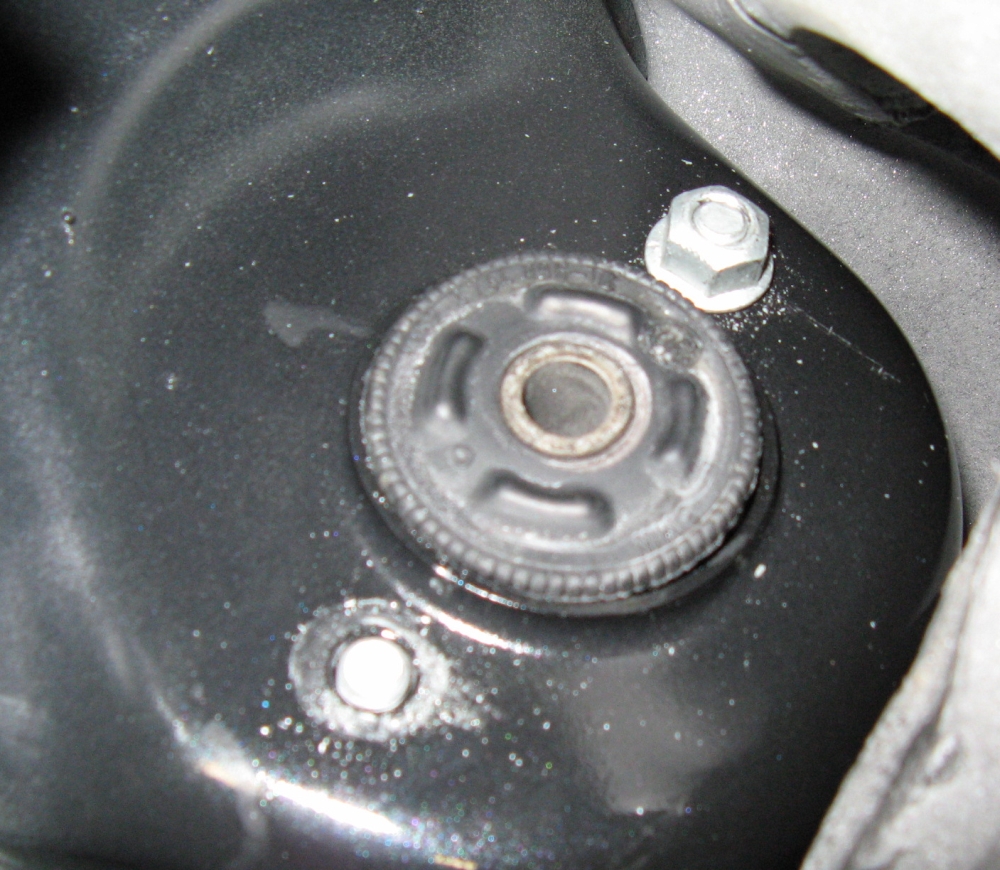
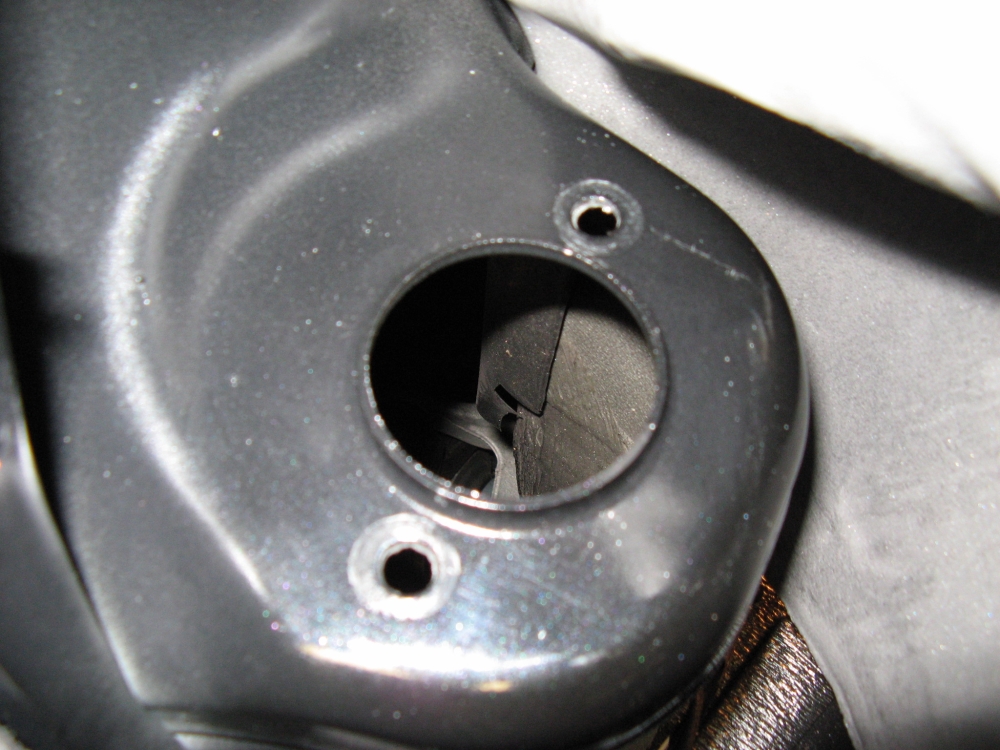
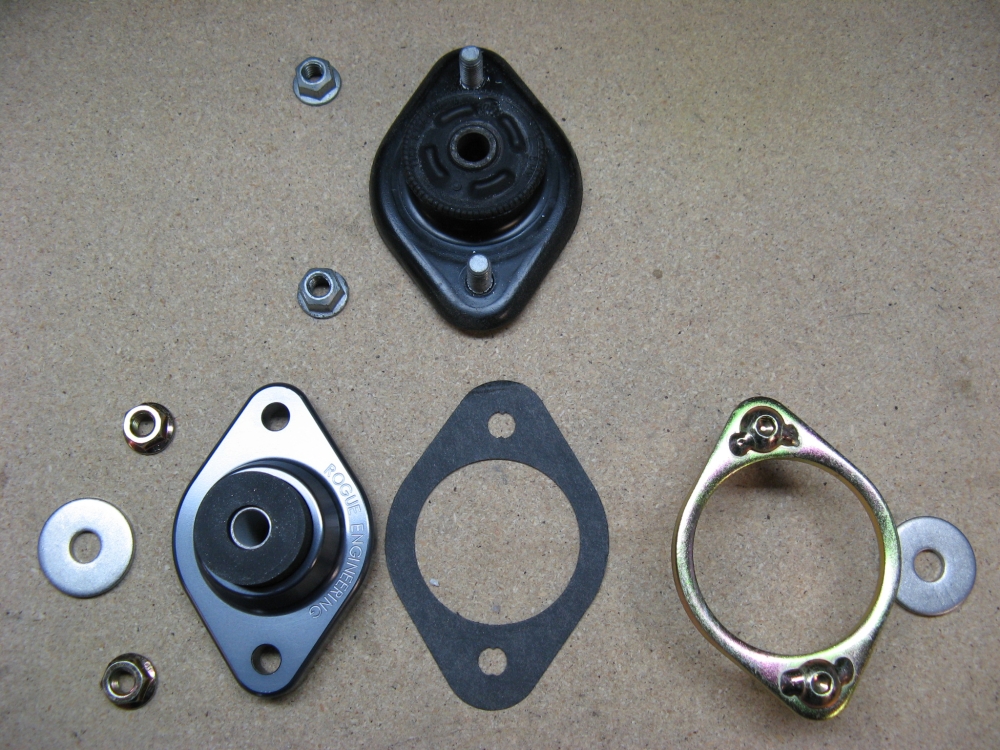
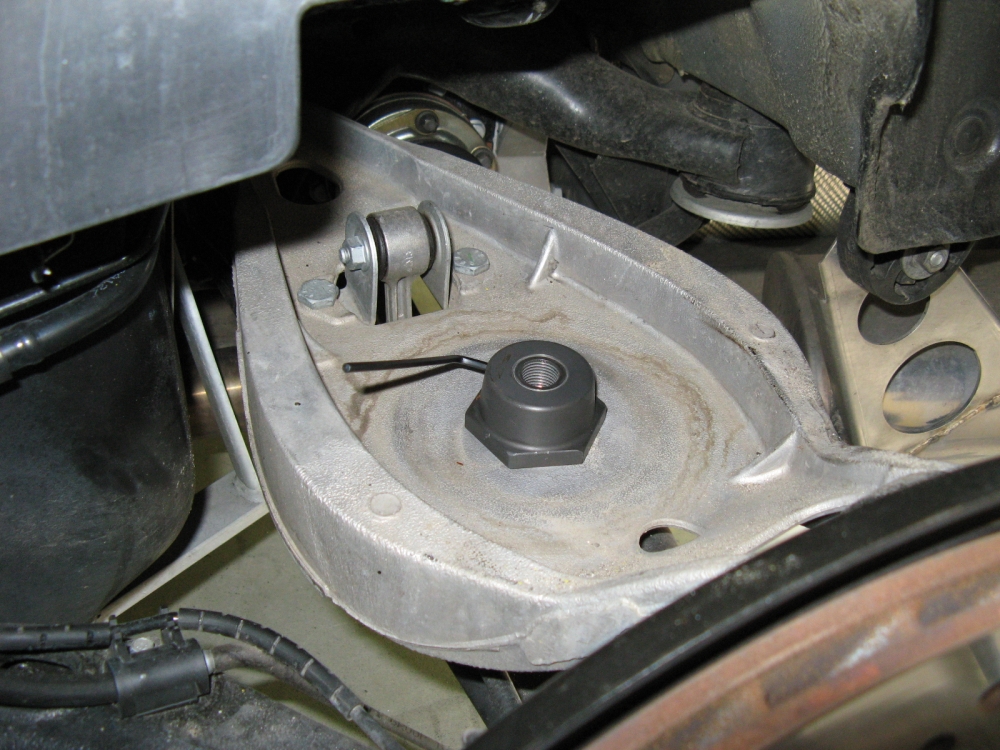
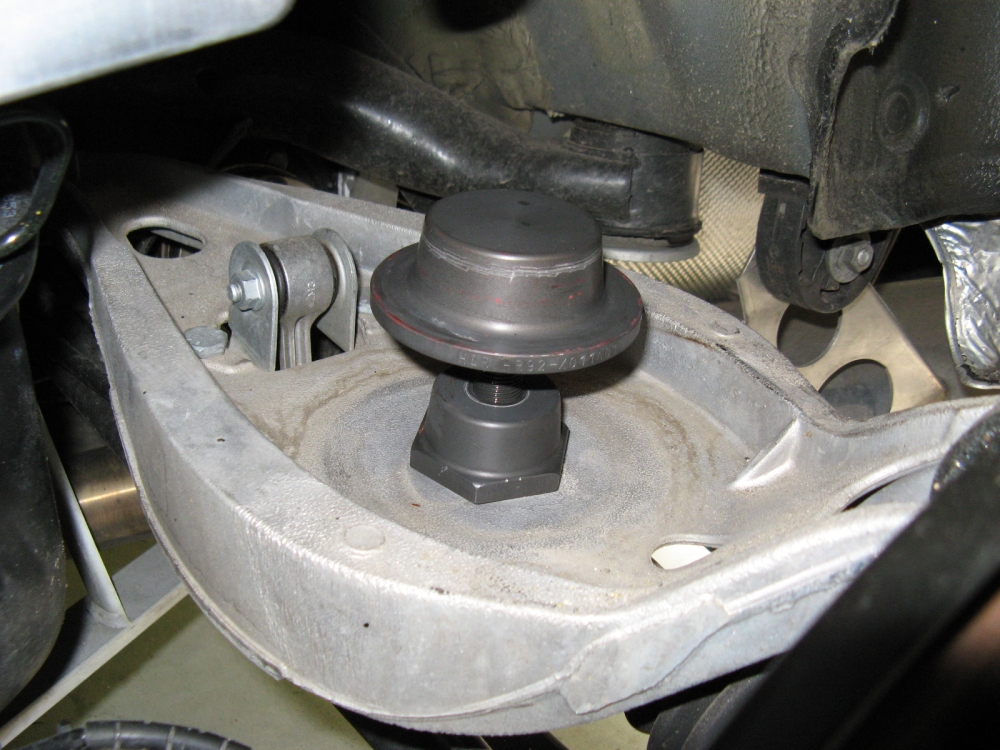
Rogue Engineering rear shock mounts installed. After tearing apart the interior to install the KWV3s above, it didn't make sense to have to do it again if I ever needed to adjust the rear shocks. Rogue Engineering rear shock mounts allow for the rear shock assembly to be removed without top access, the upper shock mount bolts are accessible from below. These shock mounts also have replaceable rubber bushings. To install, the rear upper shock bolt was removed and then the two bolts holding the OE mount in were removed. I followed the RE instructions HERE for installation:

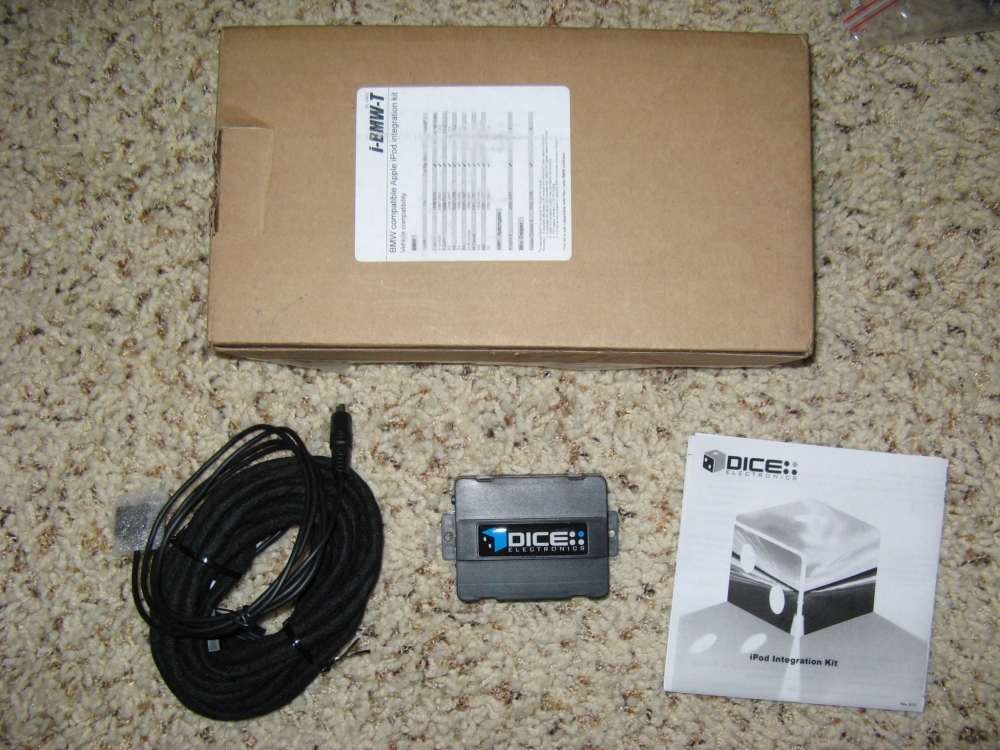
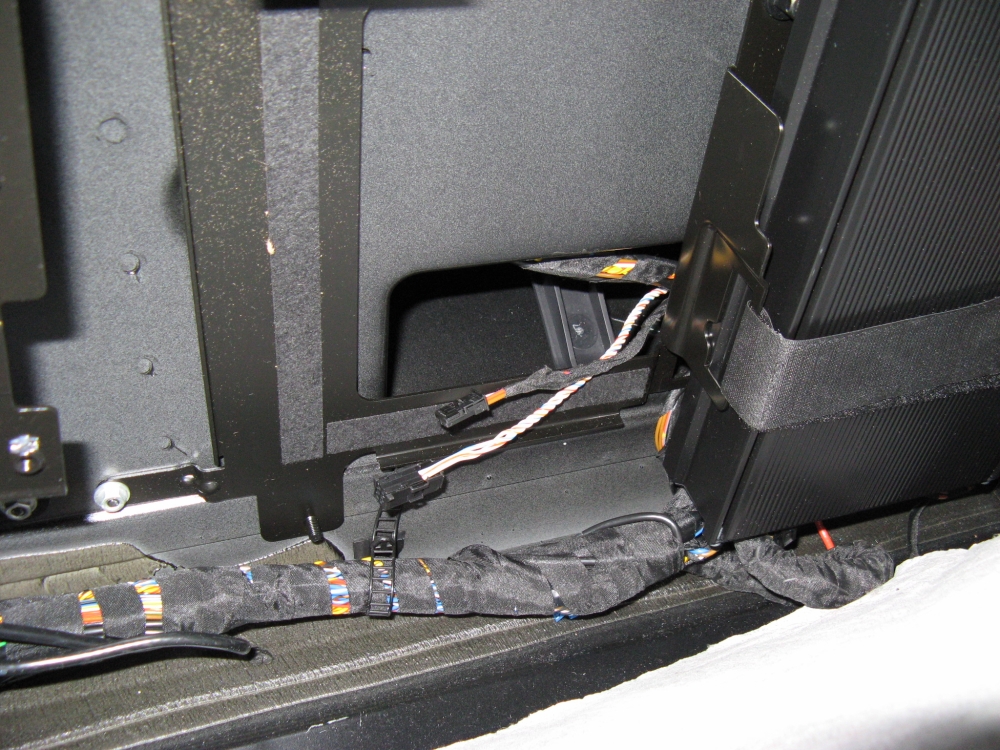
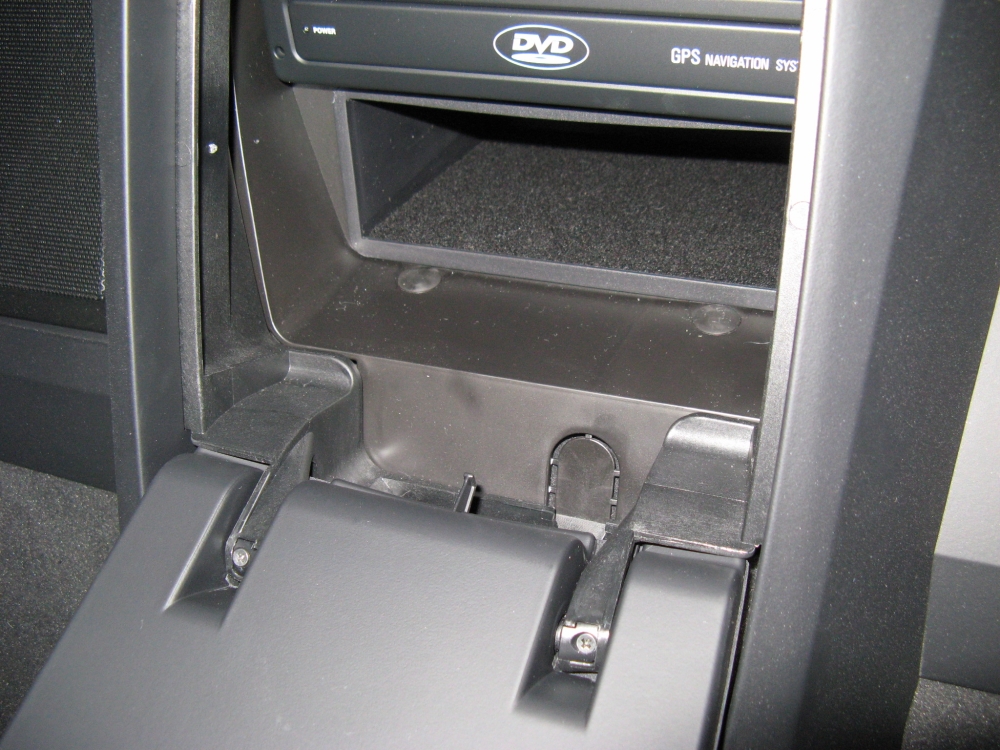
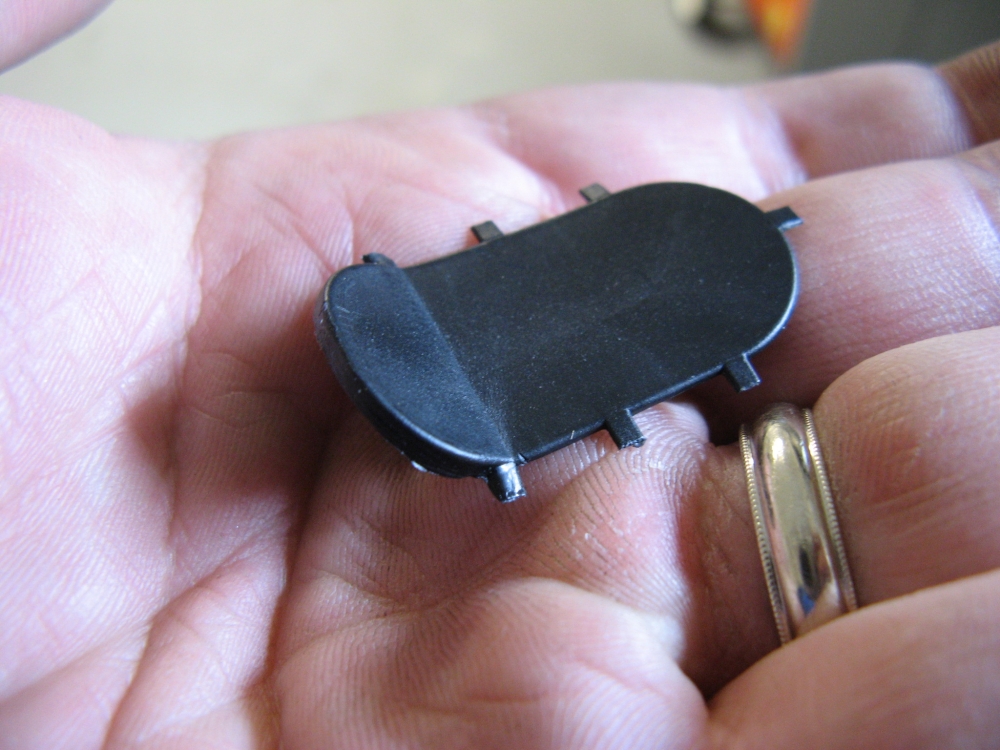
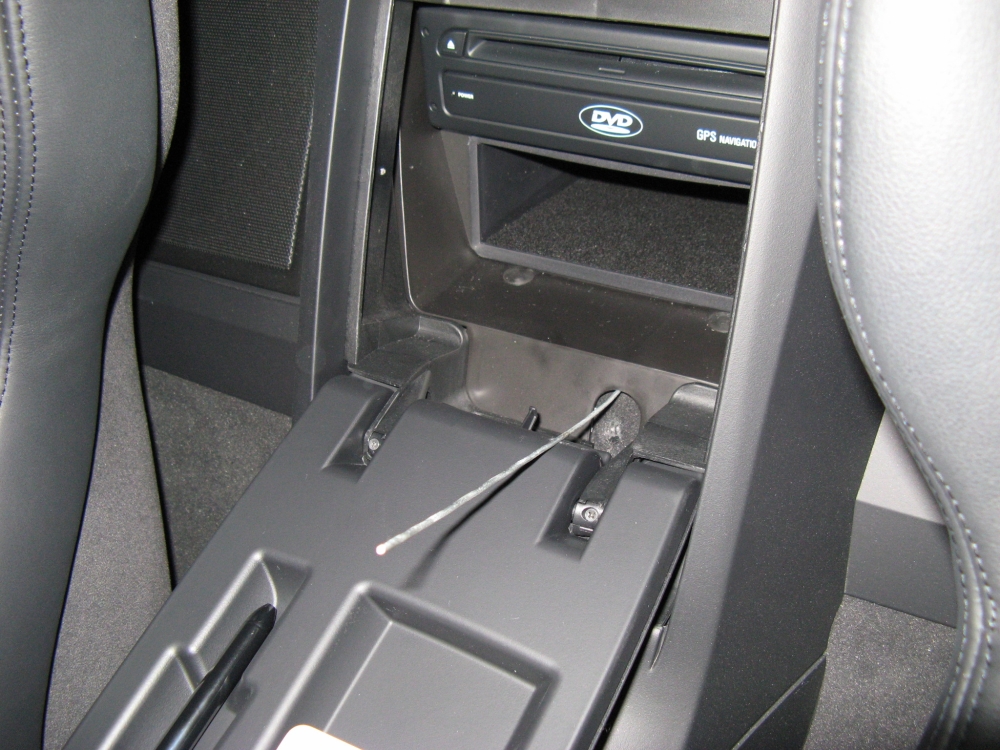
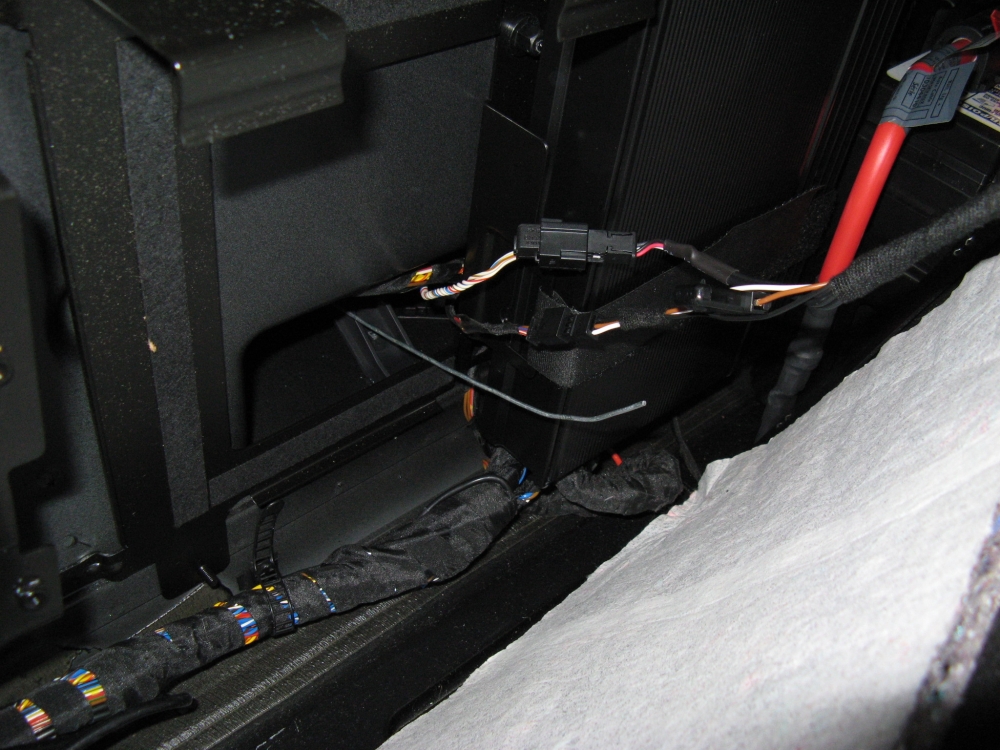
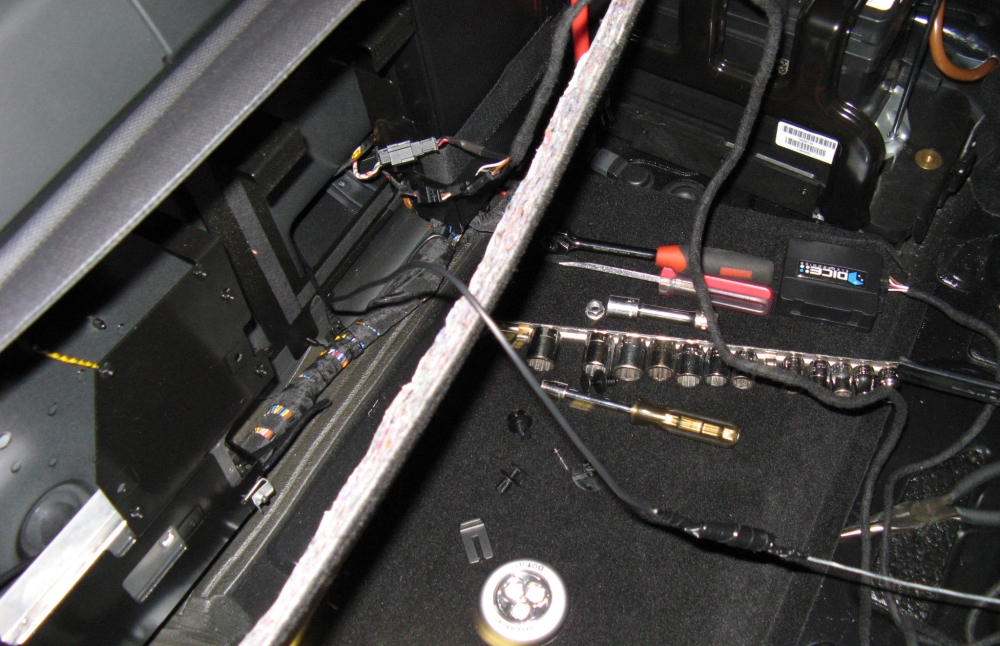
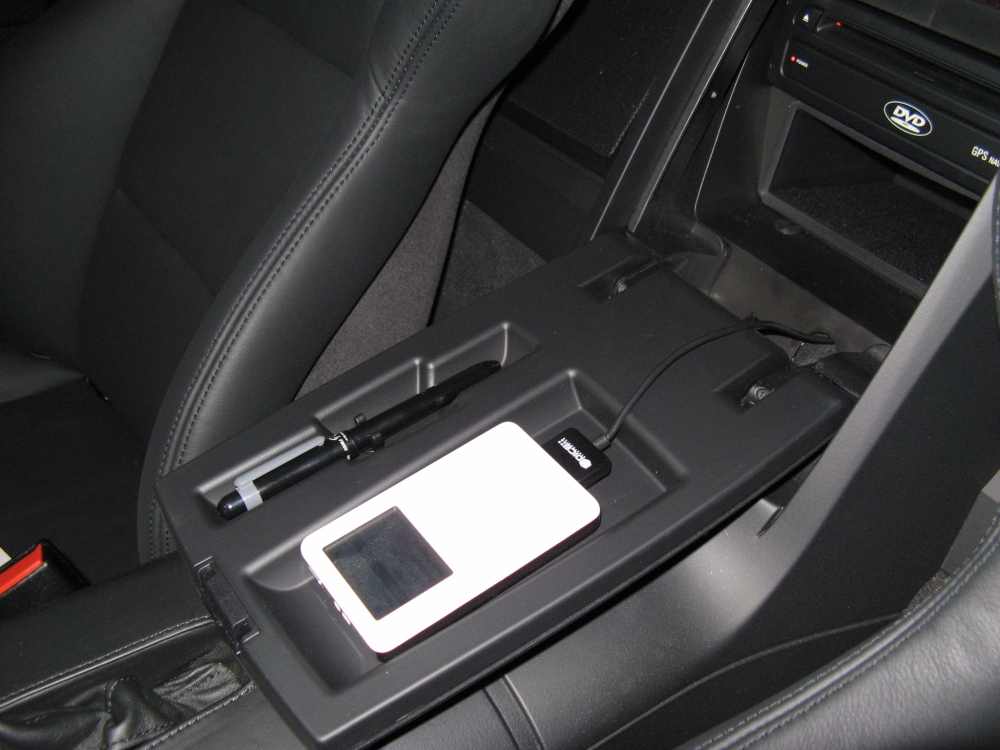
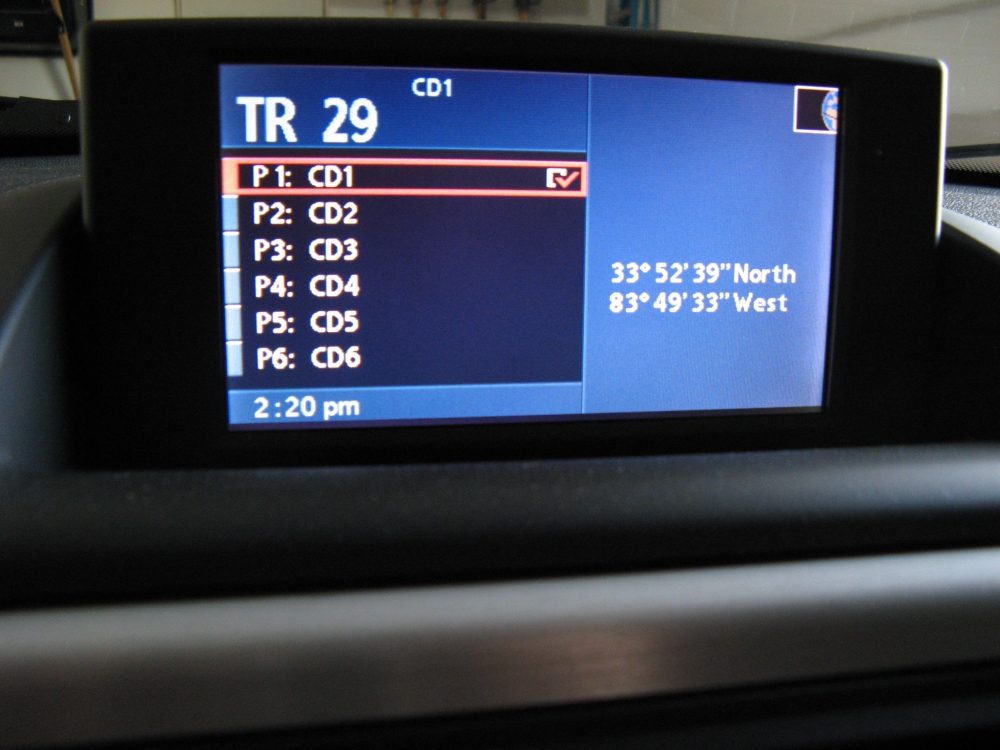
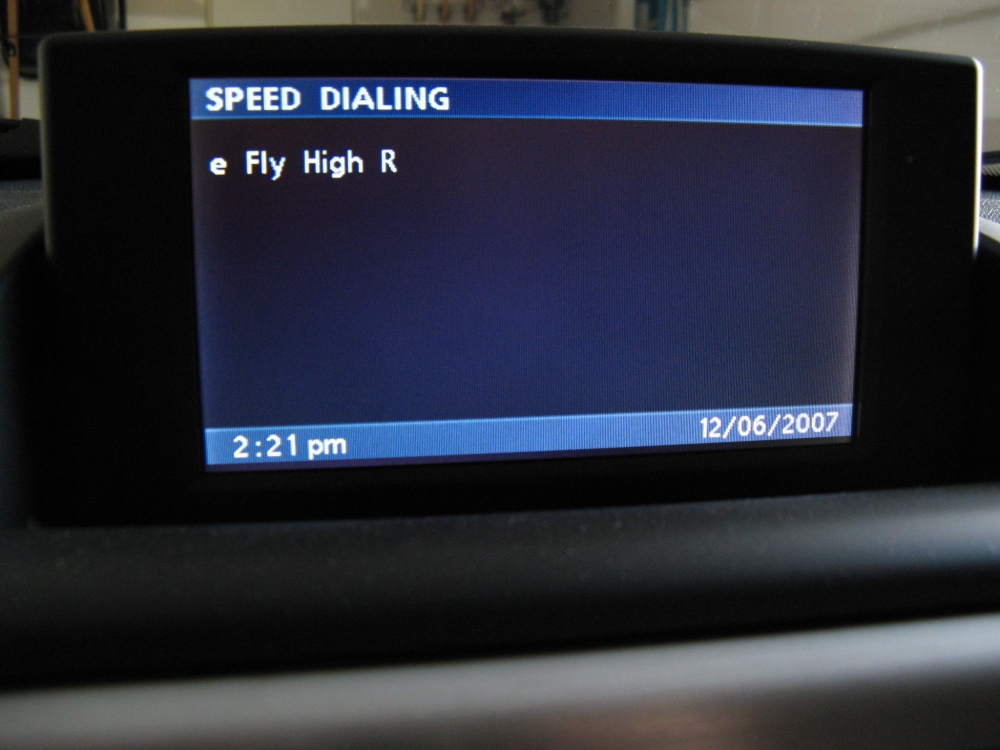
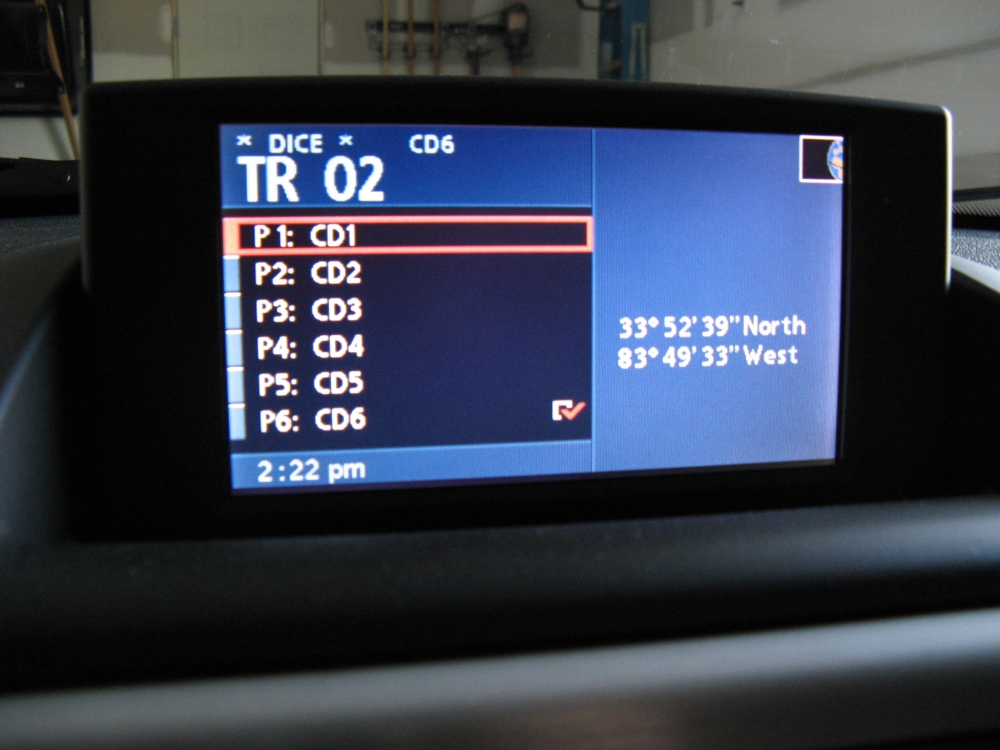
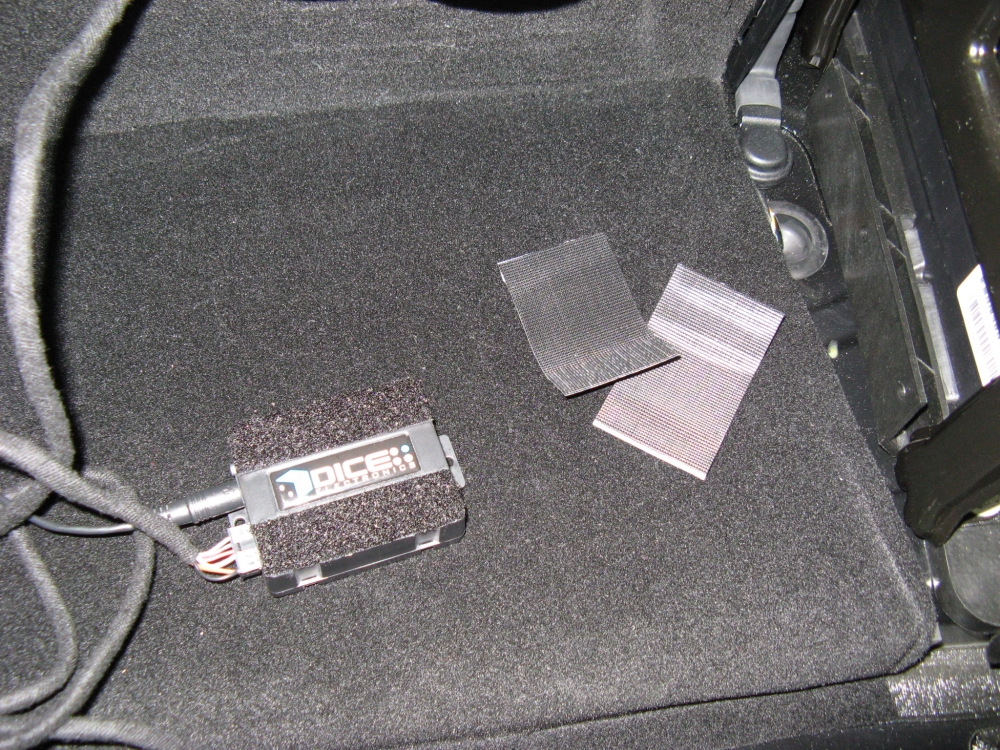
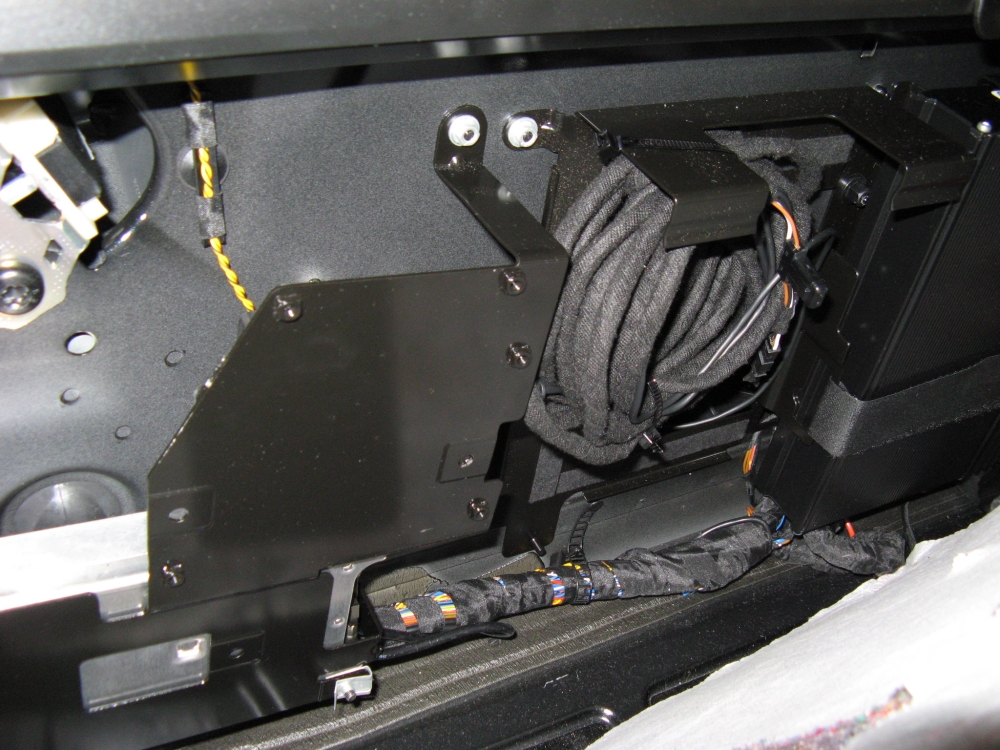
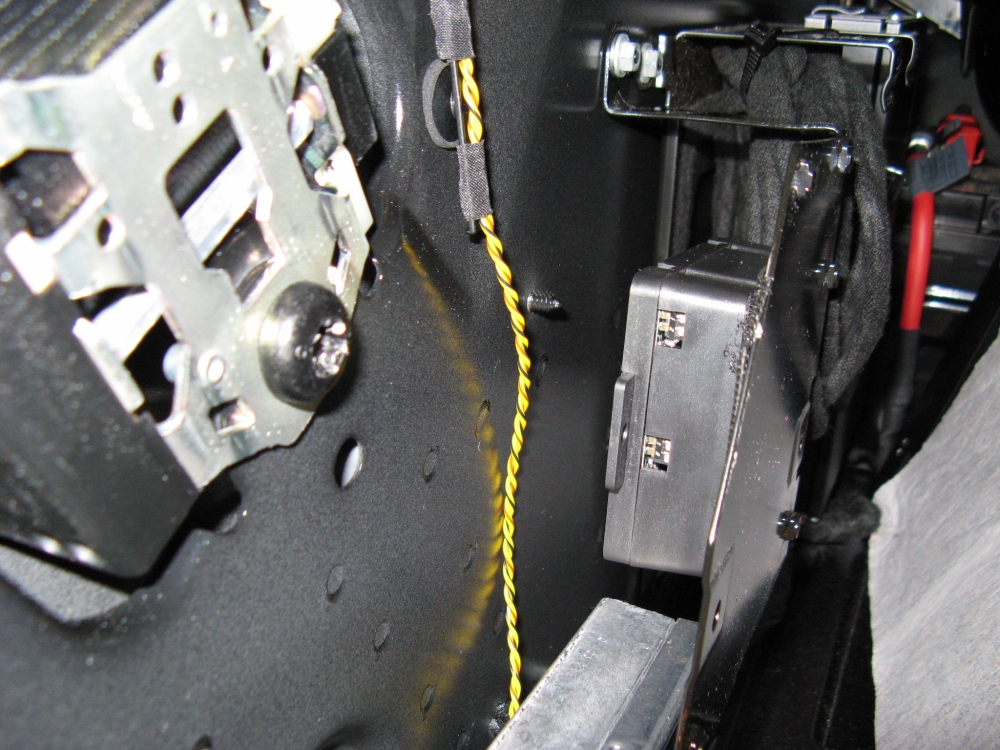
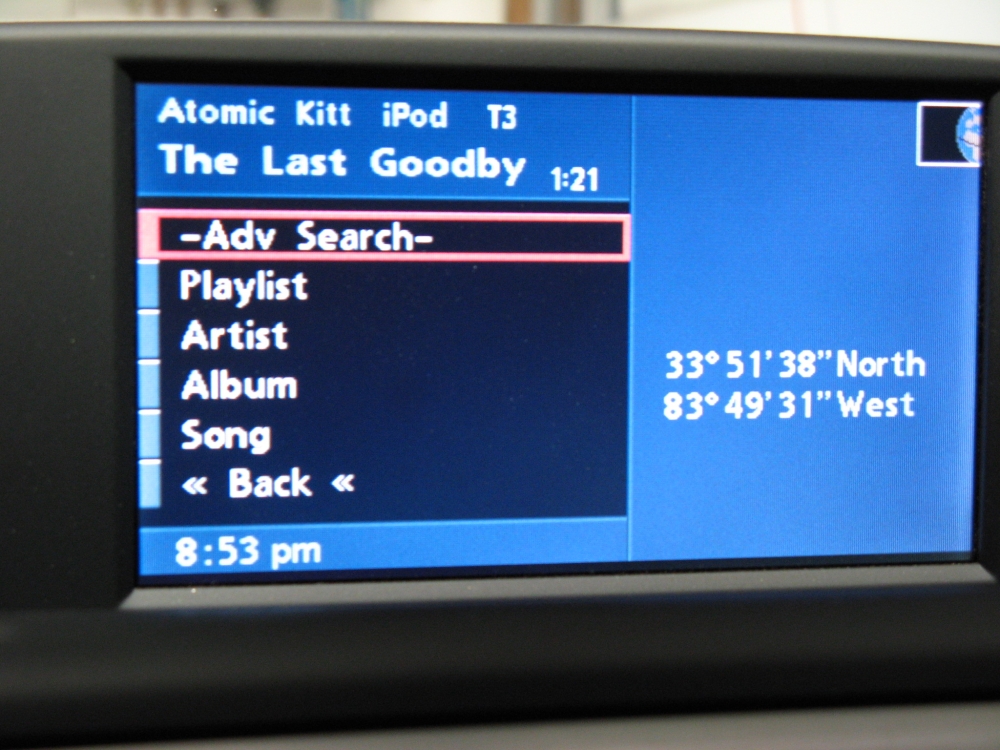
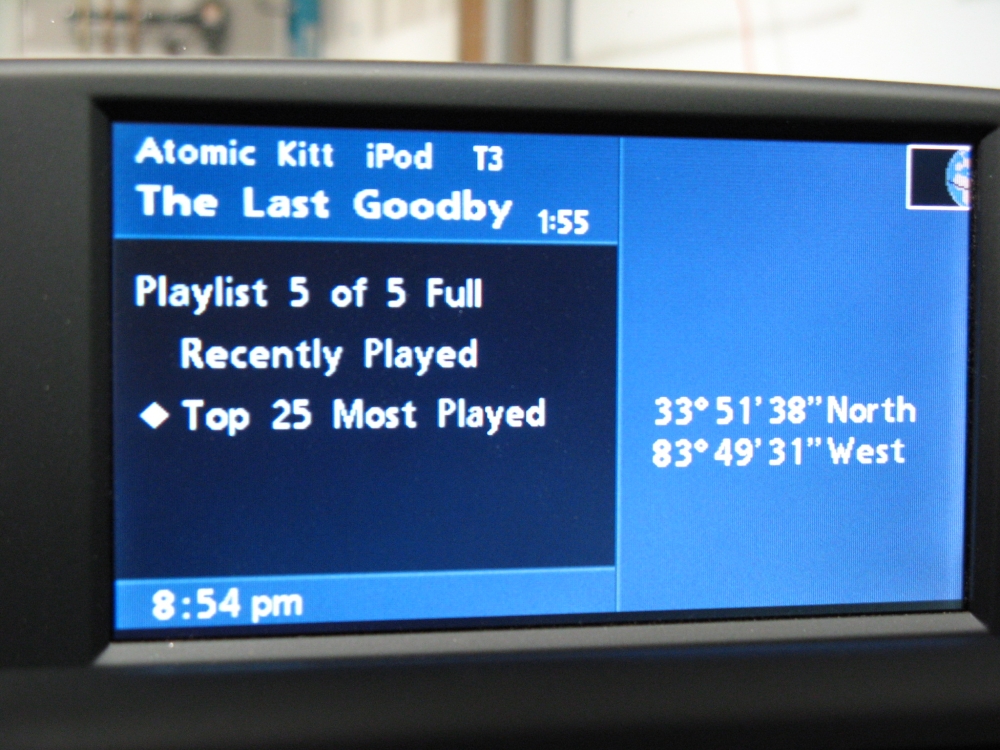
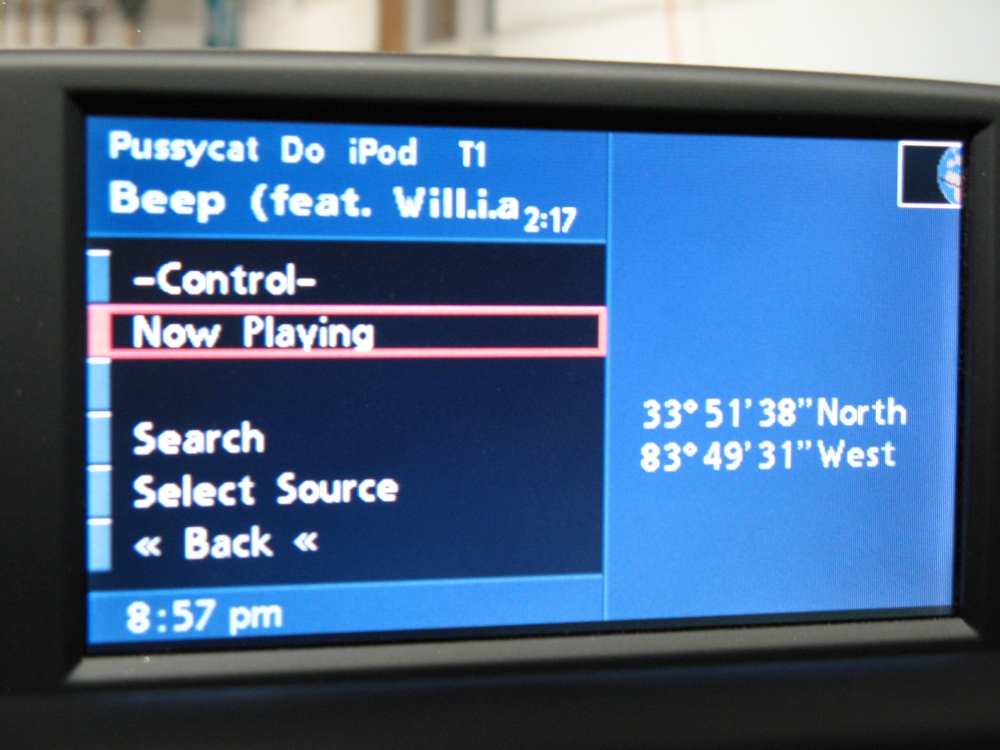
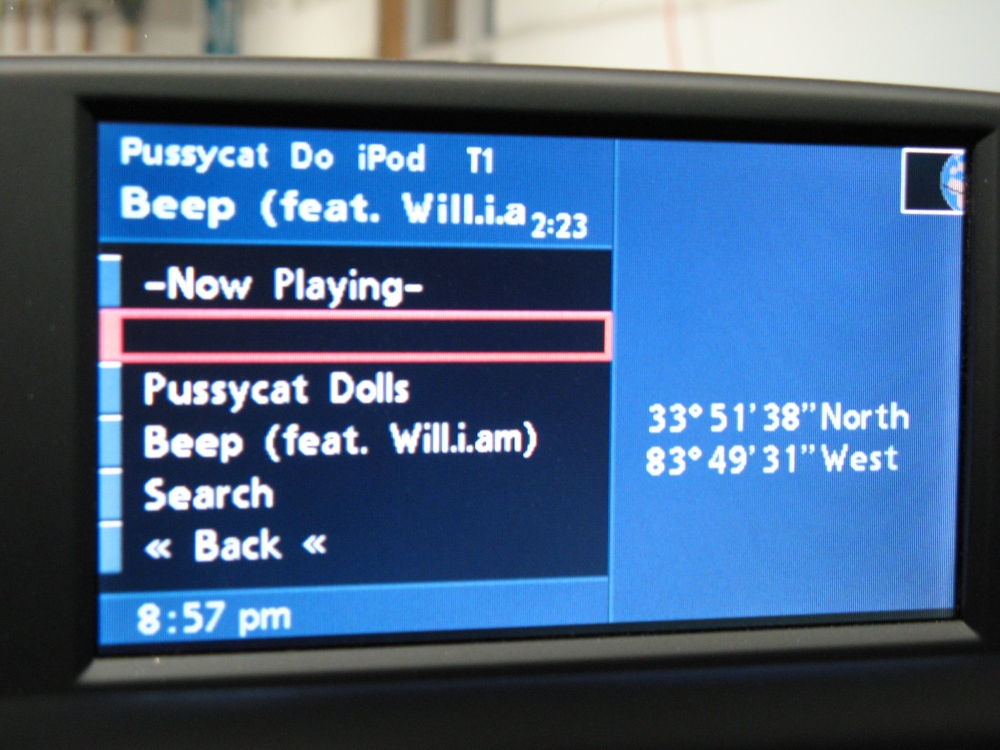
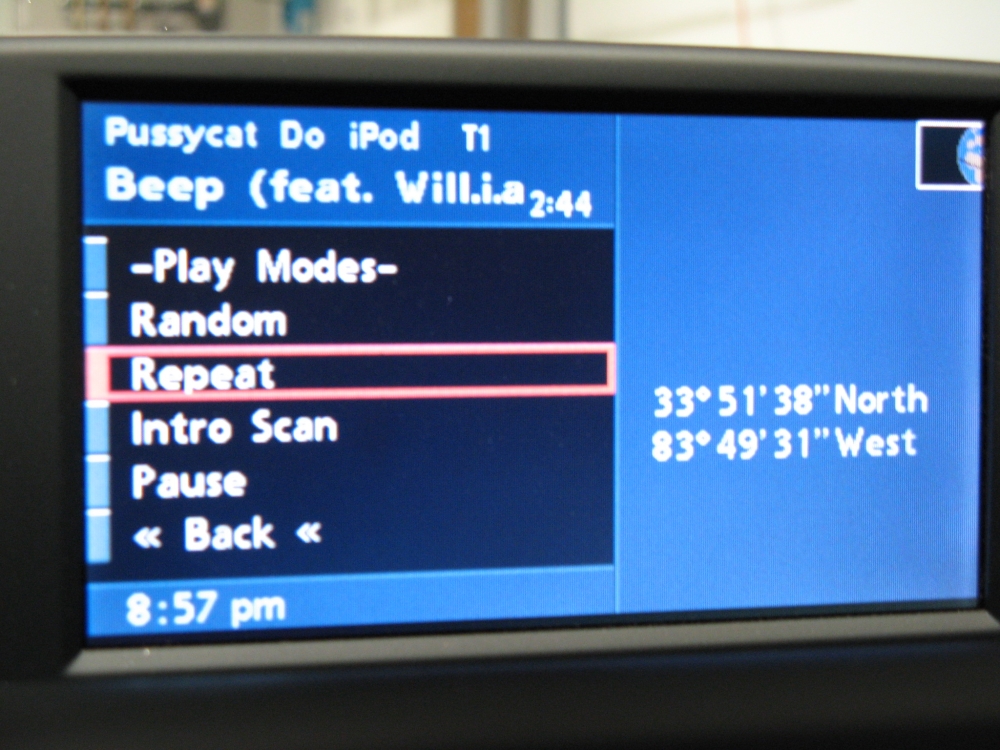
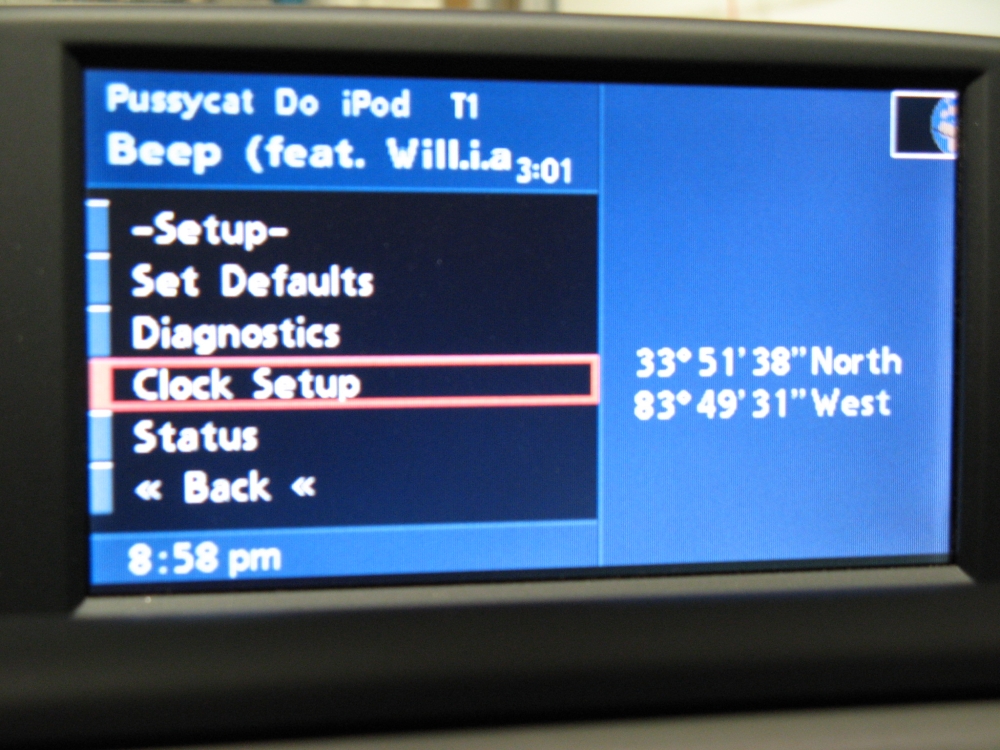
DICE iPod Integration Kit for BMW (Trunk Interface) from European Auto Source installed while the cargo area interior was removed for suspension installation. BMW Dice Trunk Interface Installation Instructions HERE and BMW Dice User Manual HERE. To be honest, not as great of an interface as I had hoped for. The text display has to be turned off if you want to see navigation maps (or any of the menus) while using the iPod- if a menu or map is selected it reverts to the text display after a few seconds with no regard to a user being in the middle of an entry. And the text display, when on, only utilizes a small portion of the display (12 character display limit) and constantly scrolls so it is not useful anyway. There is not a great way to navigate as playlists are your only hope for being able to find anything - and because there is no text, hopefully you have the disc numbers and corresponding playlists cross reference memorized. The installation manual and user manual are both terrible. The only redeeming feature is that it charges the battery and offers somewhat minimal control through the radio. I am debating whether I want to keep it or just ditch hopes of an iPod interface and burn MP3 CDs. I was able to route the iPod wire through the plastic punch out to the back so the installation looks clean. Pics (L to R): Dice BMW Trunk Interface, wires located behind cubby, punchout located and removed from console, guide wire fed through punchout hole and through to rear bulkhead, iPod wire for iPod<>Dice taped to guide wire and fed through to bulkhead- all plugs connected and Dice is tested, iPod mounted to console door with Velcro, sample Dice display screens (nothing fantastic), Dice unit mounted with Velcro and wires bundled and zip tied to bulkhead wall:
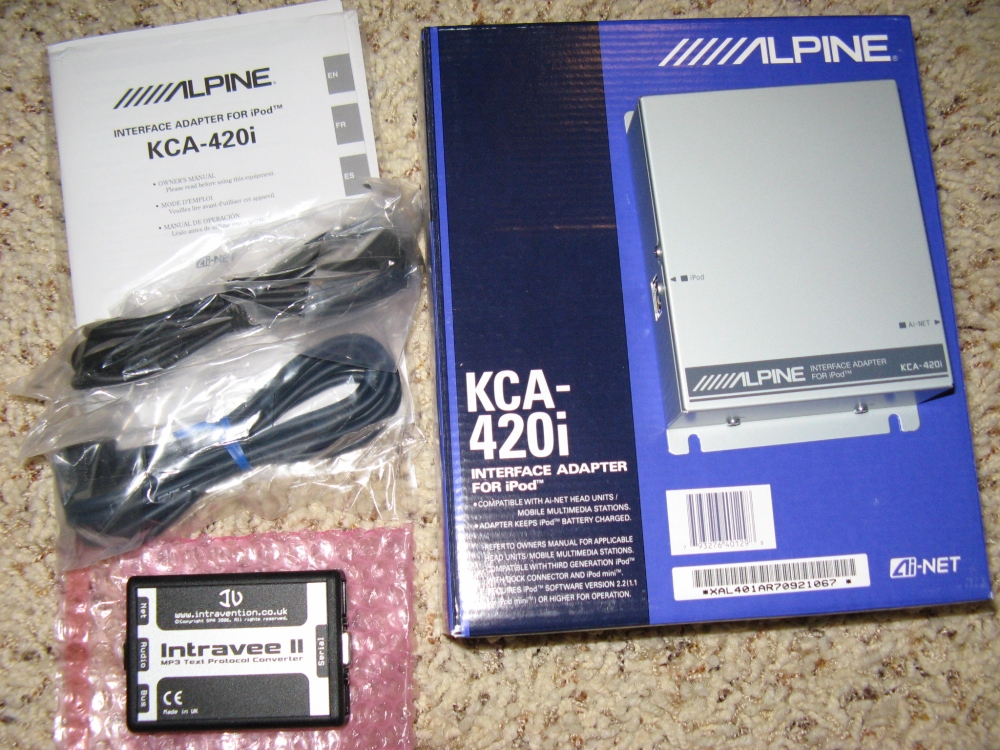
Intravee II iPod interface from BimmmerNAV.com
paired with required Alpine KCA-420i to replace inferior Dice interface (comparison video HERE).
Intravee II Manuals: Quick Install Guide, Quick User Guide,
User Guide for NAV Units.
There is an Intravee forum at the Intravention website HERE with some good information about functionality and updates.
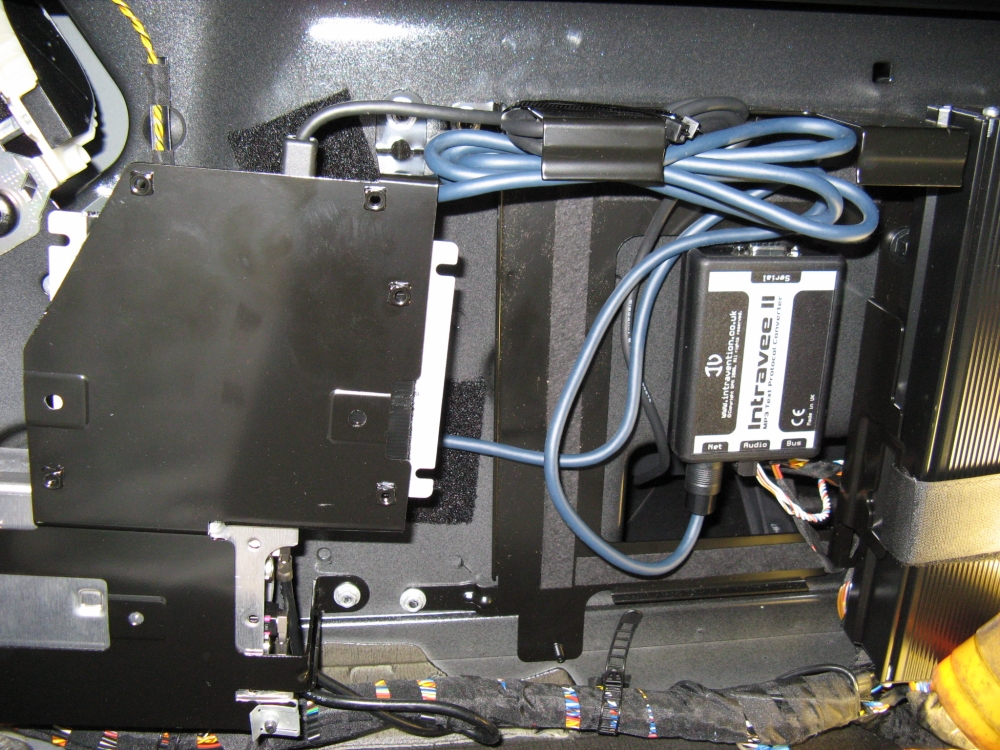
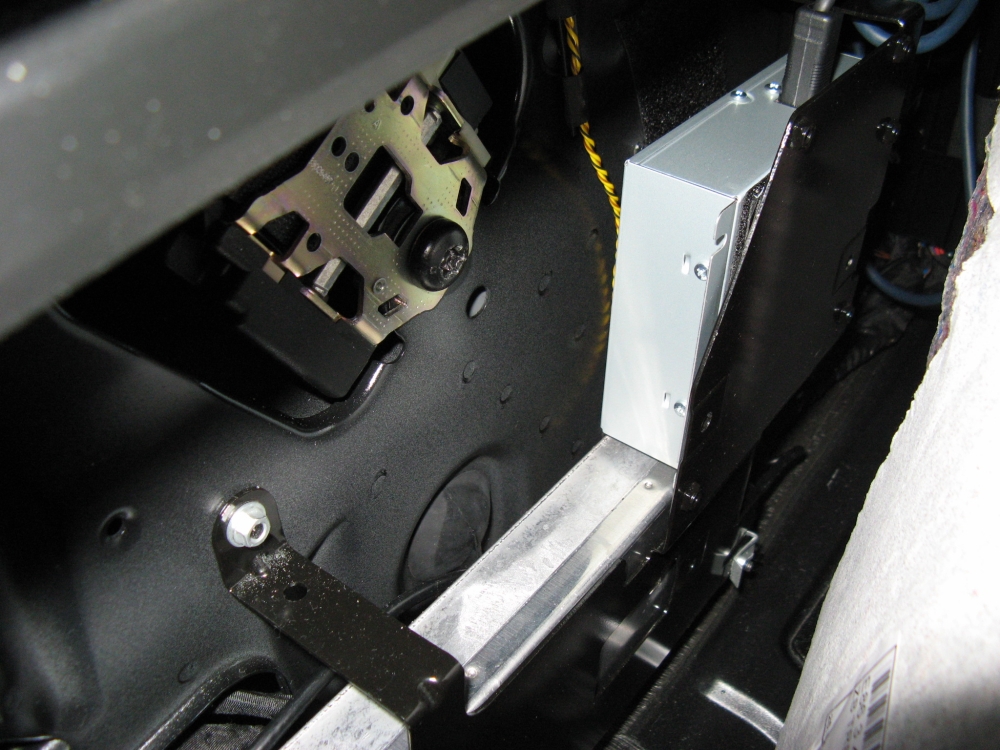
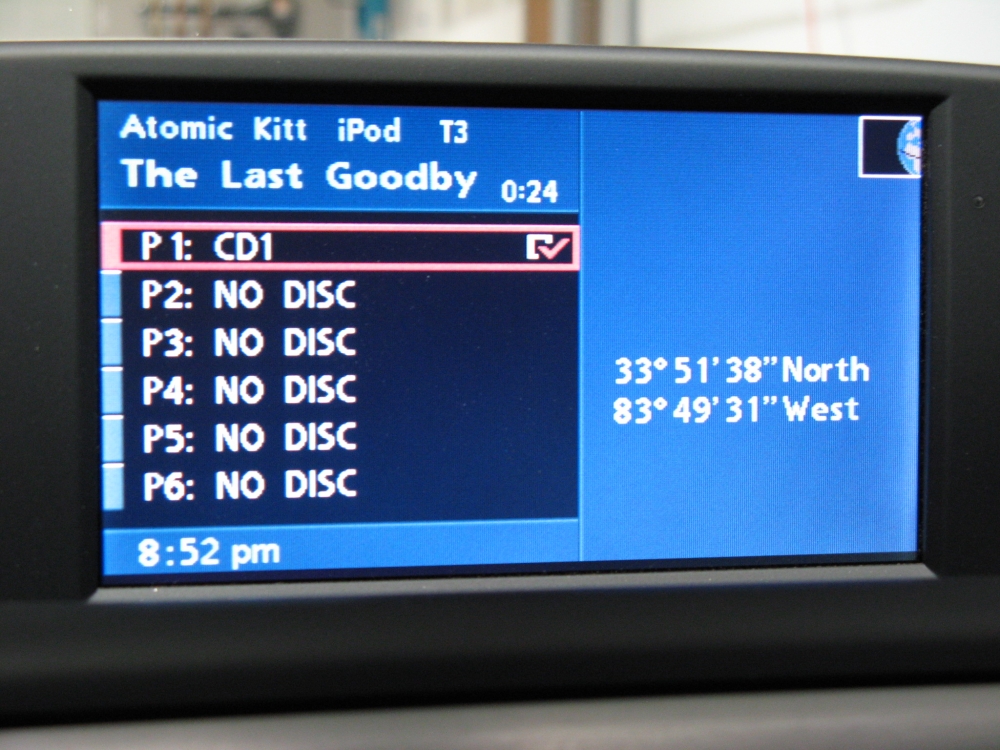
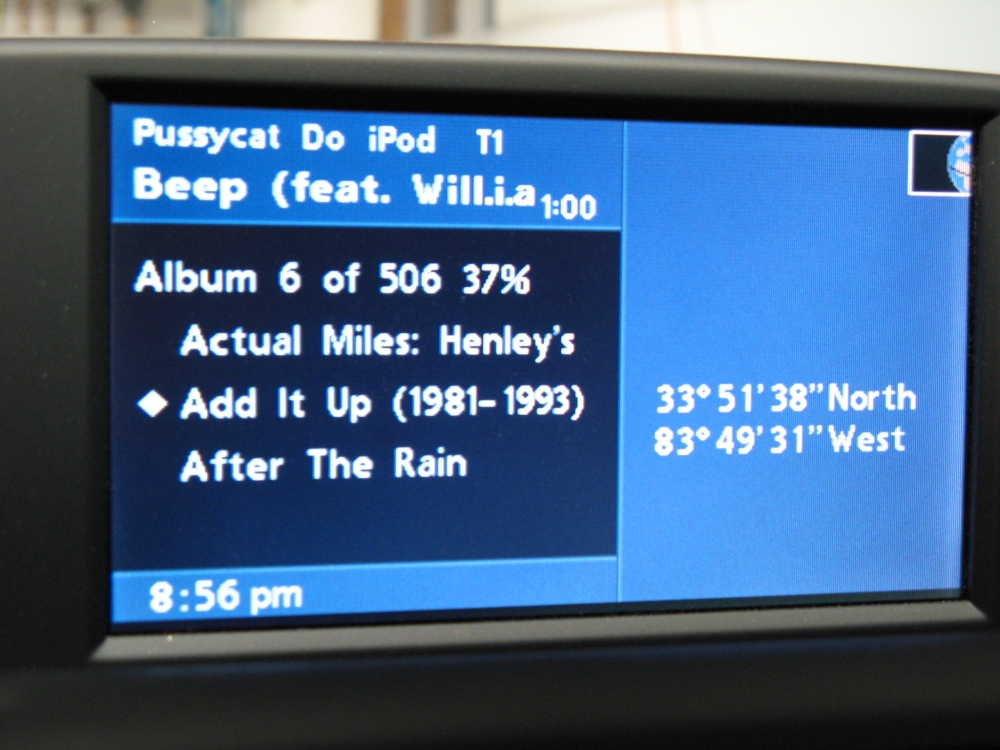
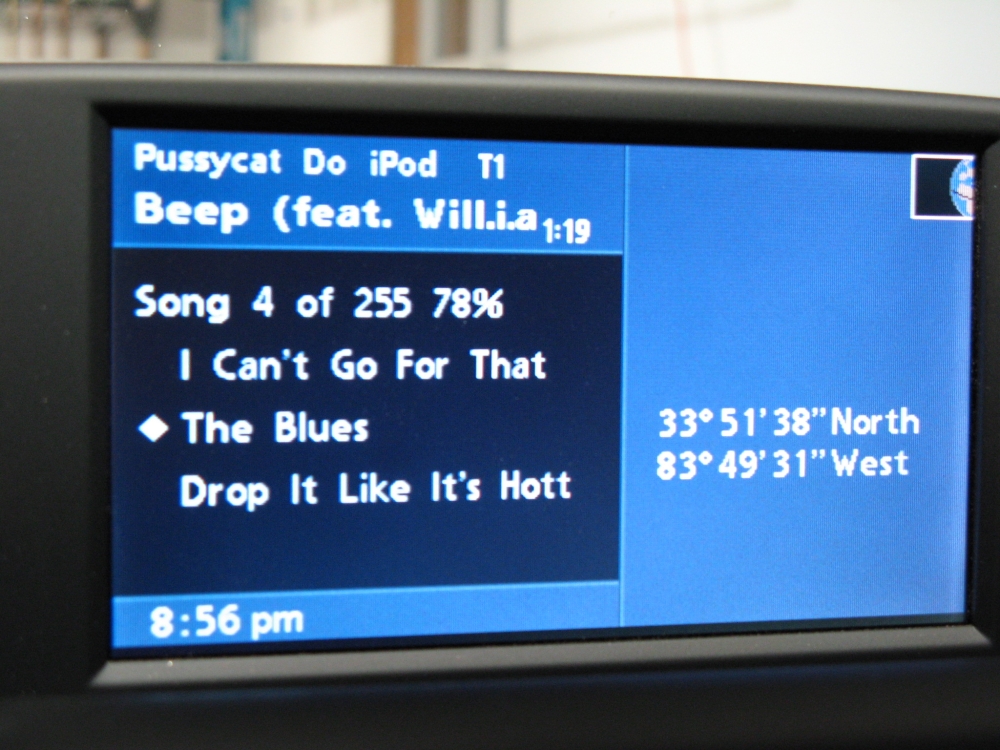
This interface is almost as good/fast as my old Alpine iPod deck, partly because the Intravee works with the Alpine interface adapter. This interface team does everything that Dice does plus all
of the things it does not do. All menus are easy to read text displays, very intuitive and best of all, the Navigation map and all other menus are reverted to automatically after a few seconds. It is
obvious that the people that came up with this have used an iPod. I mounted both units with industrial Velcro and zip tied extra harness wiring up and out of the way. Some sample screens pictured to show
how superior this unit is over the competitors (the Dice unit I had lasted for 2 days before I got frustrated and placed my order for these two units to replace it):


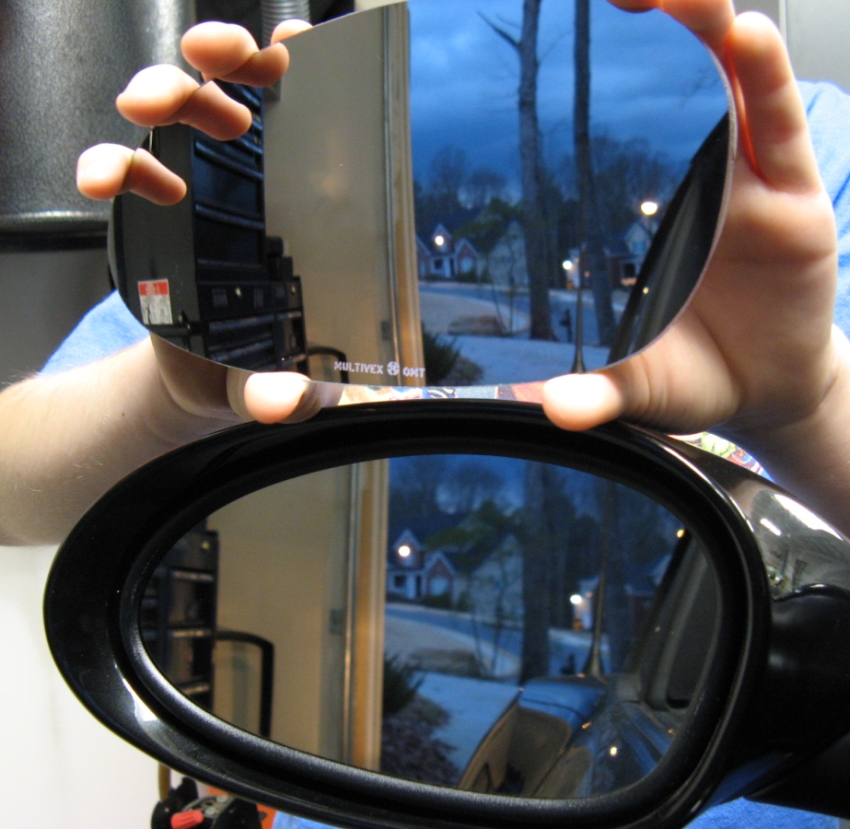
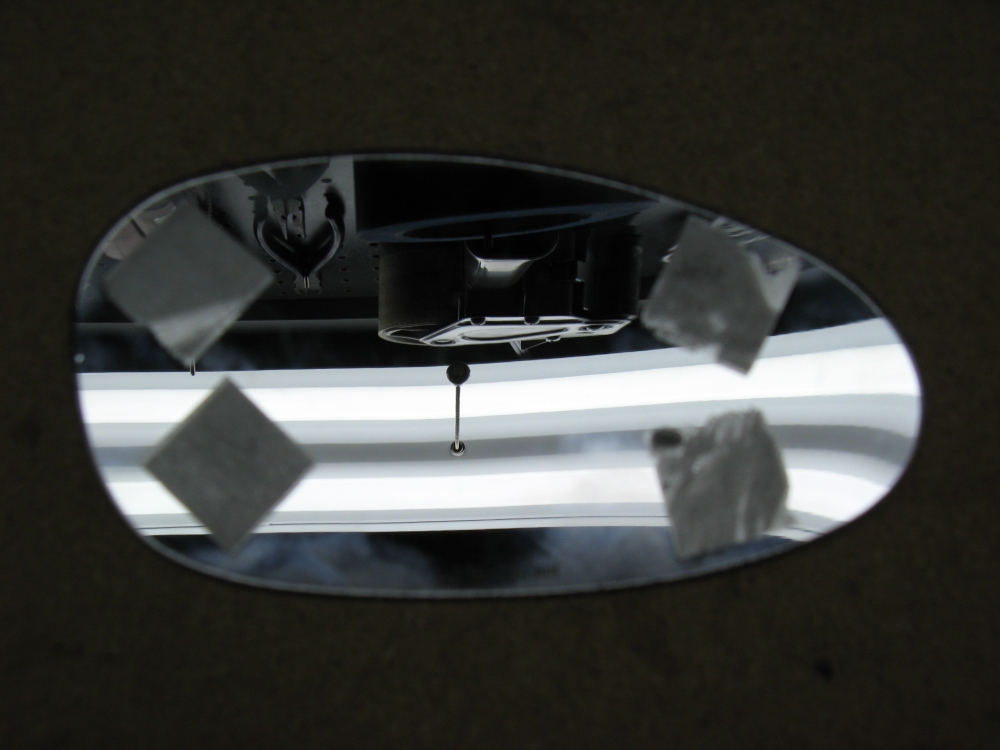
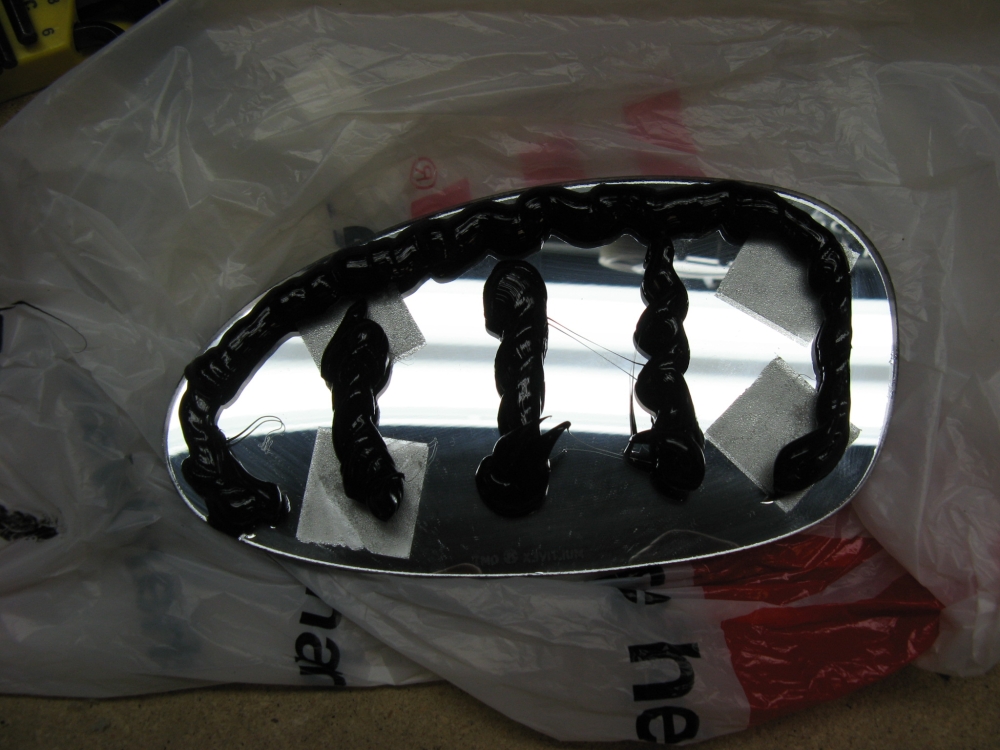
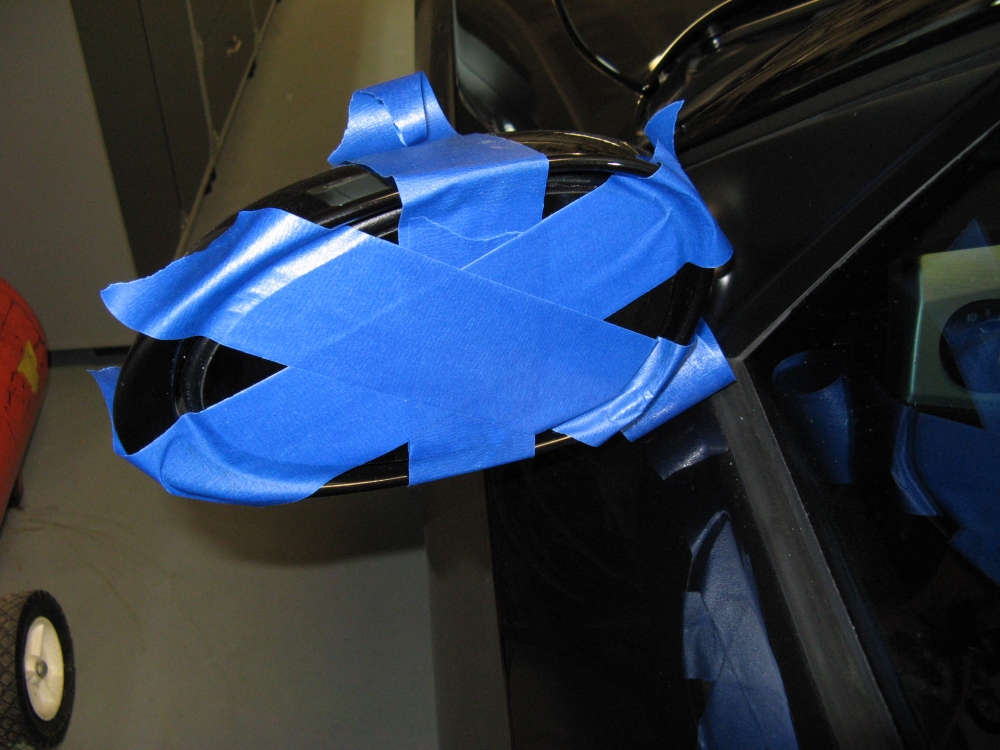
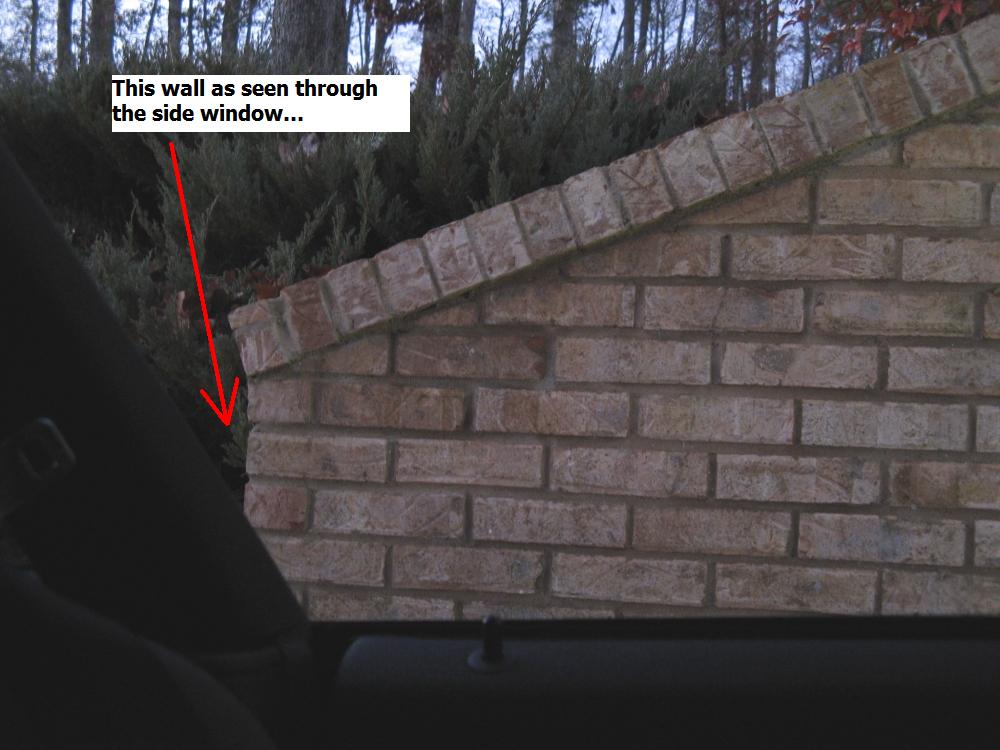
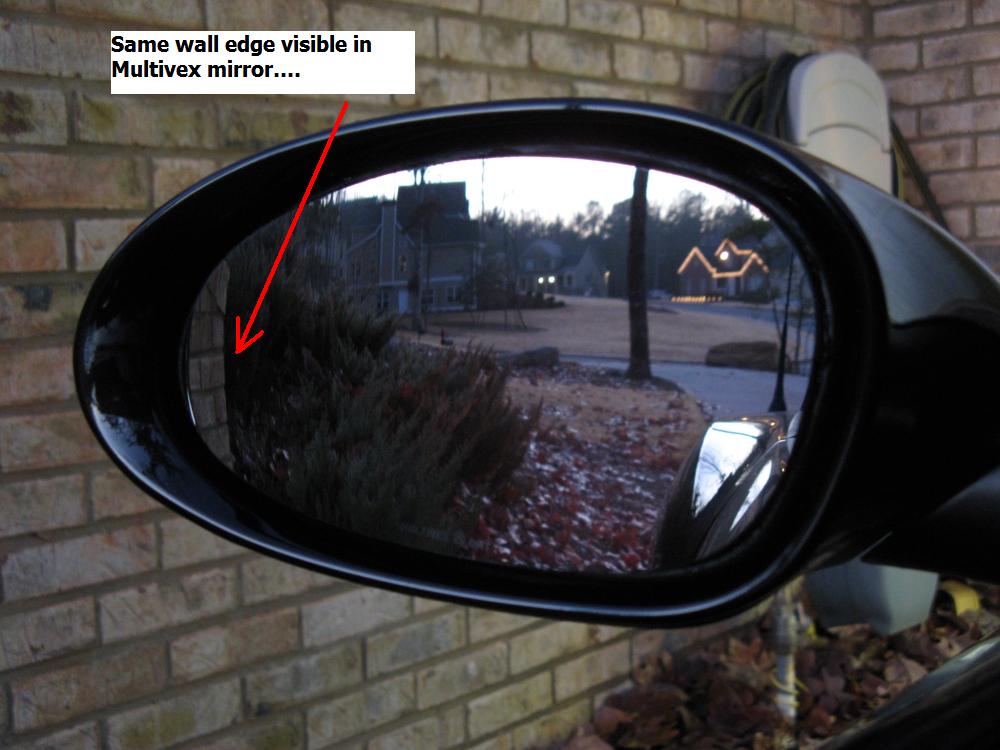
MultiVex Mirrors
, aspherical mirrors that greatly reduce blind spots. The standard Z4 P/Ns (24075LH-24076RH) are used. The mirrors come with double sided tape but this does not allow the mirror to sit semi-flush to the existing mirror.
So, the tape is removed and silicone sealant (black) is used around the top/sides/middle to attach the Multivex mirror to the existing mirror; leaving the bottom open
allows for condensation and heat to escape. Excess sealant is easily cleaned up before cure time is reached. These convex mirrors allow for anything not directly visible
out of the side window to display in the mirror- no more blind spots.
If you want to remove the mirror glass to install these, the TIS instructions can be found HERE.

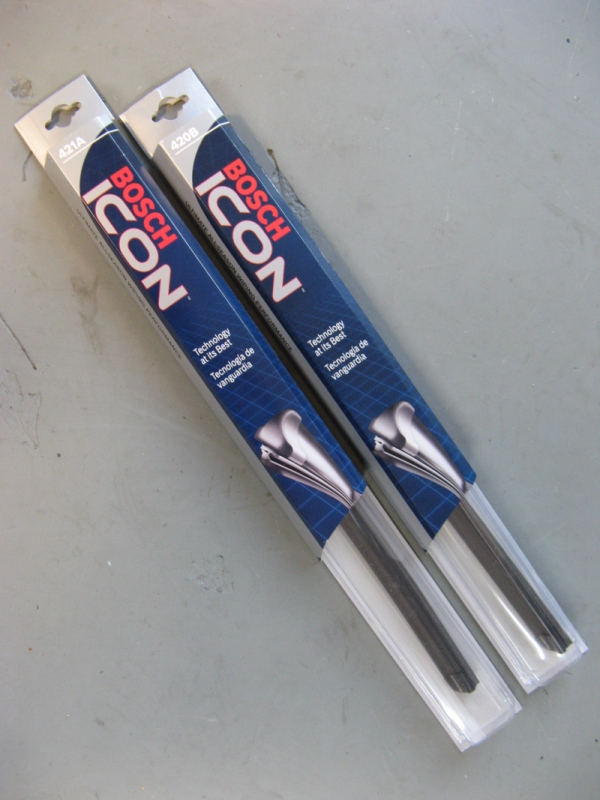
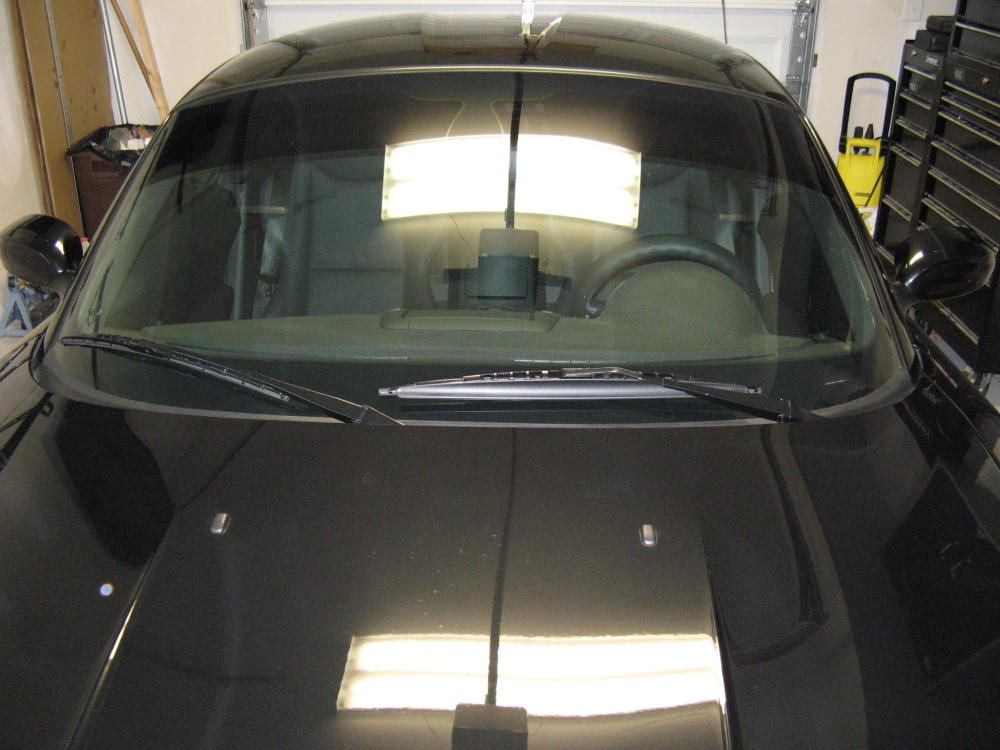
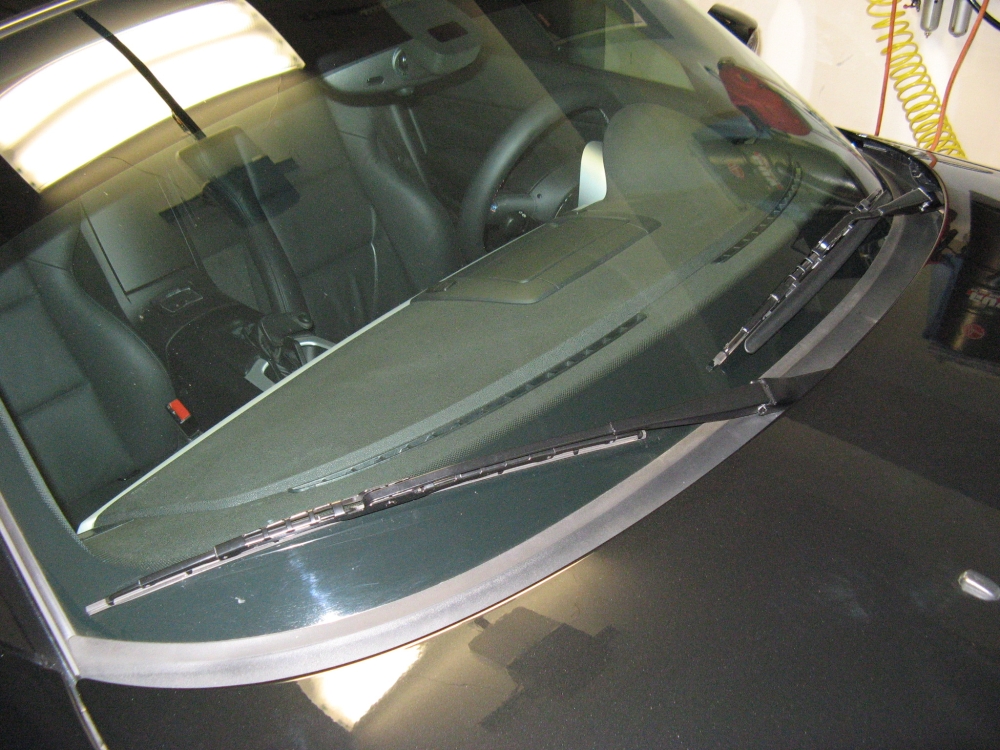
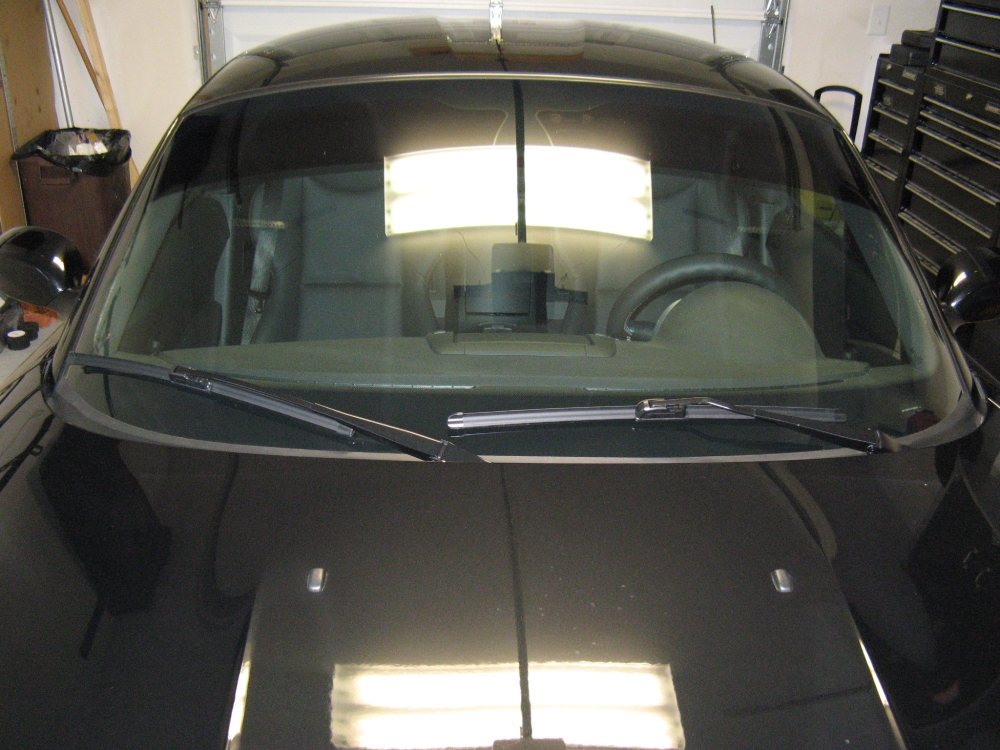
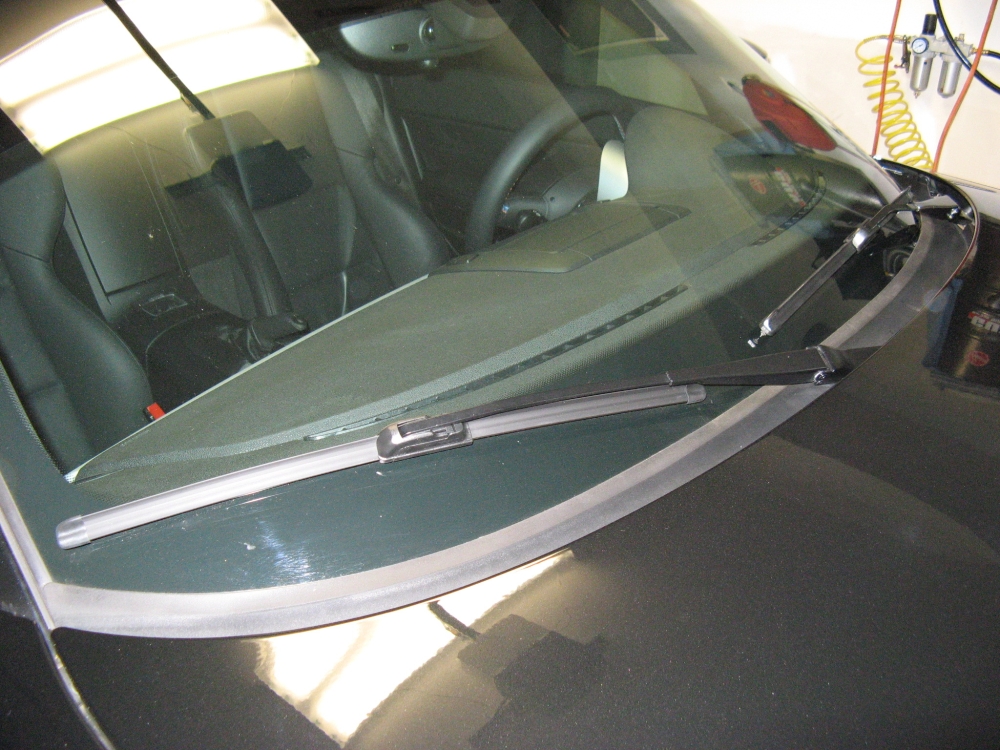
Bosch ICON wiper blades (P/N 421A [Driver] and 420B [Passenger]) from AutohausAZ. As beautiful as the Z4M Coupe is, BMW left a LOT on the table where aesthetics are concerned when they chose wiper blades. The Bosch ICON wipers look better and should offer the same or better performance, before and after pics:
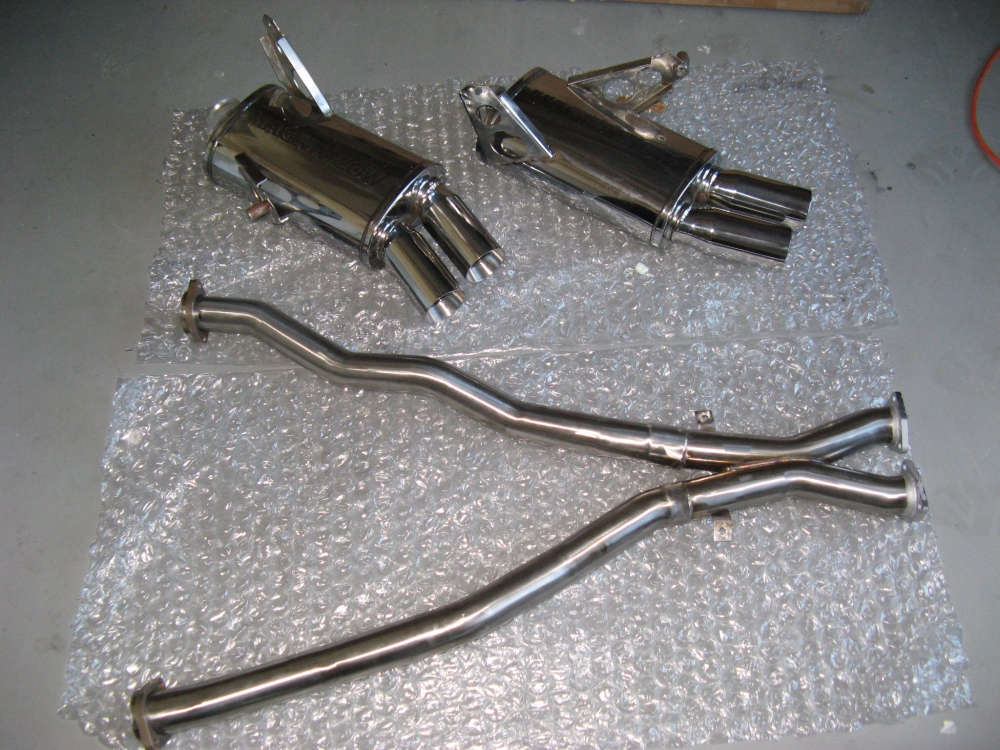
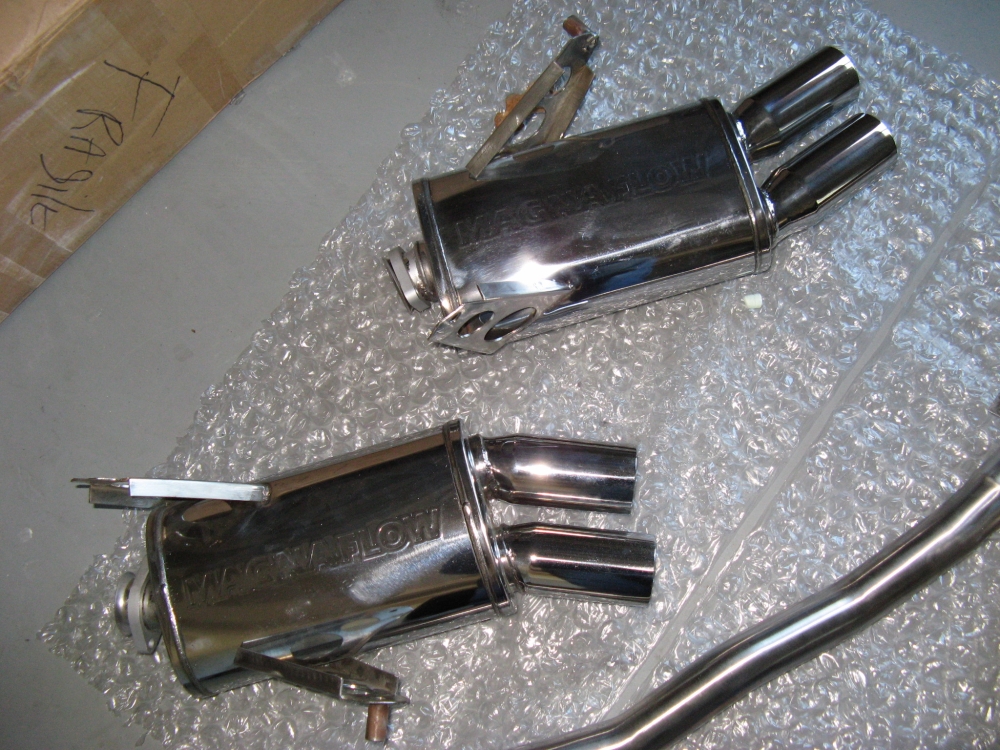
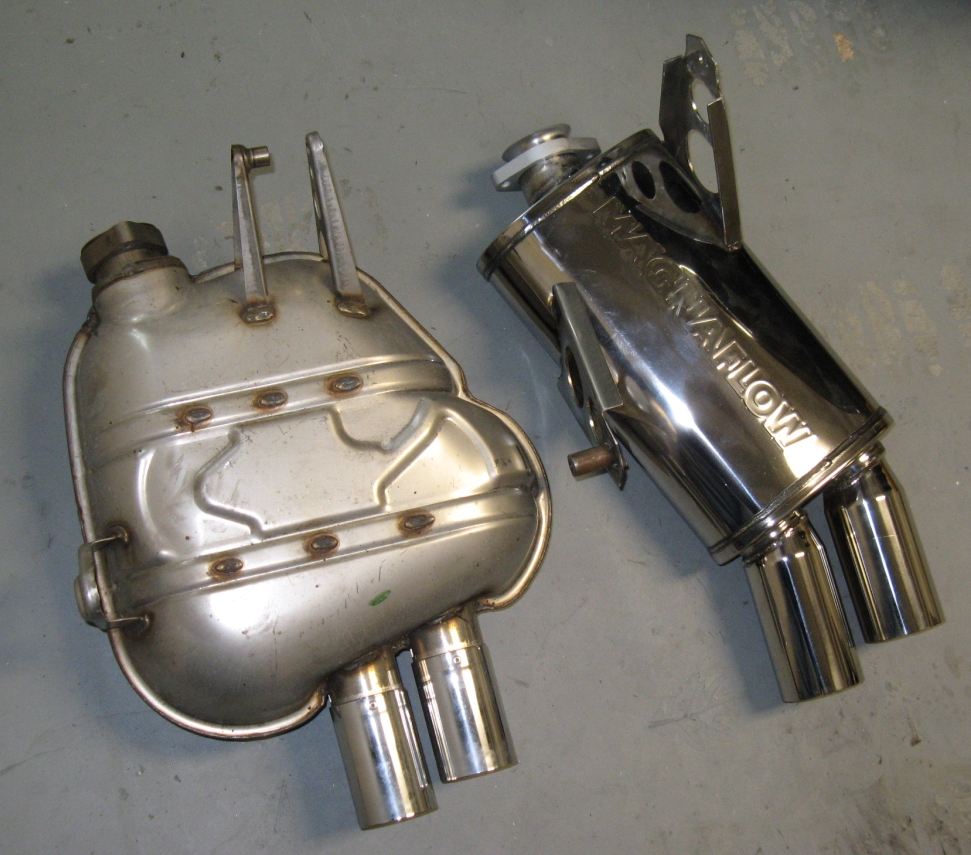
BMS Performance Exhaust using
MagnaFlow parts on the way. I ordered the Stage II which consists of a replacement X-pipe as well as all other piping/mufflers from the secondary cats back.
My DIY guide can be found HERE for exhaust removal and replacement. The exhaust sounds great, a low rumble at idle
that gets sinister on throttle- 8 HP and 15 FPTQ according to BMS dynos. The stock mufflers weigh 19 lbs each/midpipe 13 lbs compared to the BMS replacements,
mufflers 11 lbs each/midpipe 10 lbs- net weight reduction is 19 lbs.
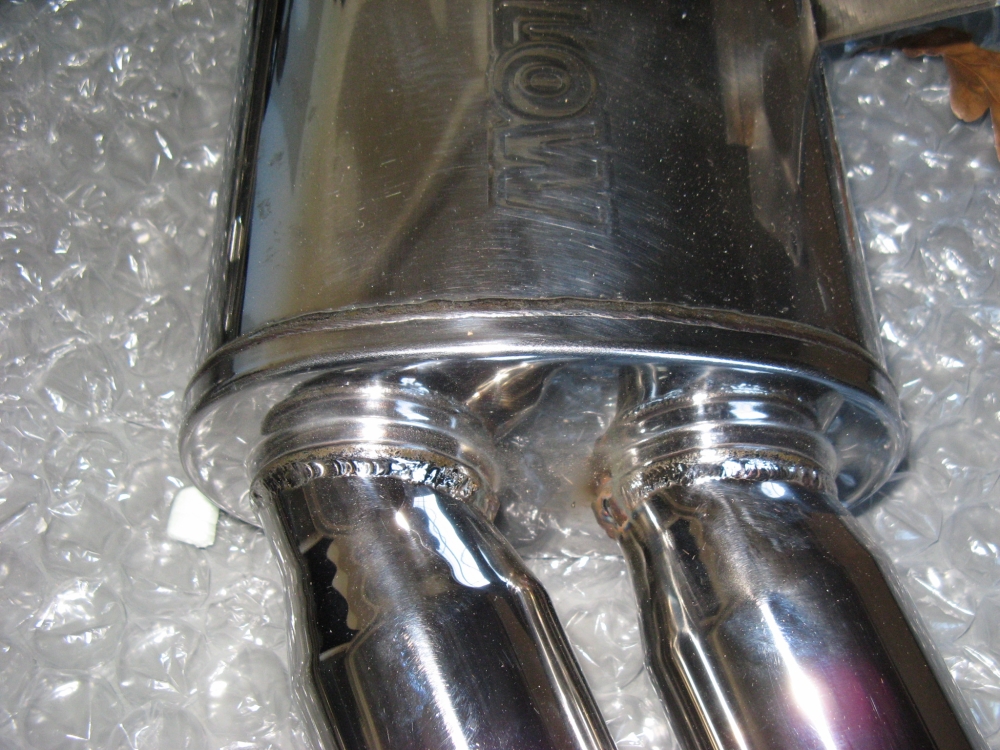
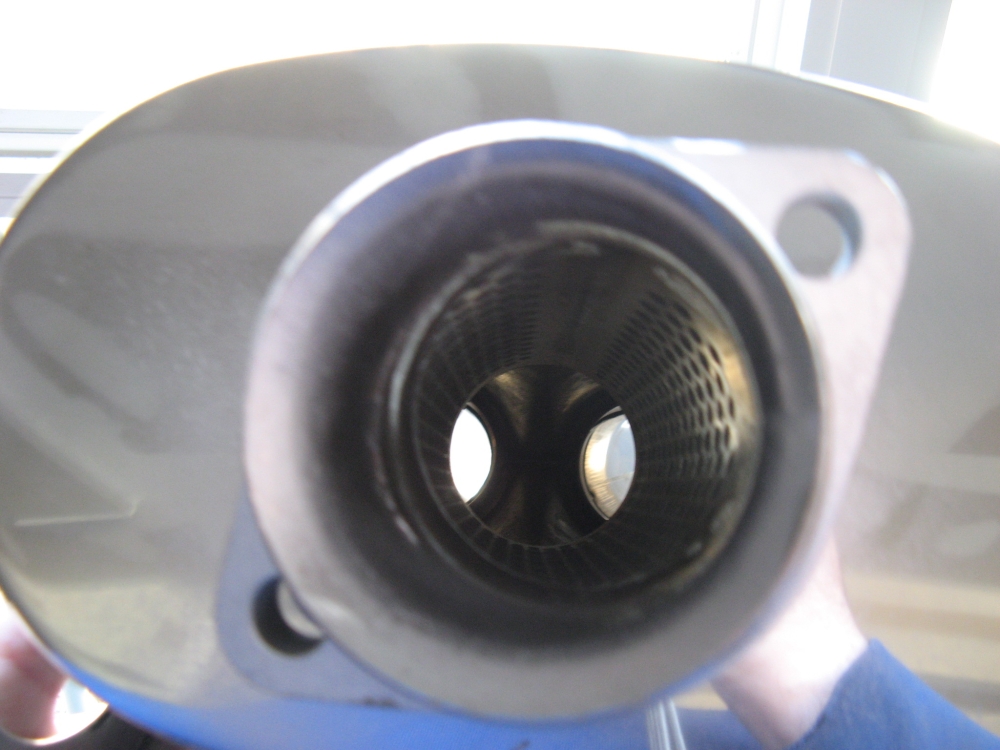
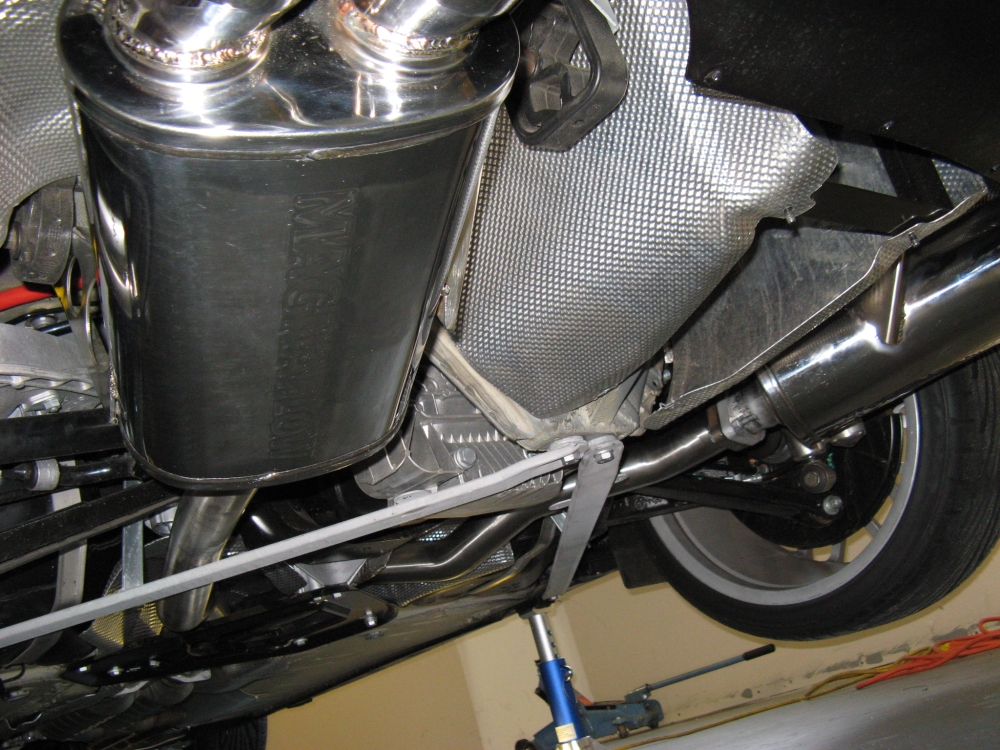
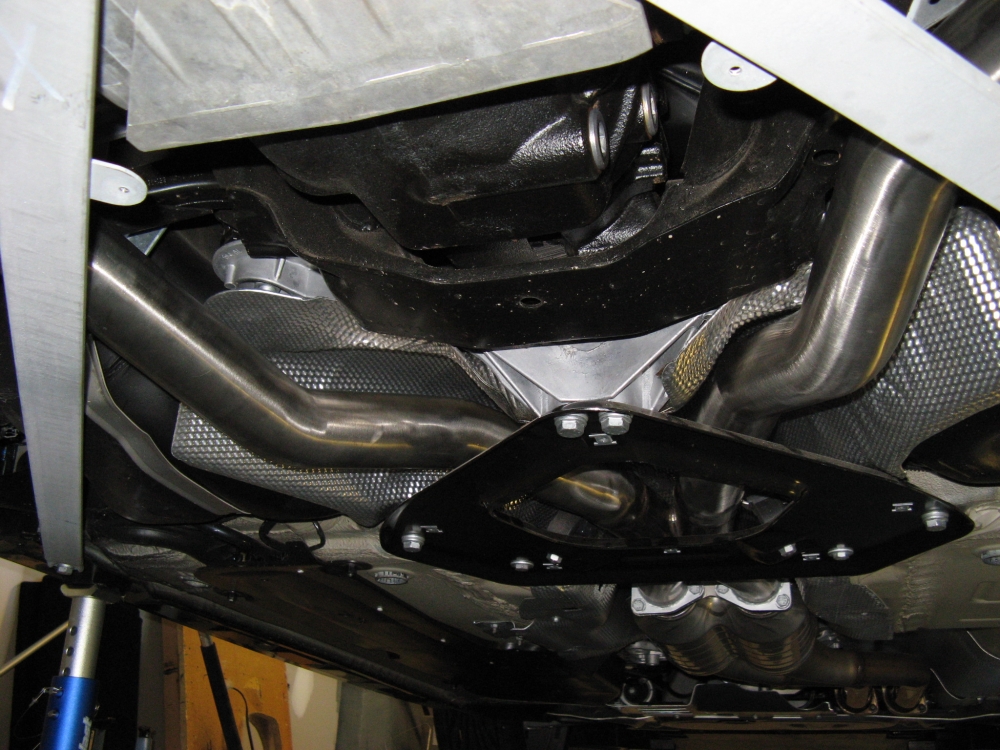
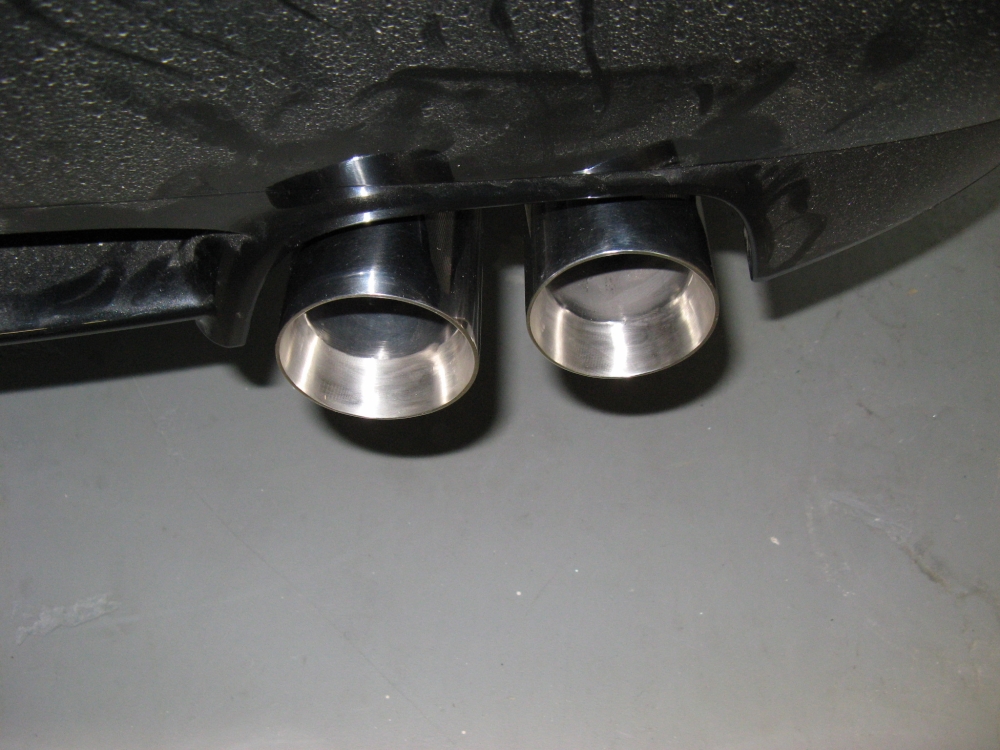
PICs L to R: BMS exhaust system components, internal view of MagnaFlow muffler,
comparison of OE to BMS Muffler, some pics installed (including mountain drive test run pic ):


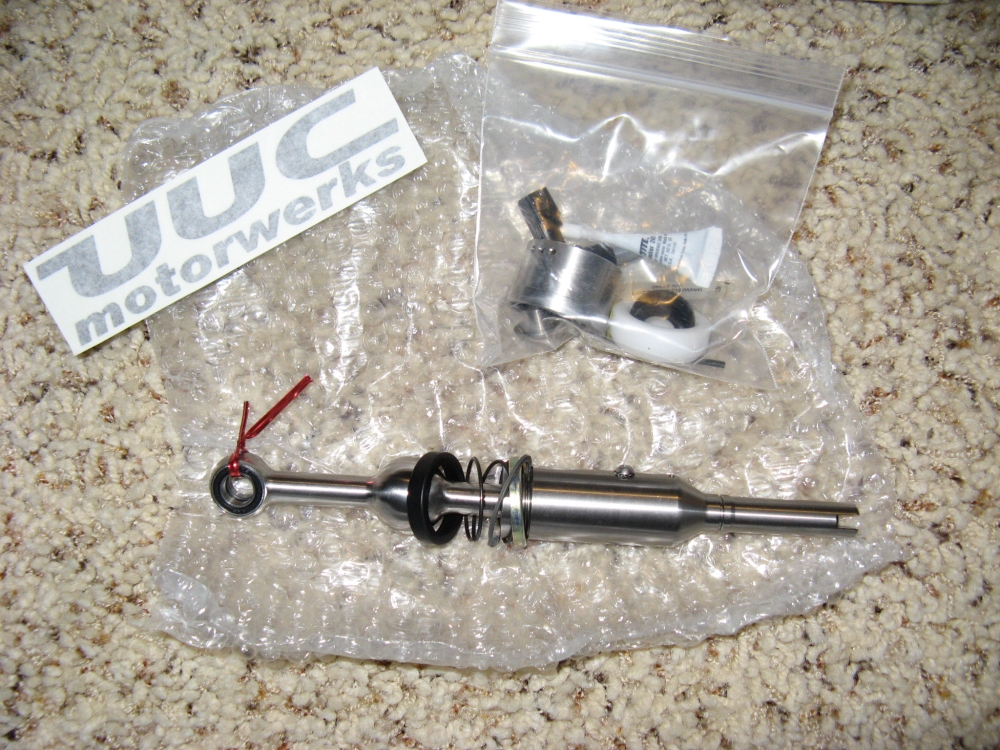
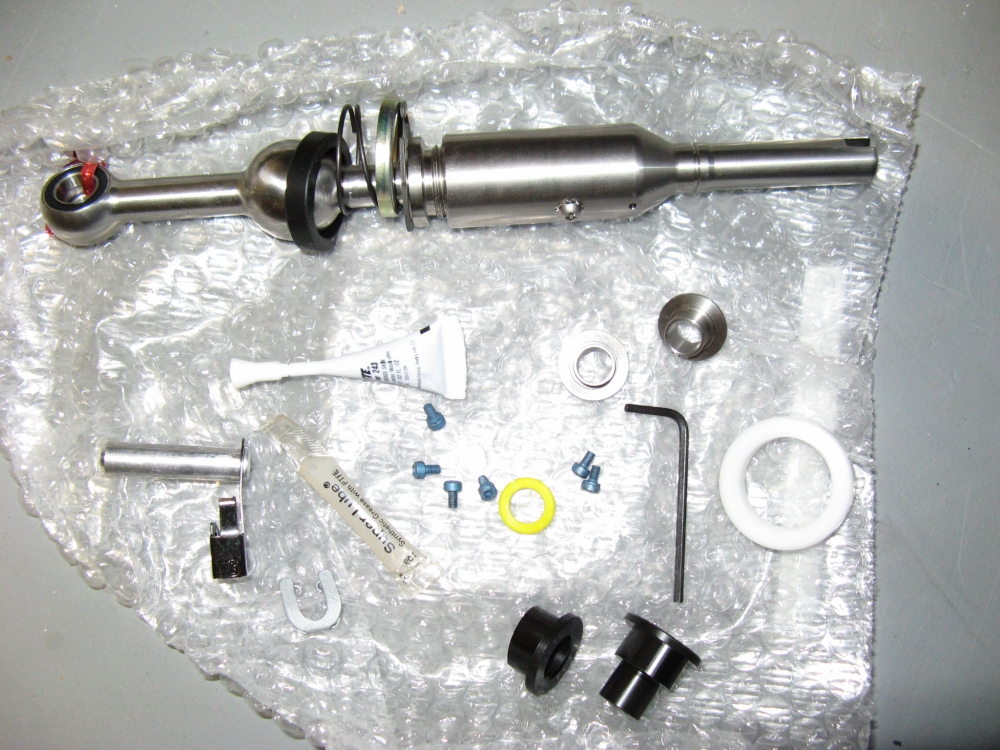
UUC Motorwerks
Evo3 short shifter (P/N UUCZ43). While the exhaust was out of the car it made sense to go ahead and install this. This shifter is a little shorter than OE but SO much more precise, definitely a worthwhile mod.
I have assembled a DIY guide
HERE, UUC installation instructions HERE.
Pics: Sloppy OE shifter, Evo3 Height Adjustability, parts comprising the Evo3, installation view from top/bottom, completed installation, shifter after
shift knob insert chamfer and more
mountain pics from test drive after installation.
[EDIT] The UUC shift knob is designed to go no farther on the shifter than the ridge above the clip recess. I decided to chamfer the edges of the Delrin insert up to the
set screw to allow the shift knob to be flush with the top of the boot- this was done with careful application of a Dremel tool.
So far this seems to work fine but it does require some fitting to get right so that the
set screw makes full flat contact with the shifter rod and not the ridge. Pursue at your own risk
Coco Mats
installed to replace OE mats. These mats are superior in every way: thick and stable with more coverage, I'm sure they will last a long time as well.
Mercedes Benz Magazine wrote an article about the company HERE.

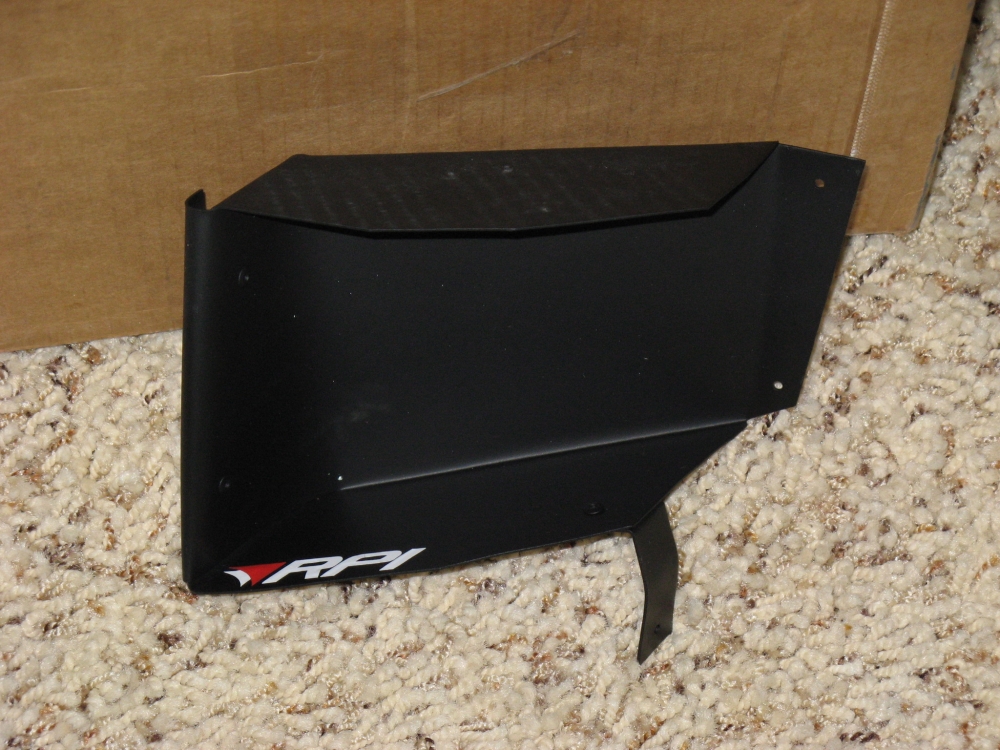
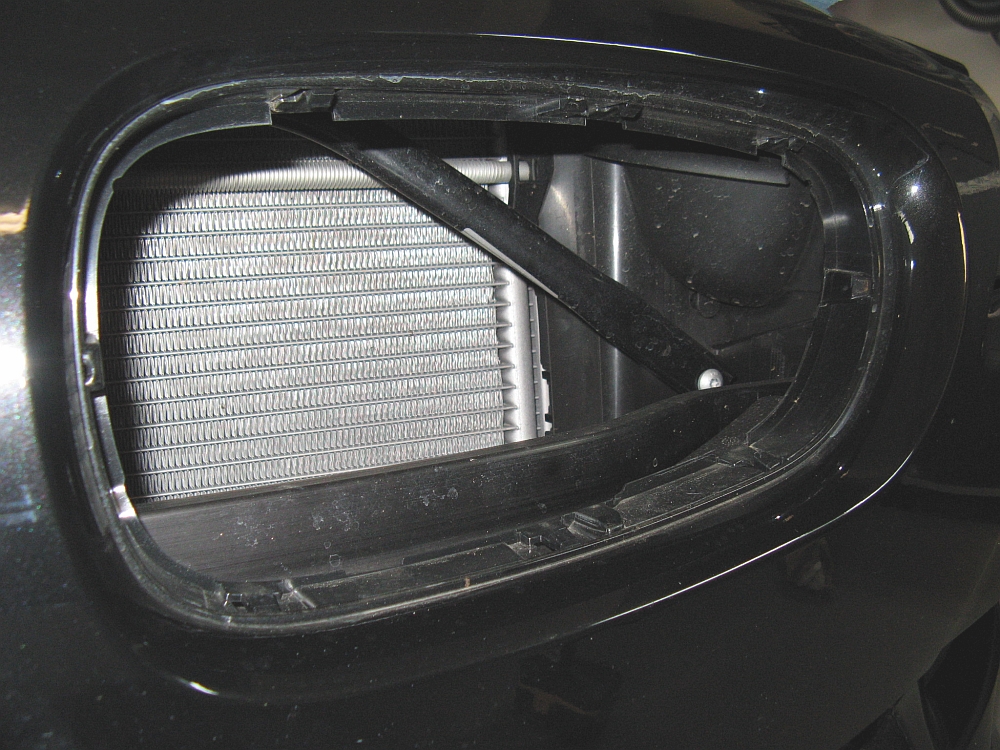
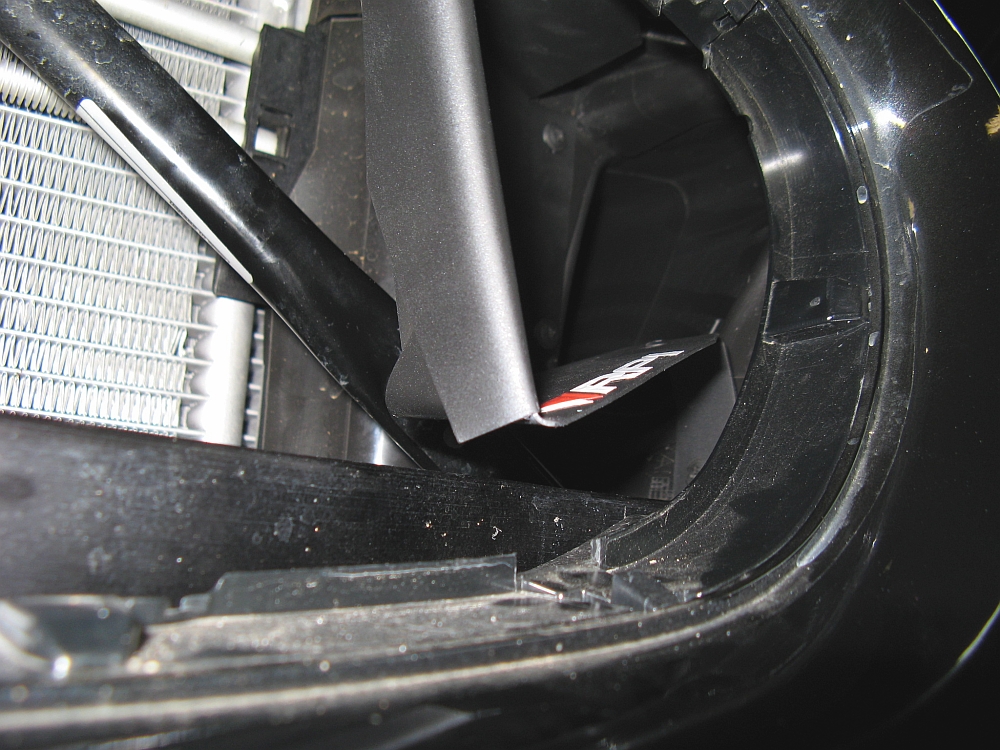
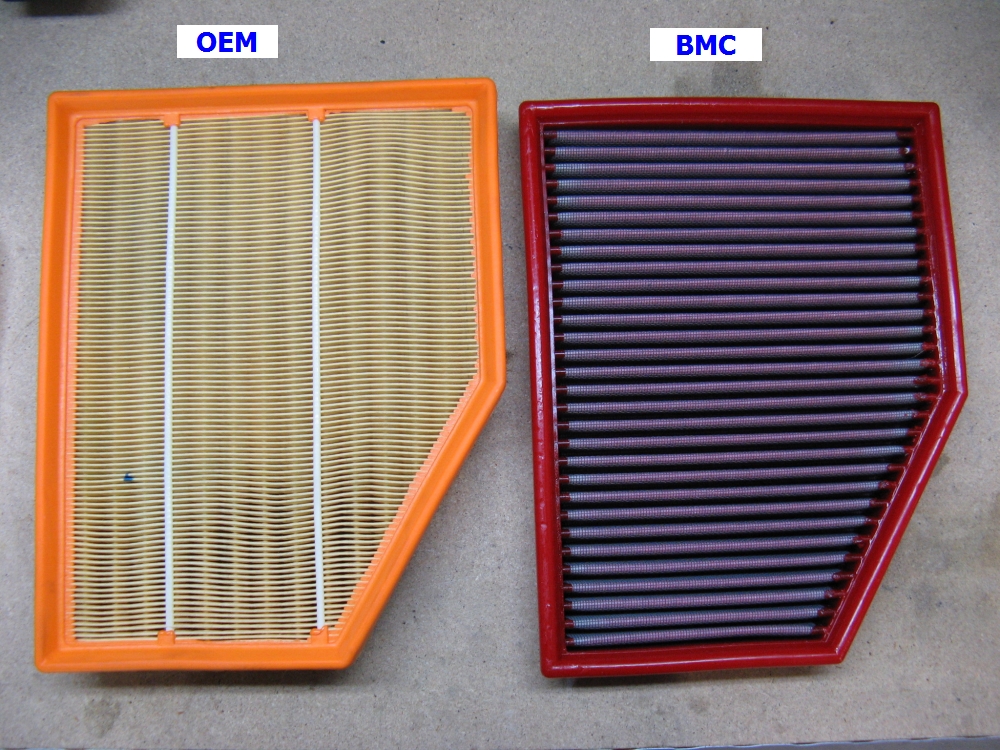
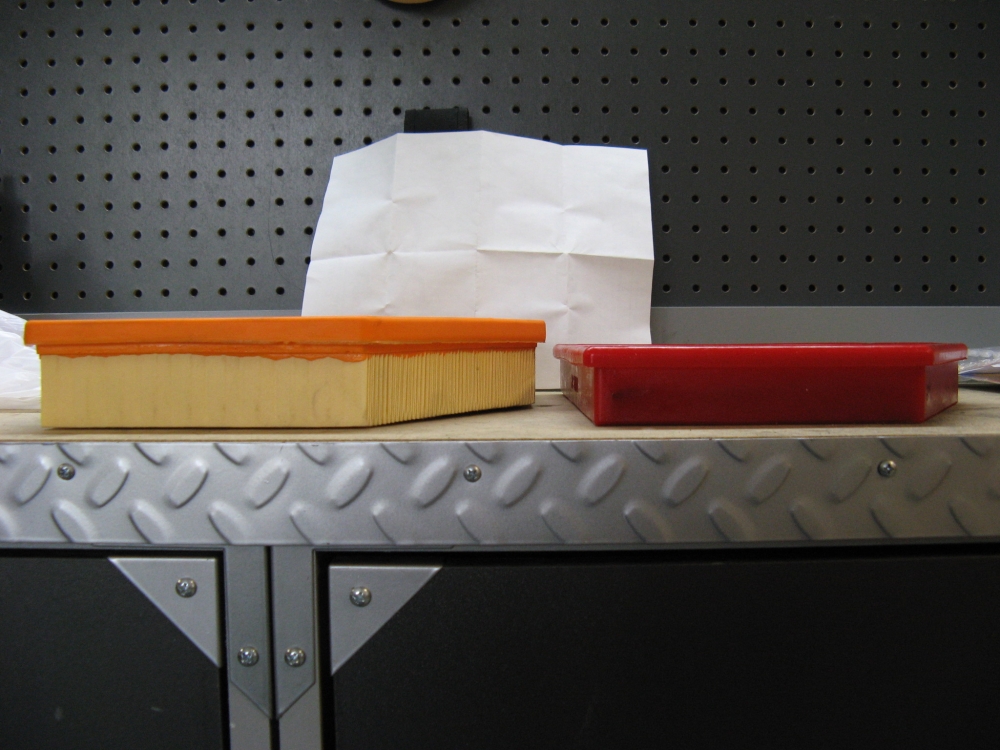
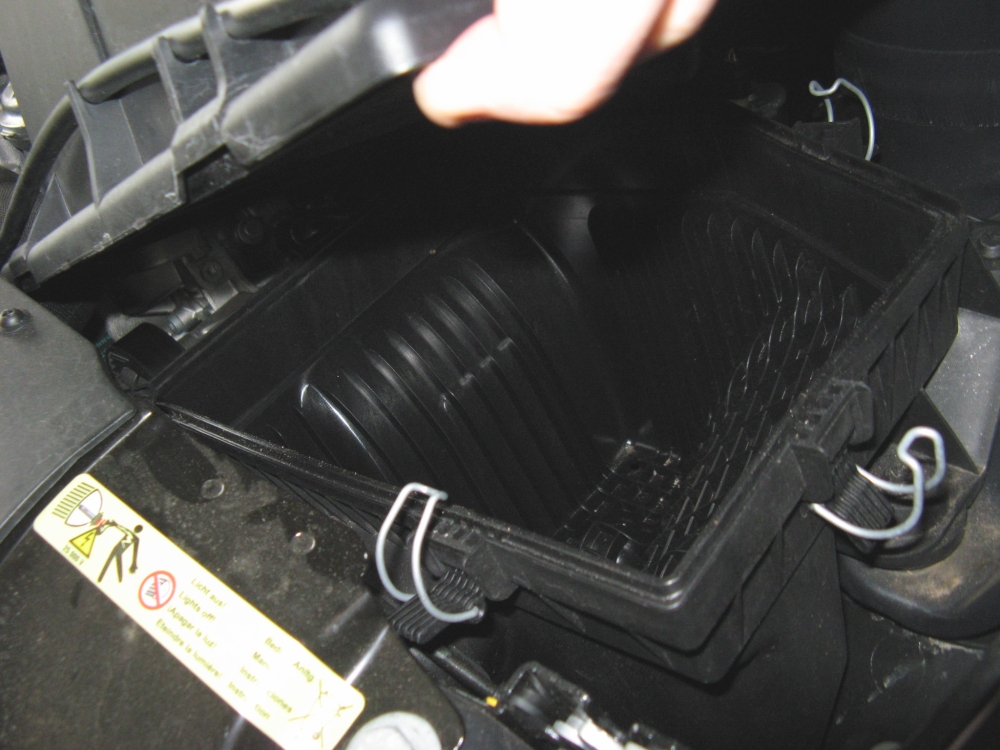
Race Precision (RPI) ram air scoop installed. RPI Installation instructions HERE.
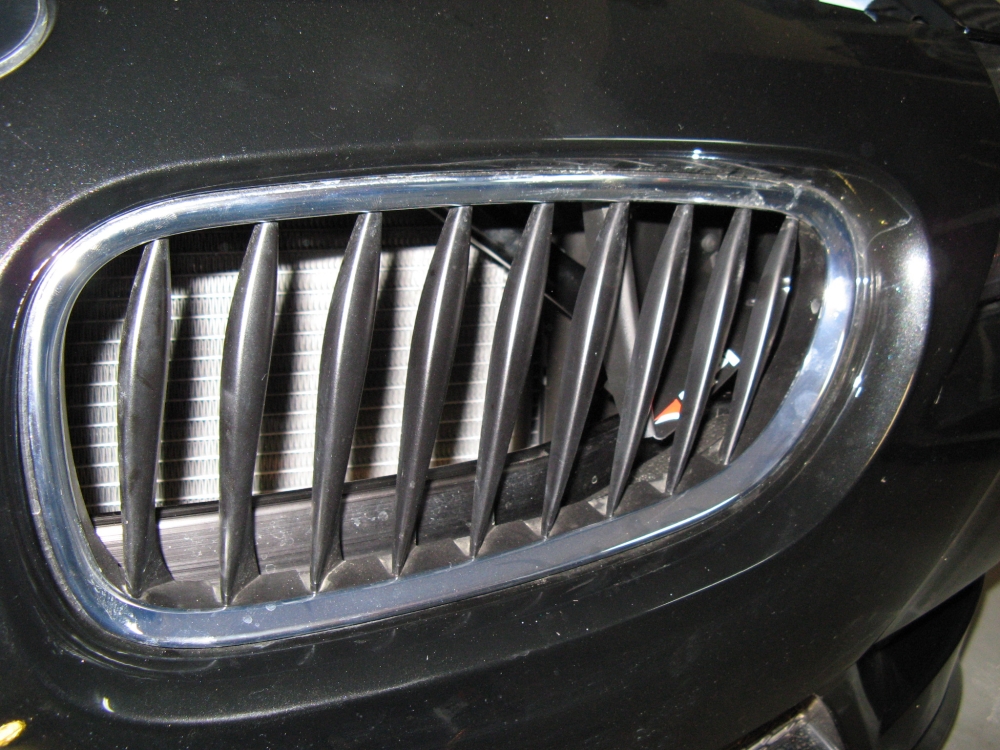
I found the driver's side grille came off easily by tugging on the left and right sides, it is held to the bumper with clips around the perimeter.
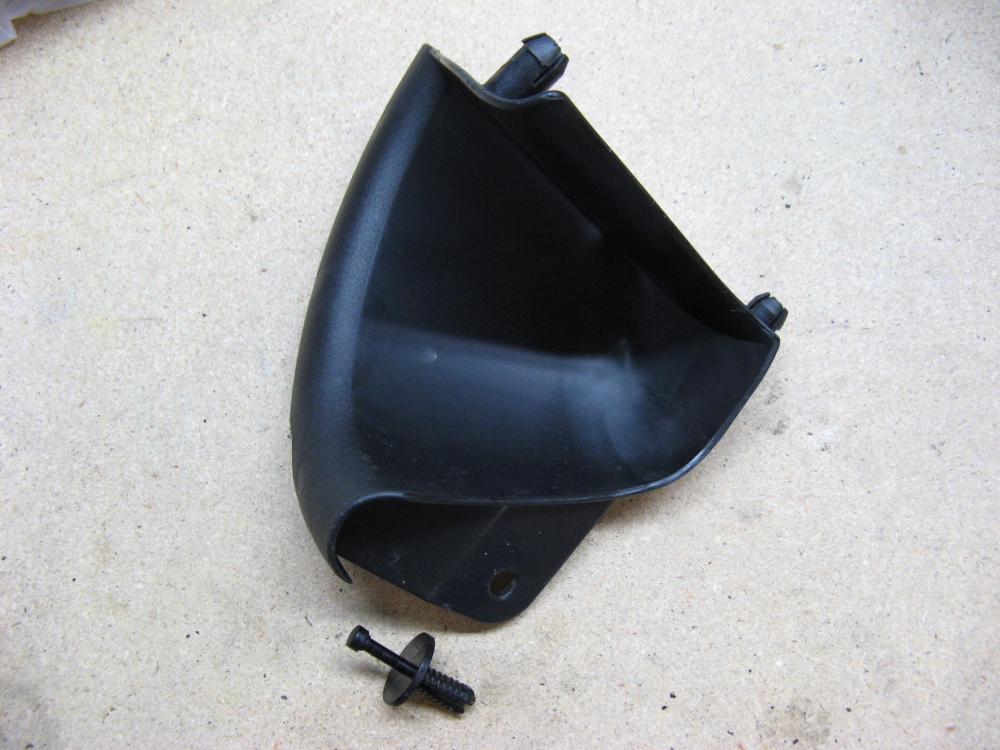
After pulling the front mounting pin for the OE scoop, the rear snaps out (2 snaps). I test
fit the scoop a few different ways before deciding how it would mount. Before mounting I noted where the scoop made contact with the top of the grille
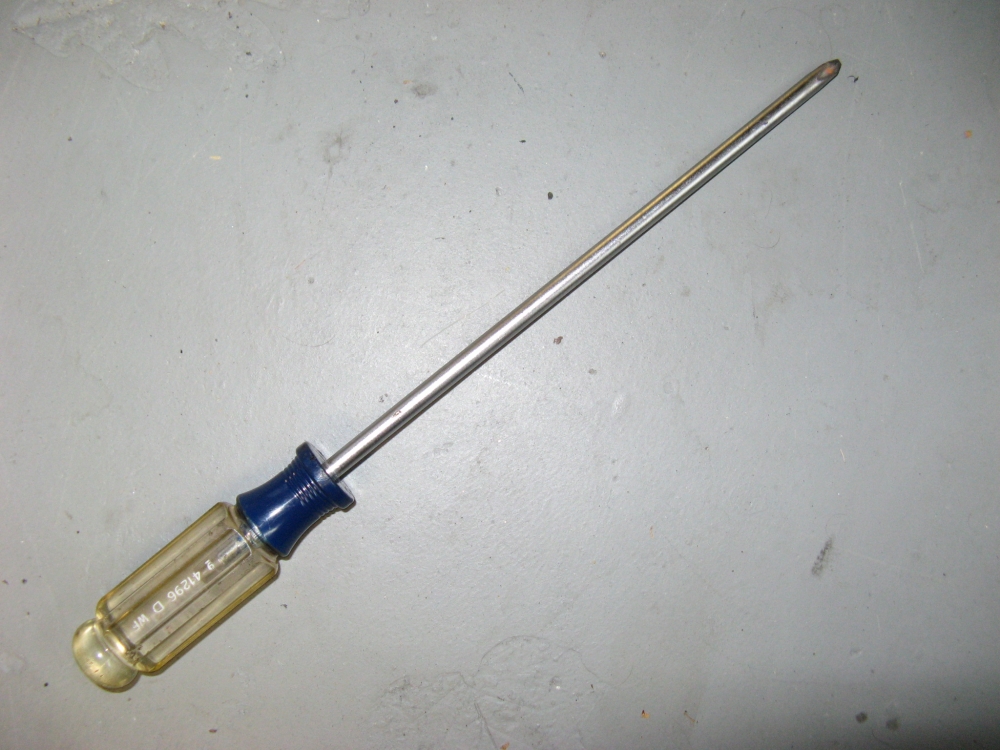
opening and the support bar behind it and placed felt tape on the scoop in those areas to minimize hard contact/abrasion and noise. The mounting screw holes were tight enough that all three screws could be started in the scoop before placement, and then using a long screwdriver could easily be installed by hand/feel (no hunting for the screw hole after the fact). Once installed, the scoop is not easily noticeable. The car does seem to pull more consistently/harder through the climb to redline with the RPI ram air scoop installed:


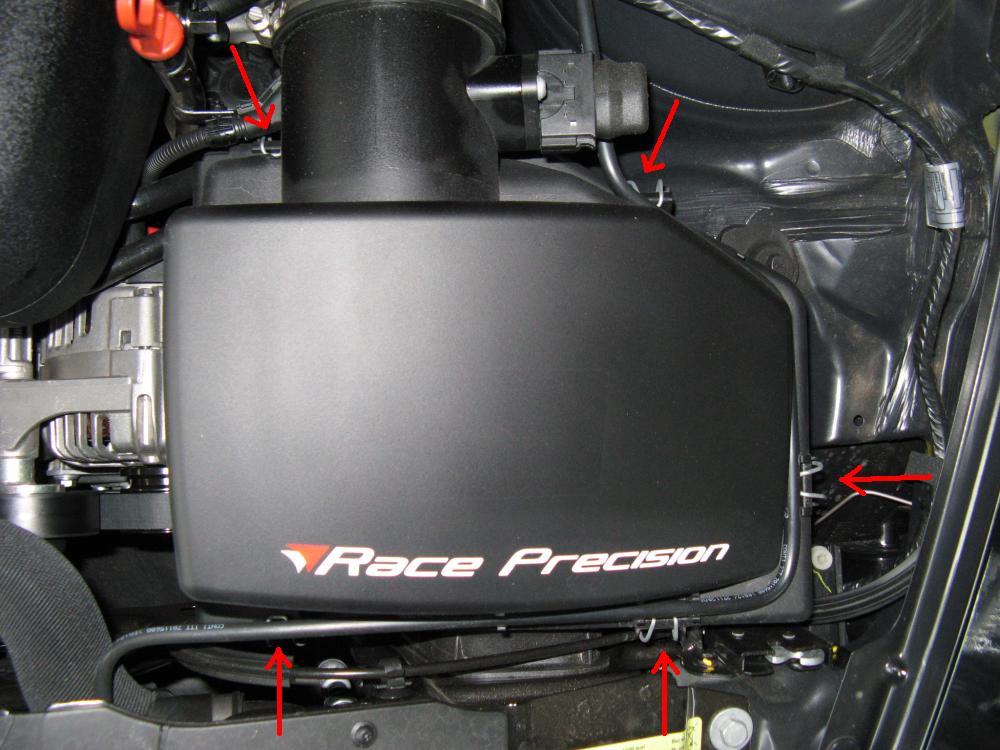
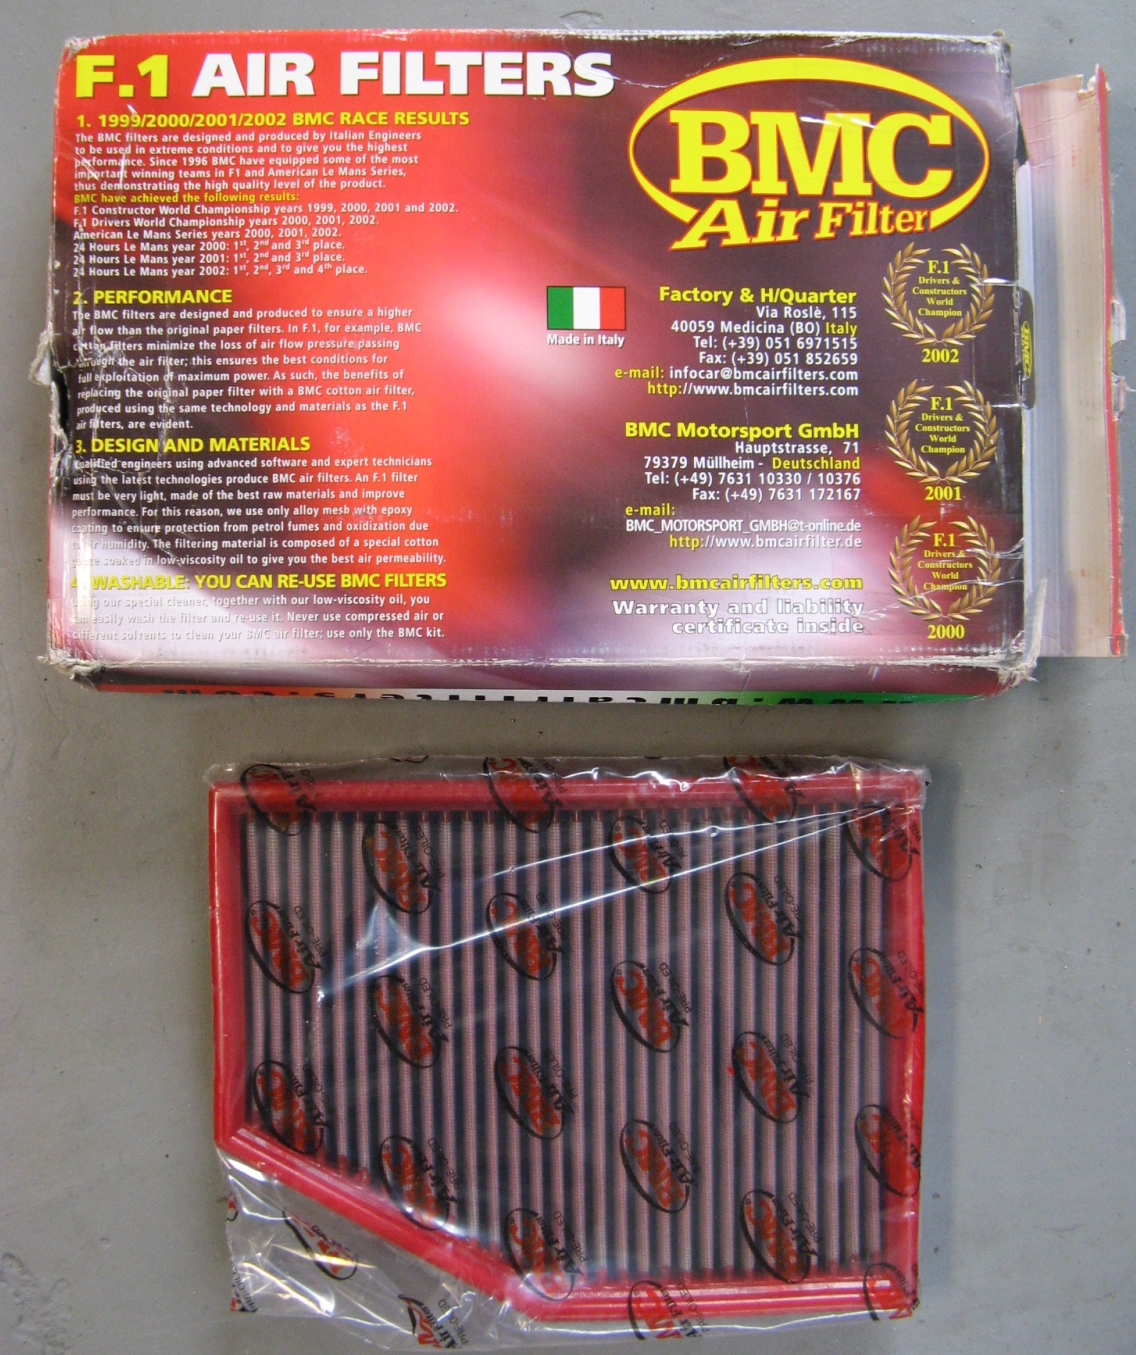
As part of the above RPI Ram Air package, a new BMC air filter was included. The five clips holding the airbox cover on were released to remove the OEM filter and install the BMC filter, easy to see when comparing both how better performance from the air filter is possible:


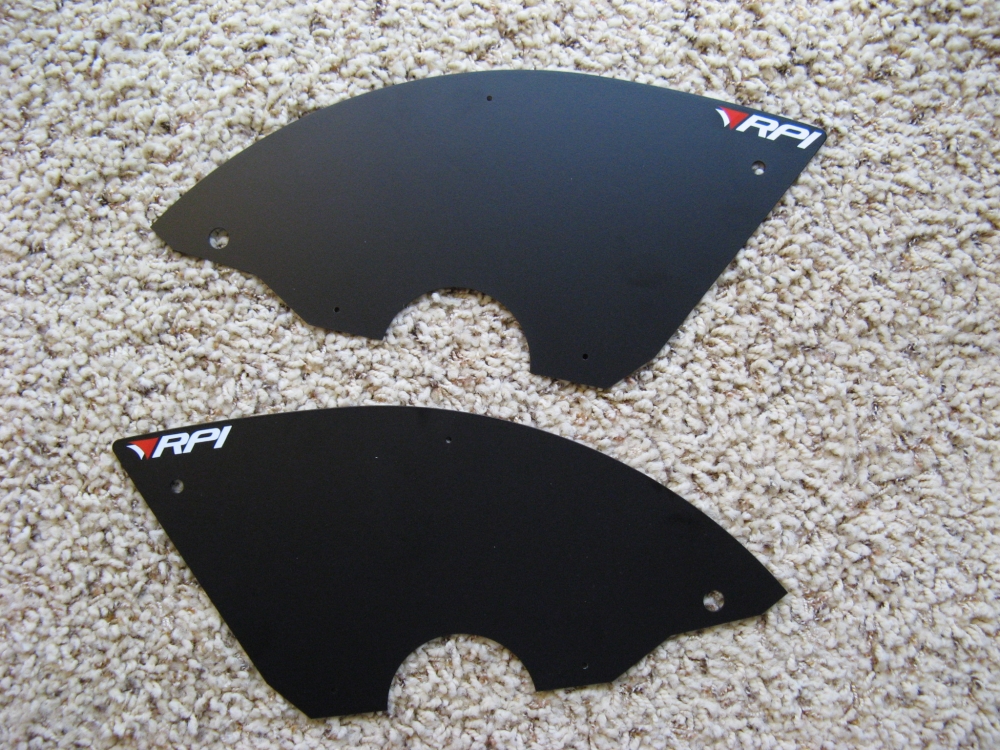
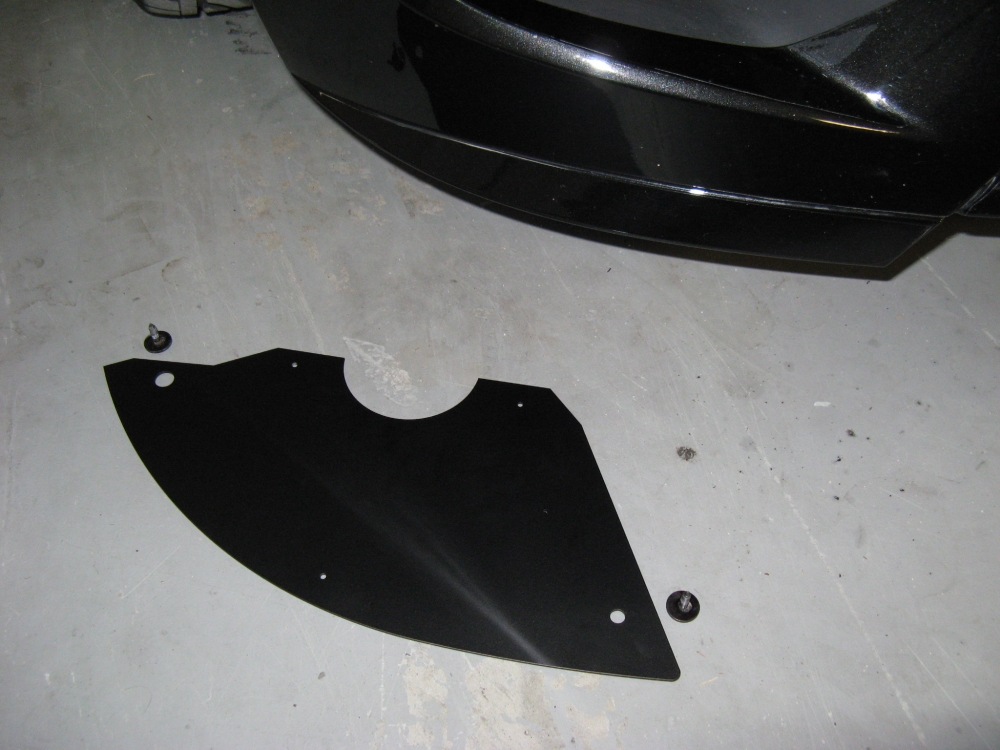
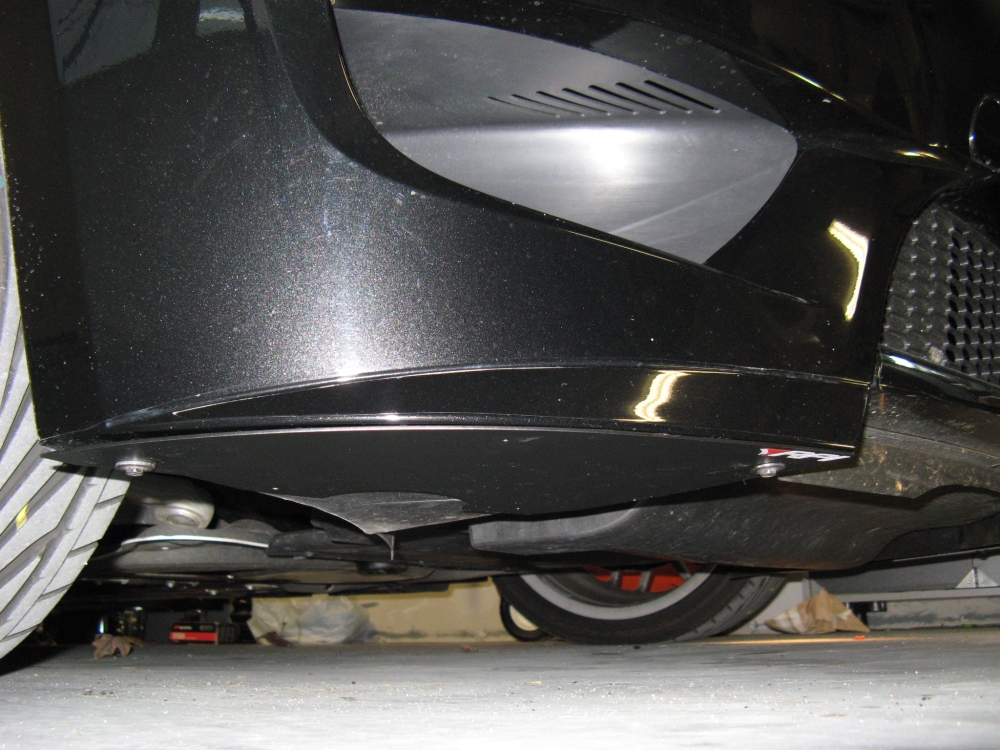
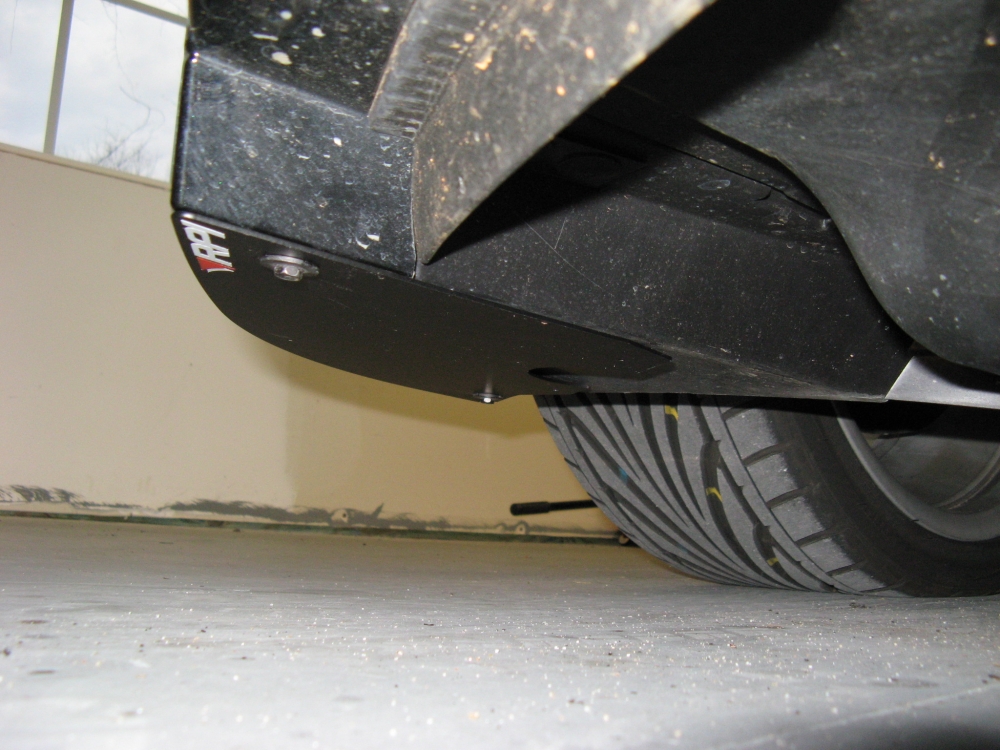
Race Precision (RPI) skid plates installed. These skid plates add some protection to the bumper "fangs" and some peace of mind. Two OE screws are removed using an 8mm socket or wrench and skid plates are installed using these two screws. I didn't even have to jack the car up for installation, an easy mod that takes about 5 minutes:

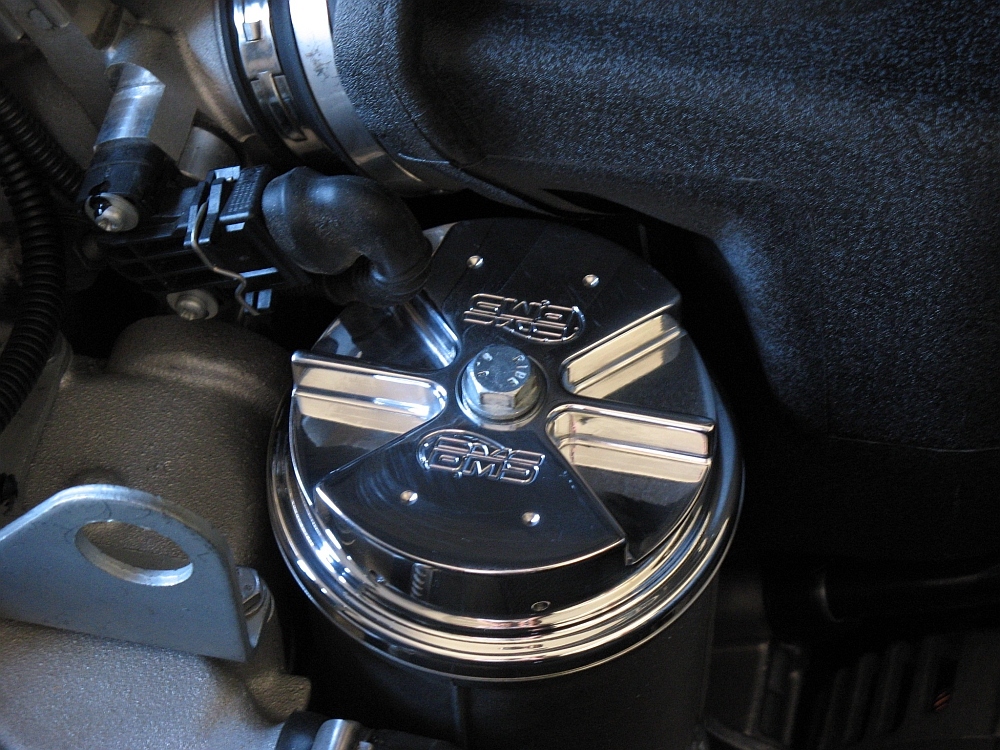
BMS billet aluminum oil filter housing lid installed. Polished for great aesthetics and should offer better heat displacement and a more rugged construction than the original cast filter housing lid. Easily installed by removing center bolt, remove OE lid, remove the OE lid O-ring seal, install O-ring seal on new lid, install new lid, and reinstall bolt (torqued to 24 lbs/ft):
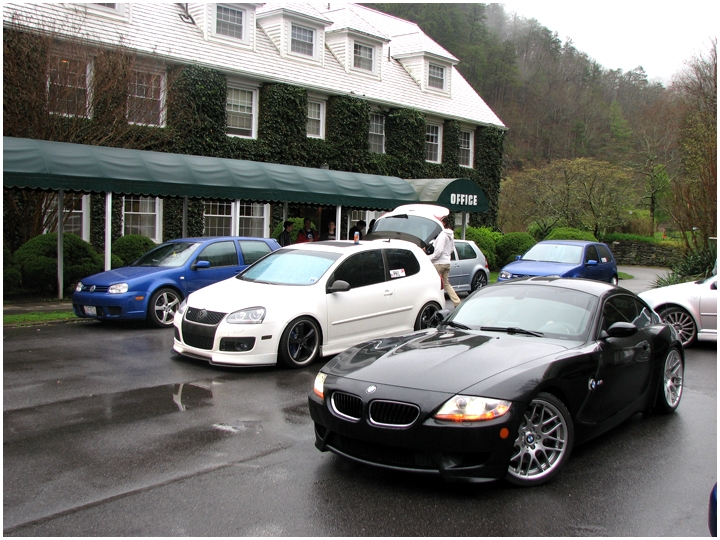
Spent some time with my VW R32 friends up at Tail of the Dragon (HWY 129) at the East Coast R GTG 2008. We drove all of the surrounding roads as well, Hellbender/Fontana Dam (HWY 28) and on the way up hit Wolf Pen Gap (HWY 180) in N. GA:


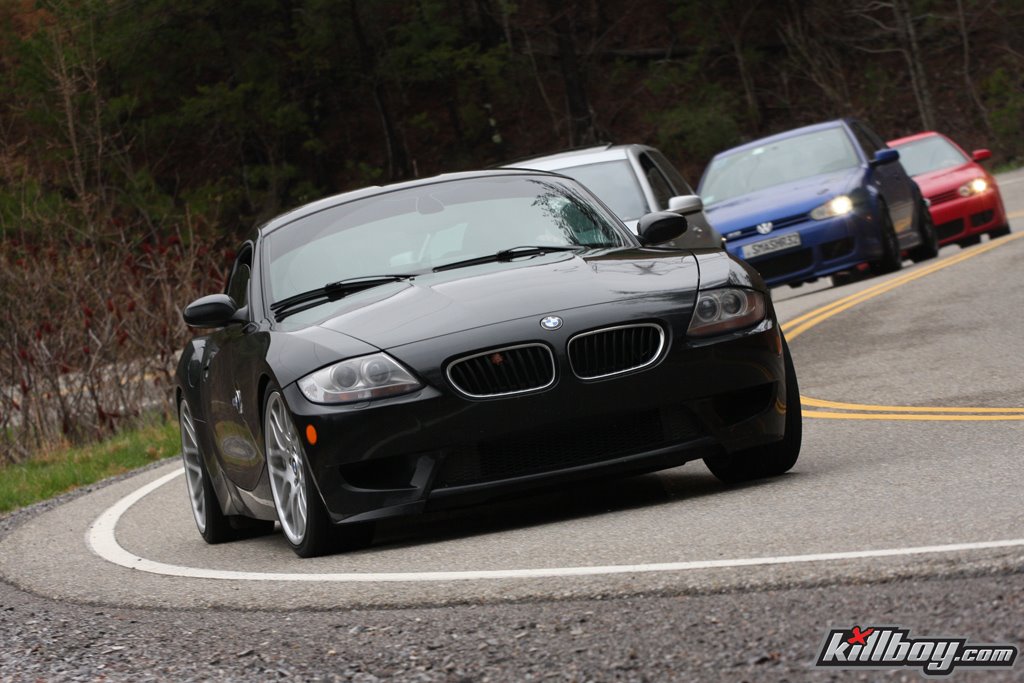
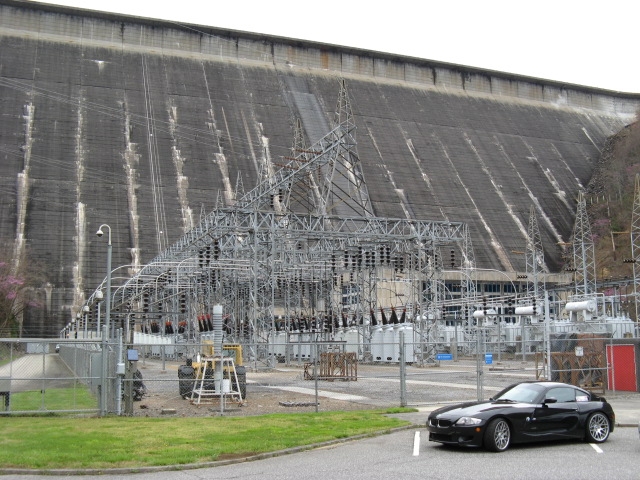
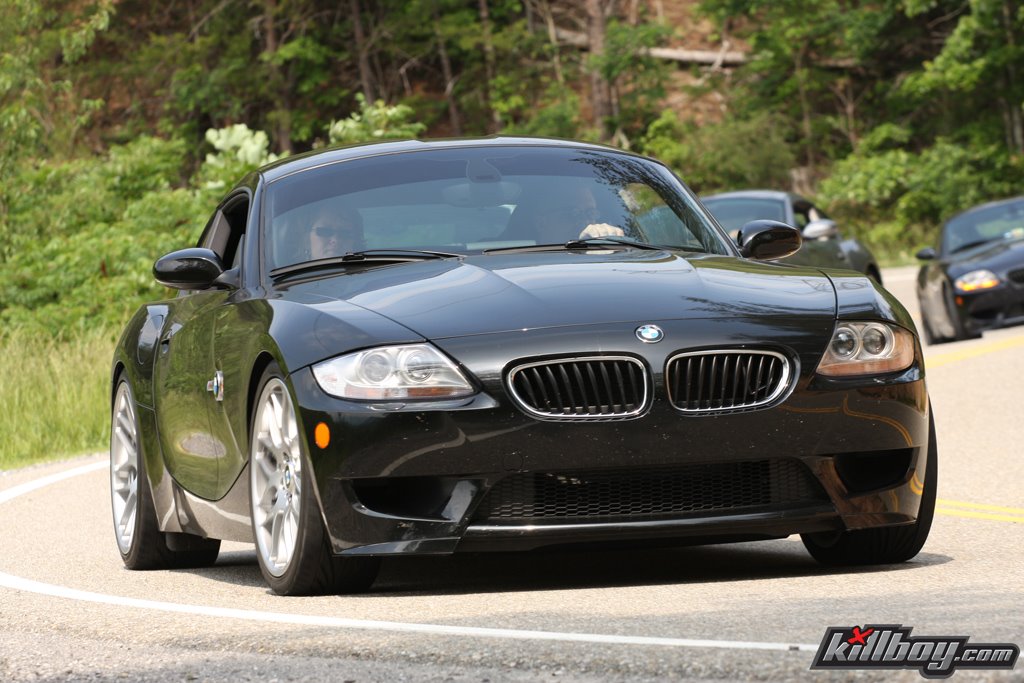
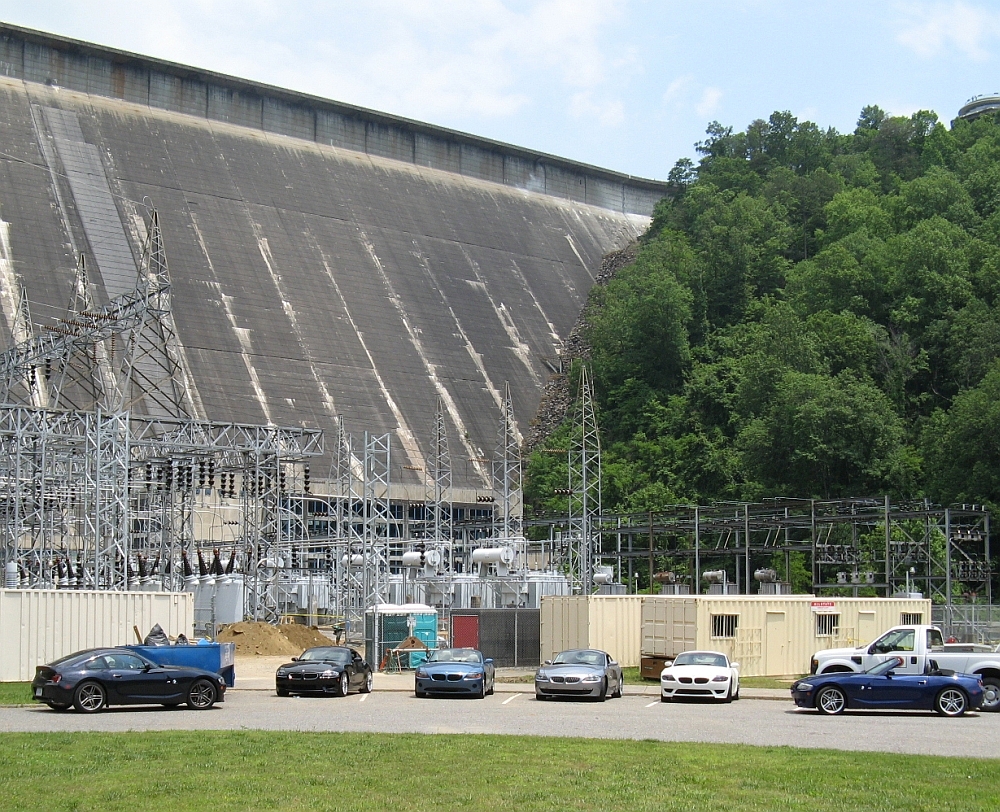
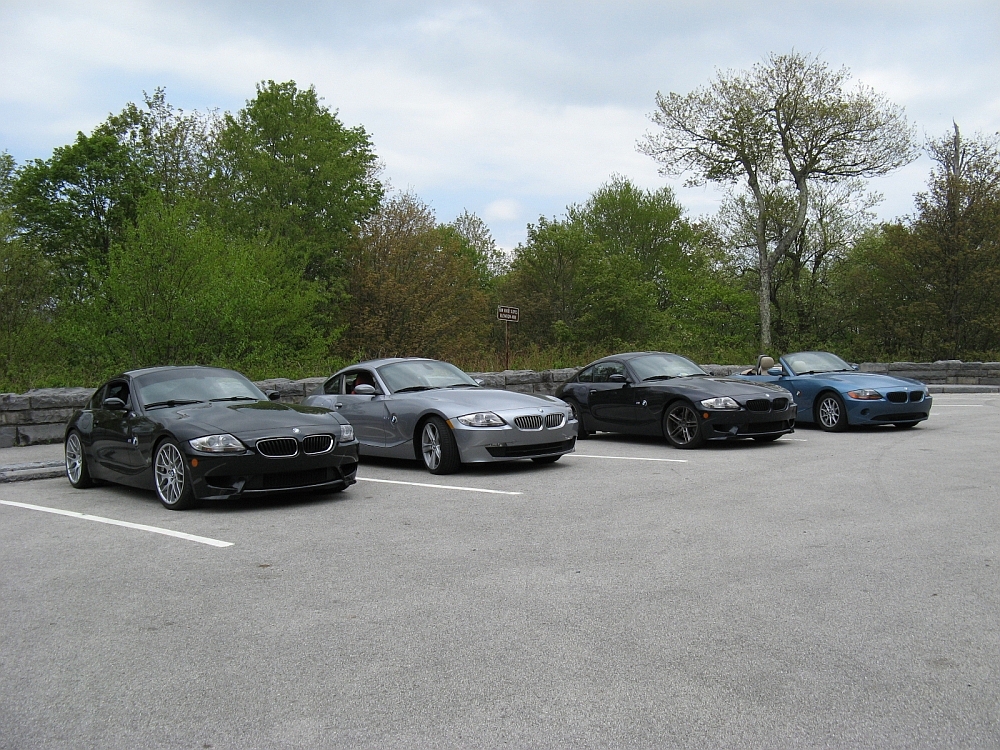
A few weeks after the R32 GTG, my wife and I met some fellow Z4 owners from the forums at Tail of the Dragon/Hellbender/Fontana Dam and did it again.


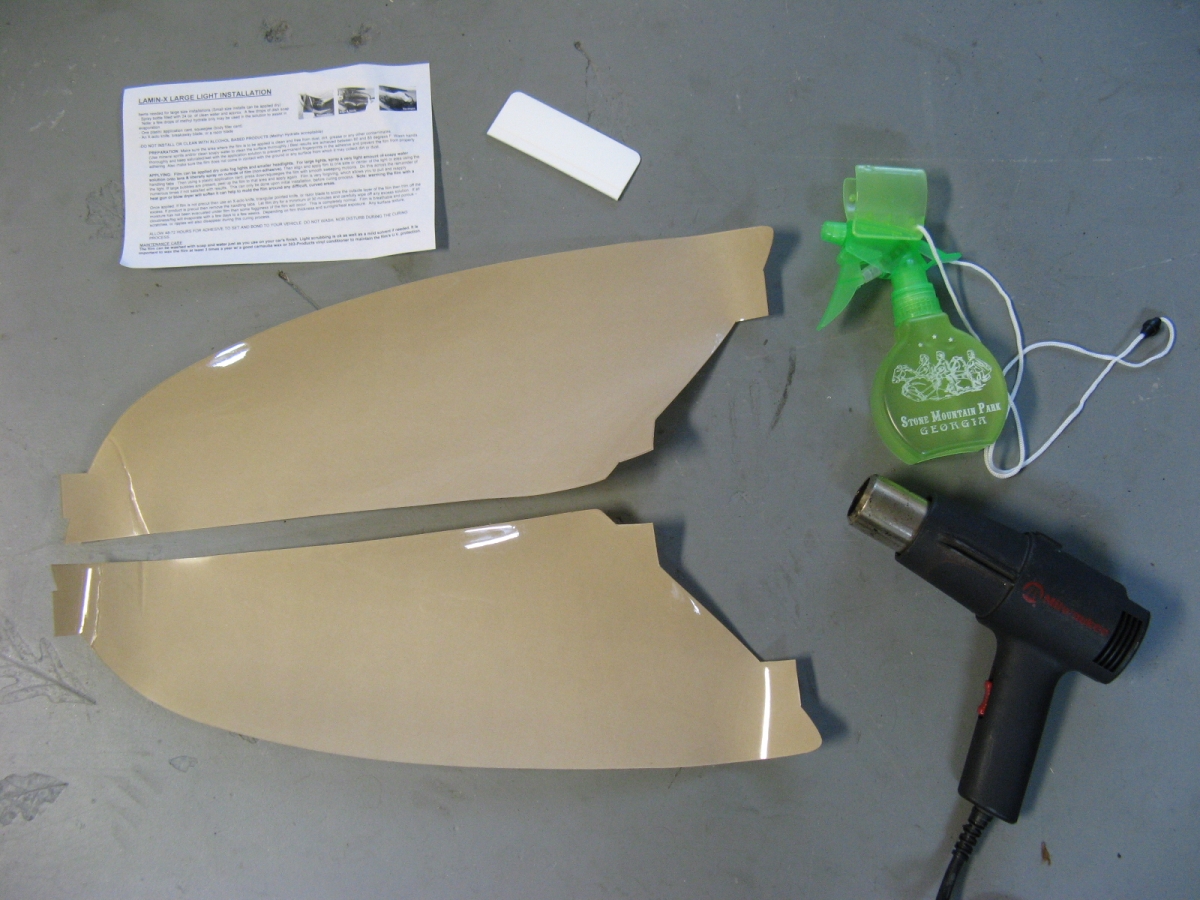
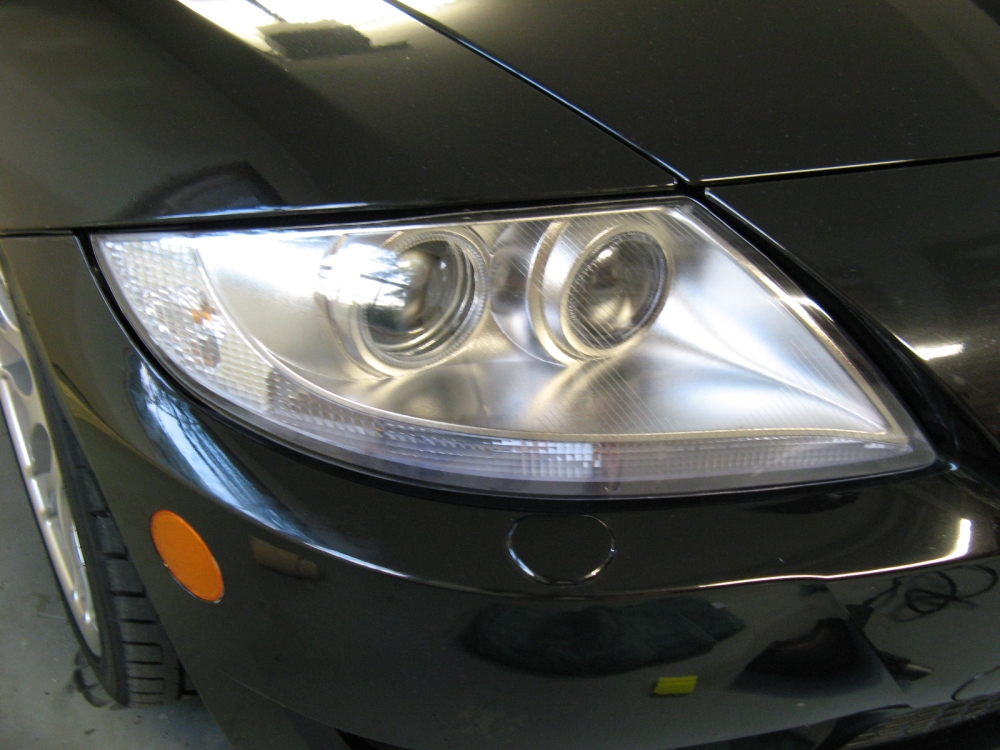
40 mil Headlight film (P/N B009-1) for headlights from
Lamin-X Protective Films finally installed- I ordered almost a year ago and finally got motivated to install it .
The installation instructions provided (HERE) worked great (video installation guide
HERE), but I chose to substitute the alcohol/water
solution mixed 3 parts water to 1 part alcohol- it seems to work better. The 40 mil is thick but don't let the curves scare you, a heat gun on low can be used to work wonders in
molding the film to the headlight contours, exercise caution so you don't burn your headlight or film:
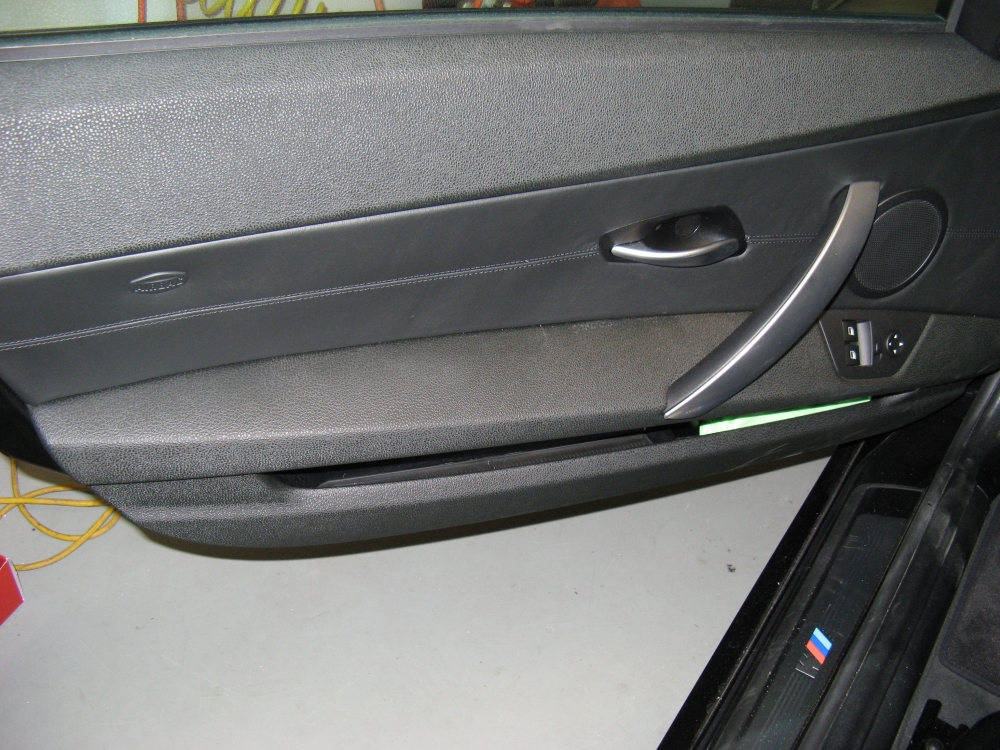
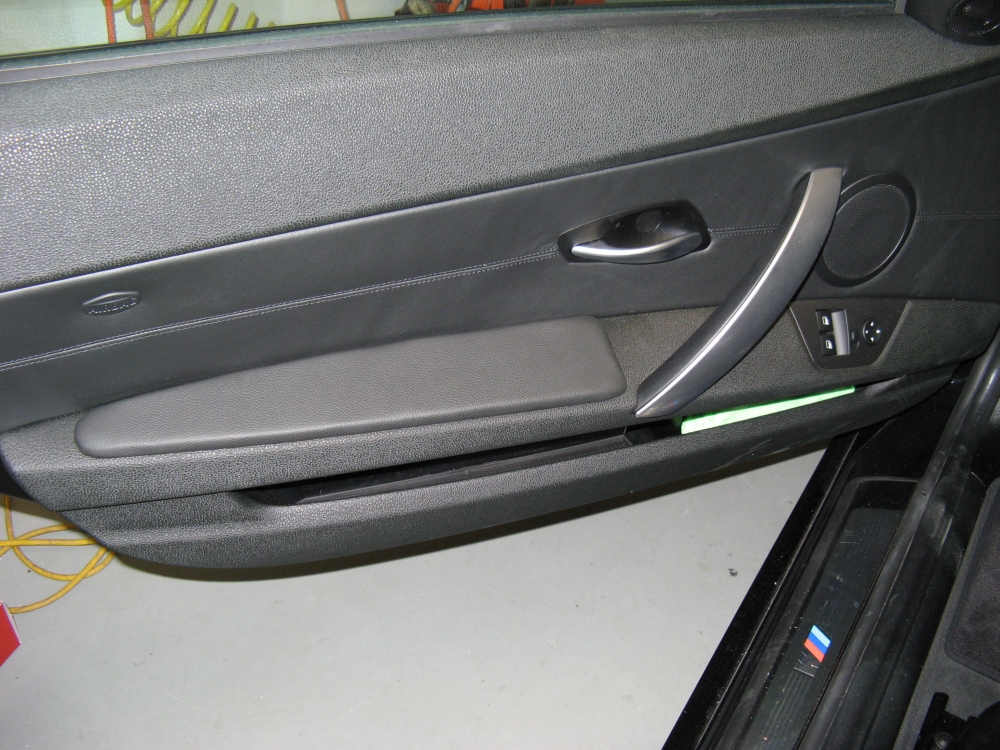
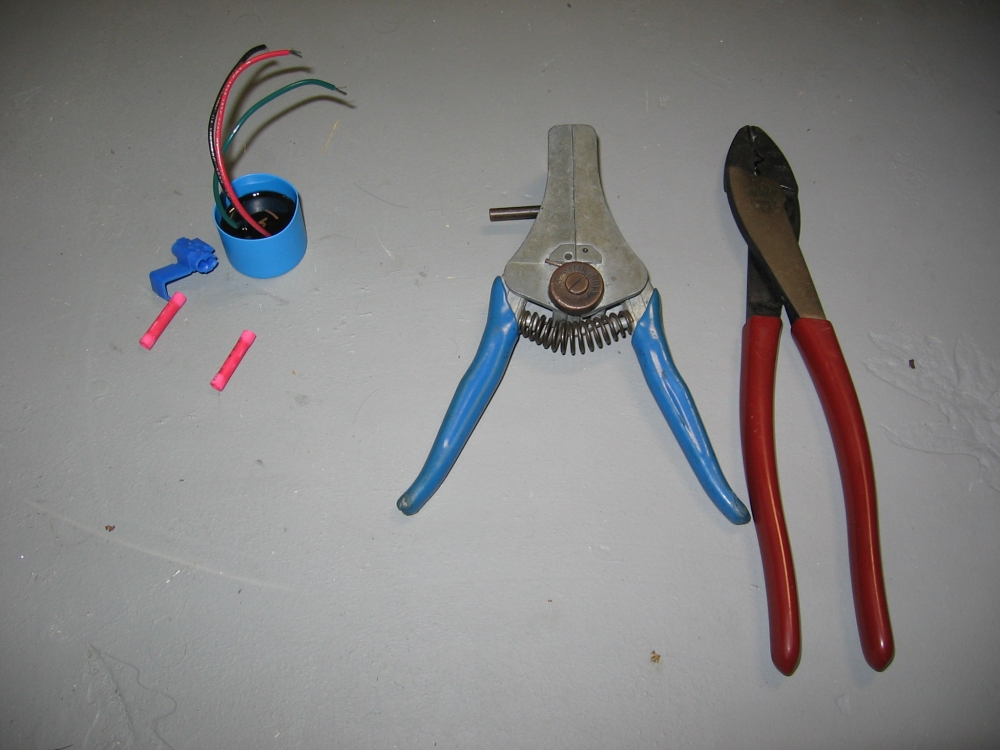
Center Brake Light Flasher from Samplex INC installed
(Thanks Michael  ). This flasher is easily wired into the third brake light with simple tools, crimp connectors and splice tap were included. When the brake is applied this
flasher flashes the center brake light 7-9 times before staying on, greatly increasing awareness of drivers behind you that you are stopping.
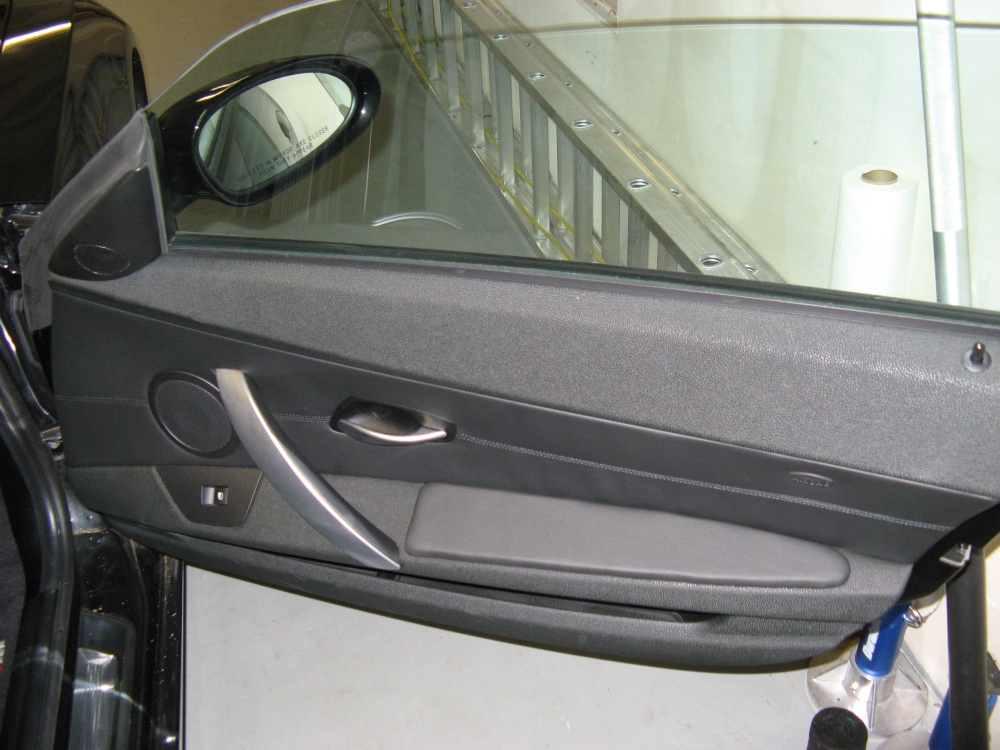
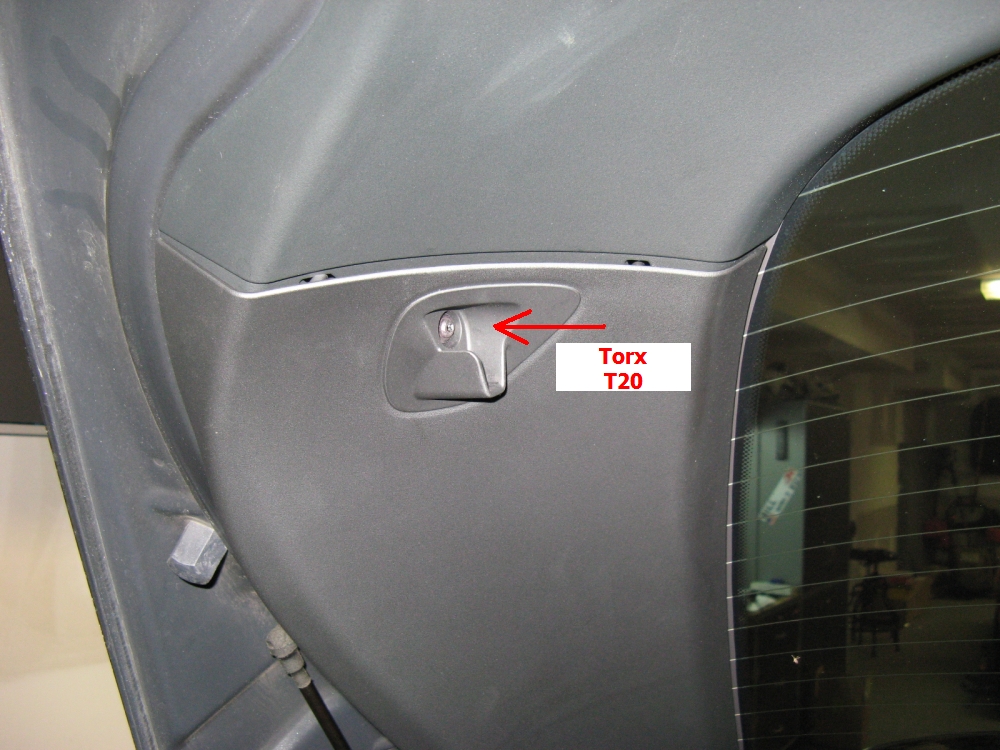
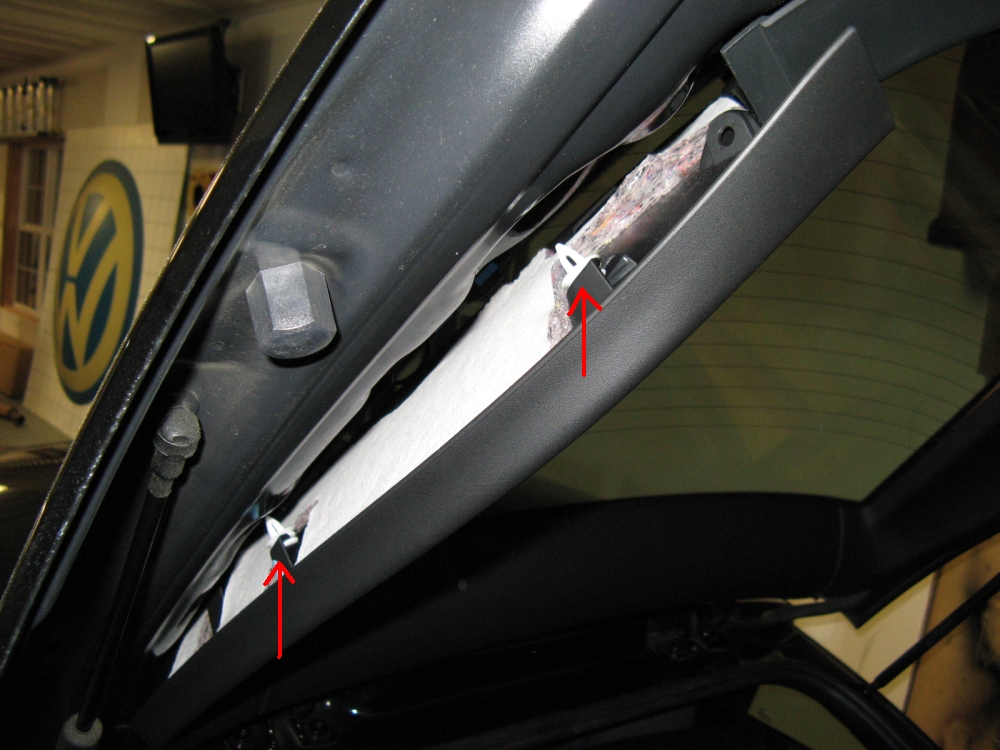
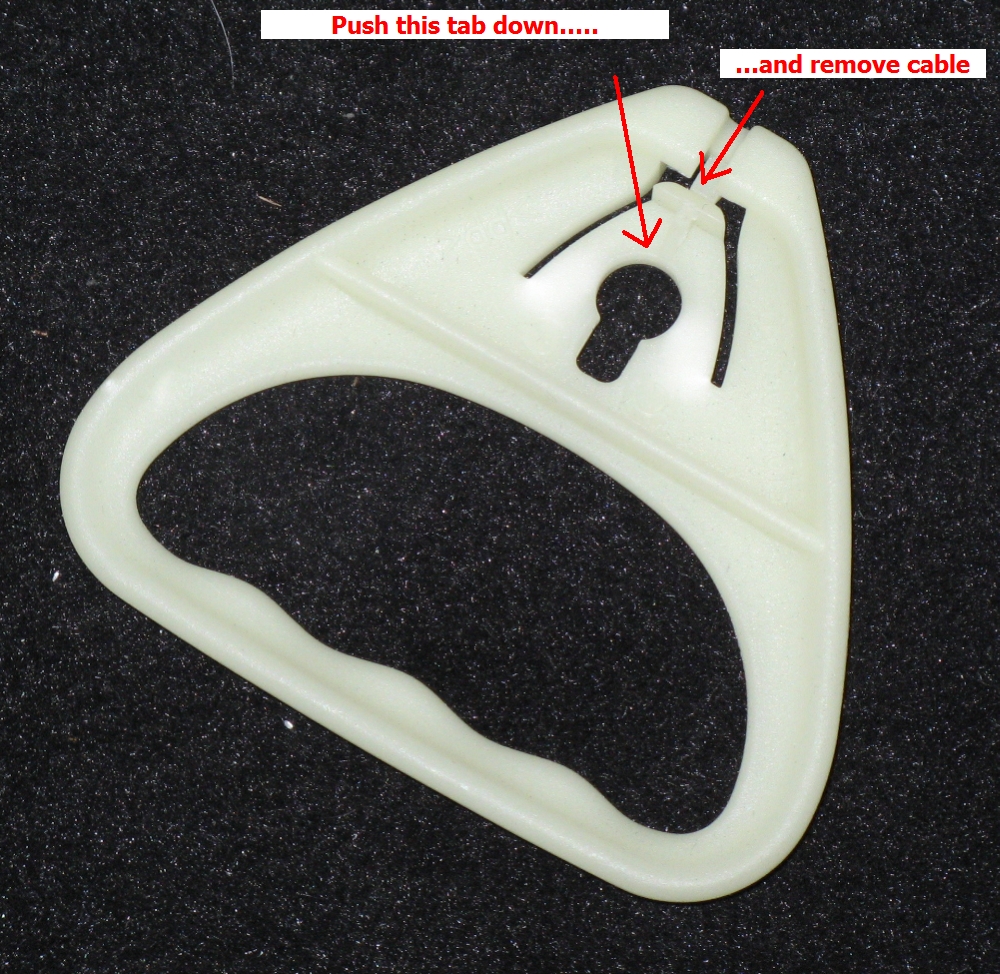
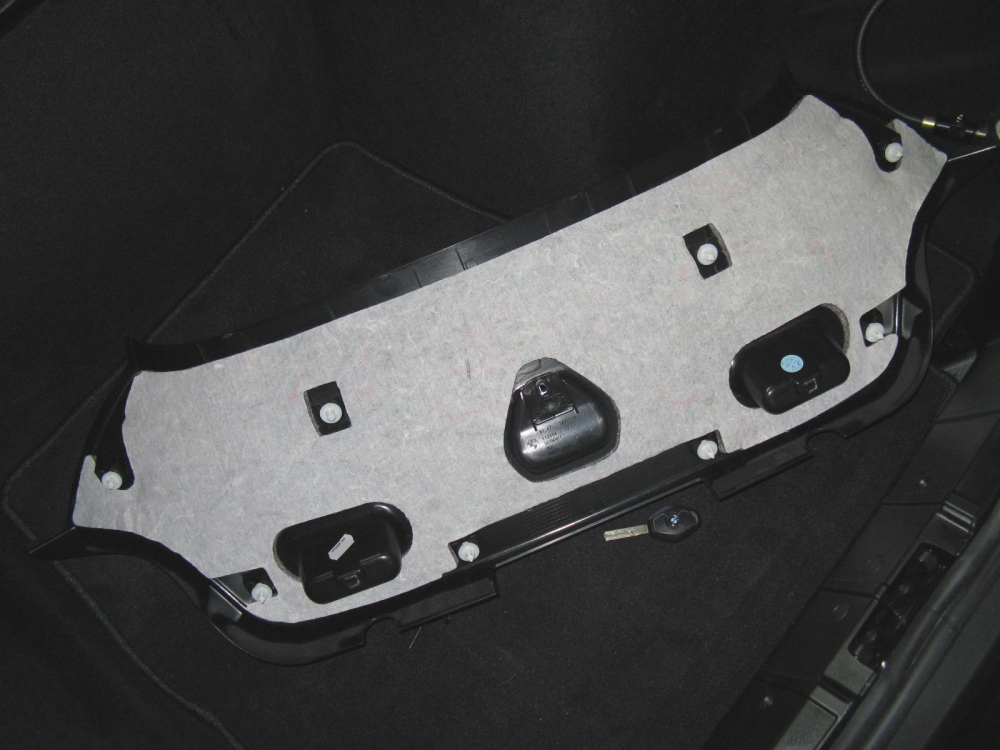
The center brake light wiring is accessible by loosening the side window plastic trim (removing one Torx 20 screw per side and then gently unsnapping). The
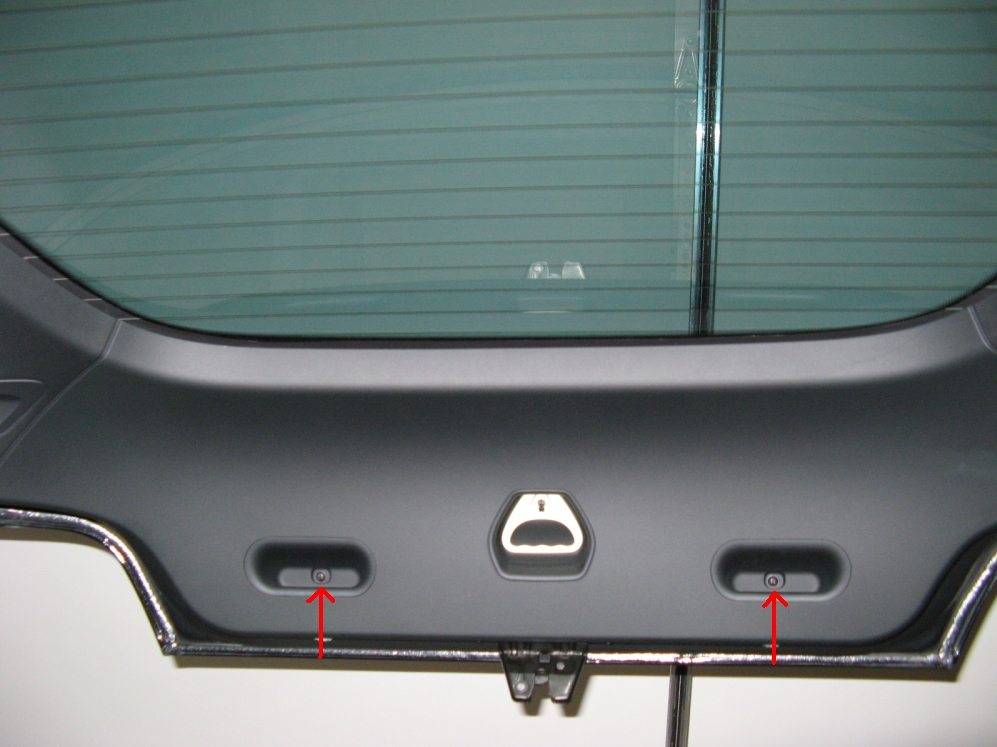
center section has one phillips head screw in each handle that will need to be removed and then it can be gently unsnapped as well. The emergency release
can be removed from the cable to remove the center plastic trim piece.
). This flasher is easily wired into the third brake light with simple tools, crimp connectors and splice tap were included. When the brake is applied this
flasher flashes the center brake light 7-9 times before staying on, greatly increasing awareness of drivers behind you that you are stopping.
The center brake light wiring is accessible by loosening the side window plastic trim (removing one Torx 20 screw per side and then gently unsnapping). The
center section has one phillips head screw in each handle that will need to be removed and then it can be gently unsnapped as well. The emergency release
can be removed from the cable to remove the center plastic trim piece.
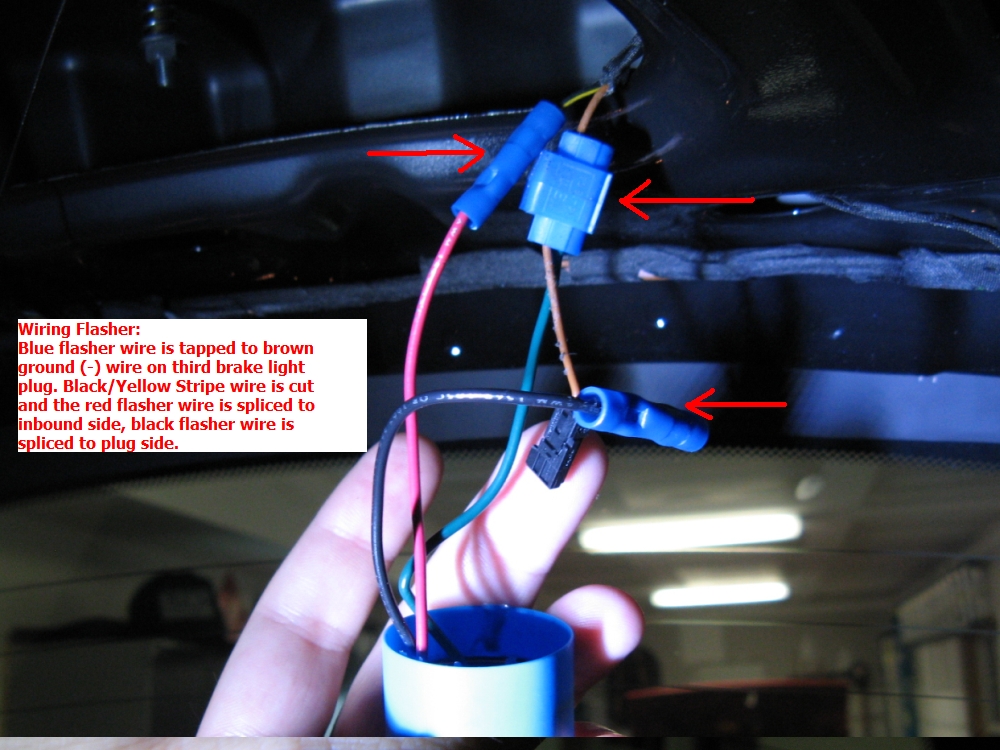
The black/yellow stripe wire for the brake light is cut and the side going to the brake light is connected to the black wire from the flasher module, the
side coming from the car is connected to the red wire from the flasher module, and the remaining green wire from the flasher module is connected to the
brown wire for the brake light using the splice tap. The flasher module is tucked over to one side and stabilized with some double sided tape,
the window trim and release handle can then be reinstalled. Works great:


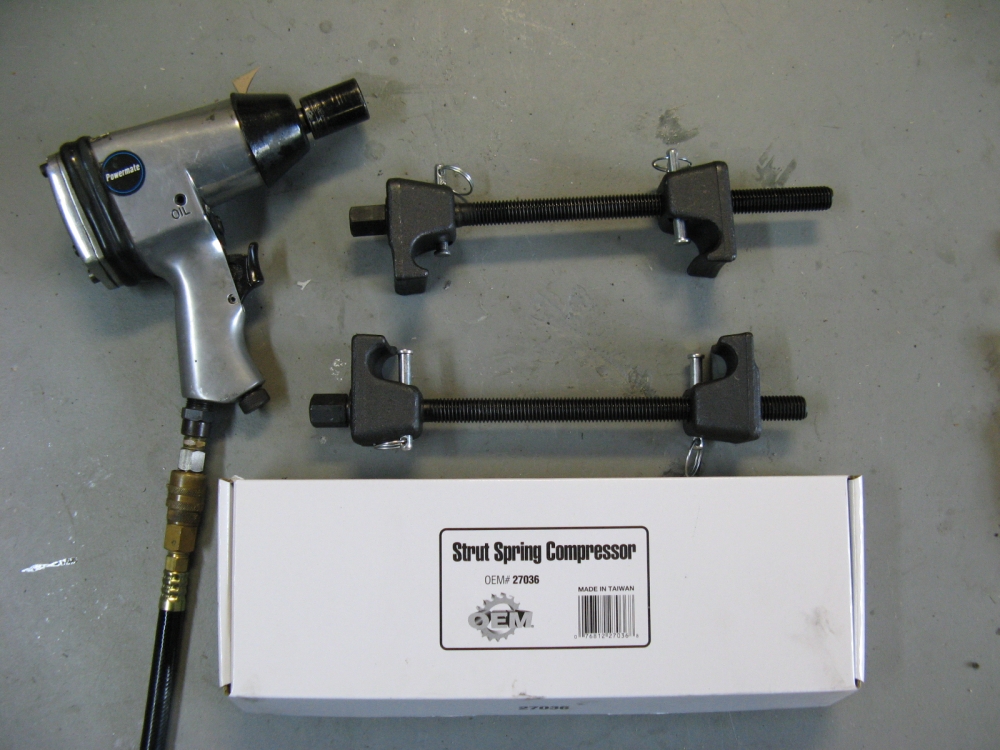
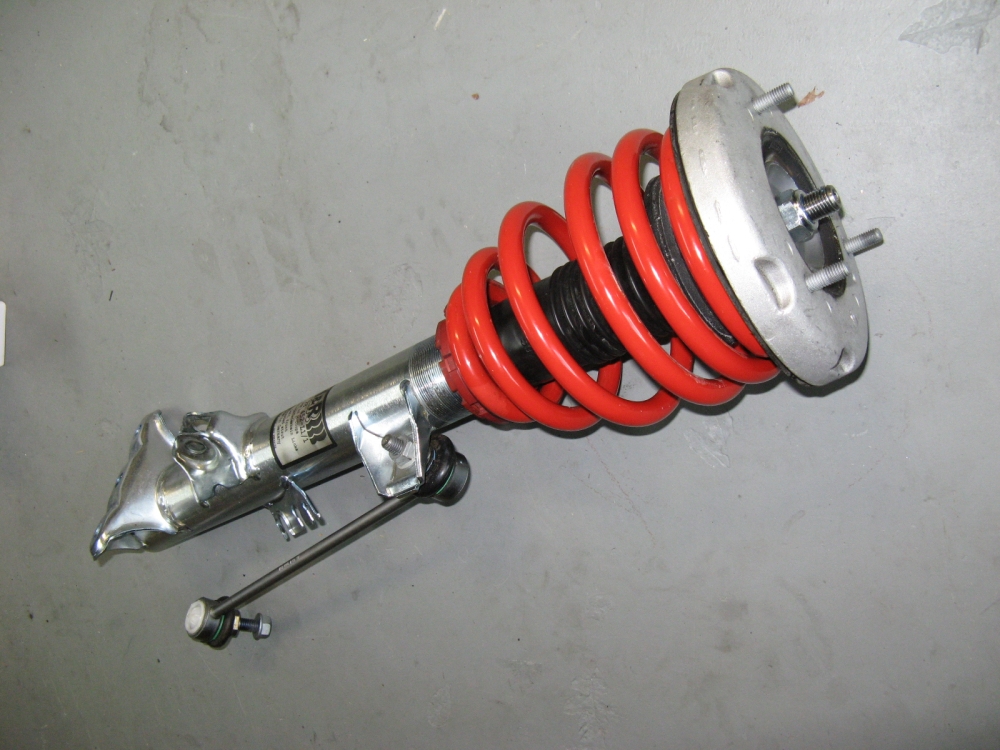
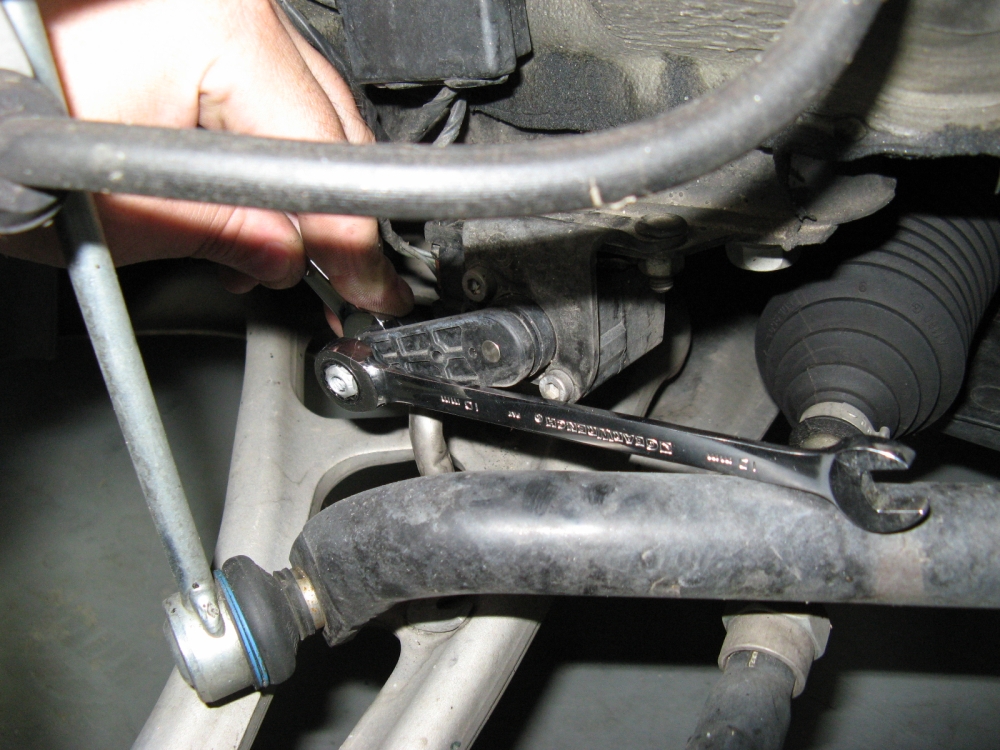
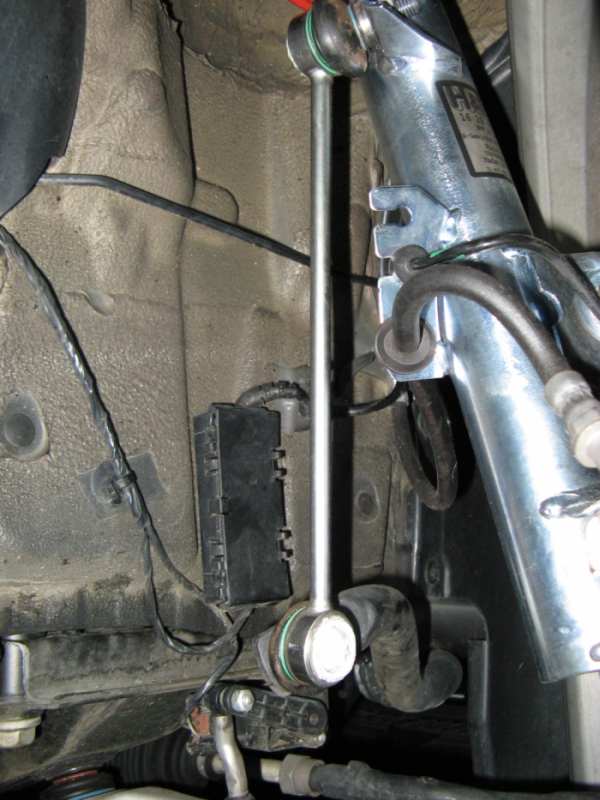
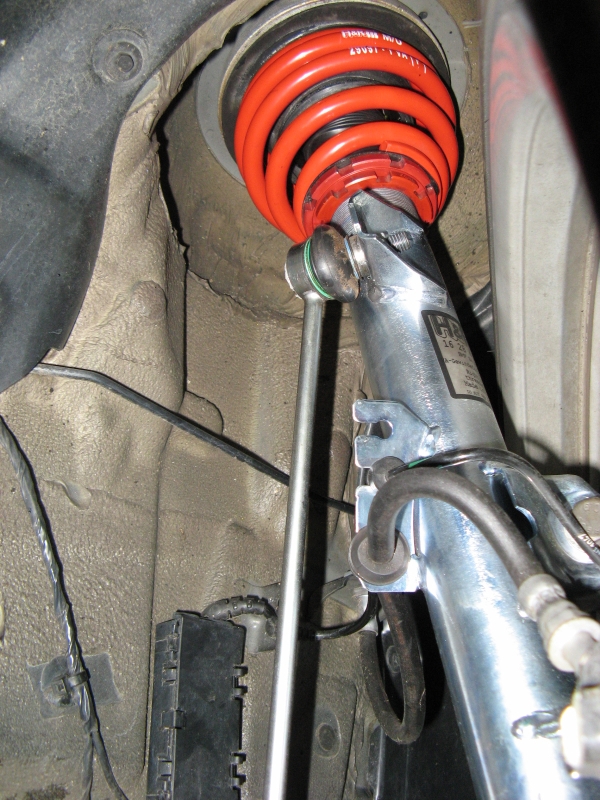
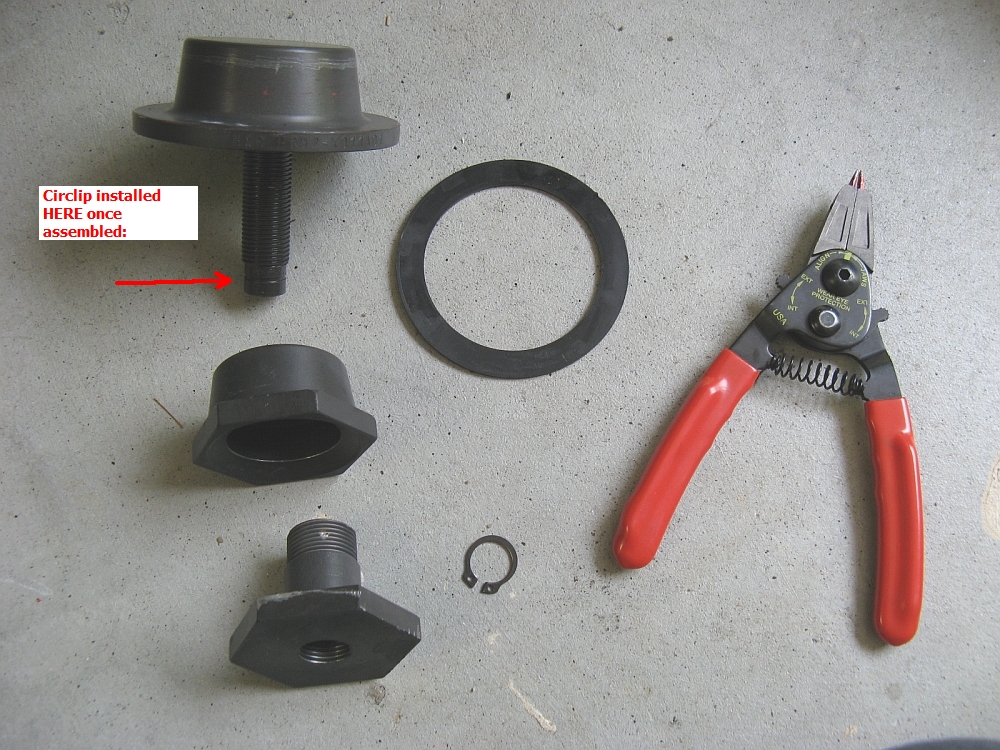
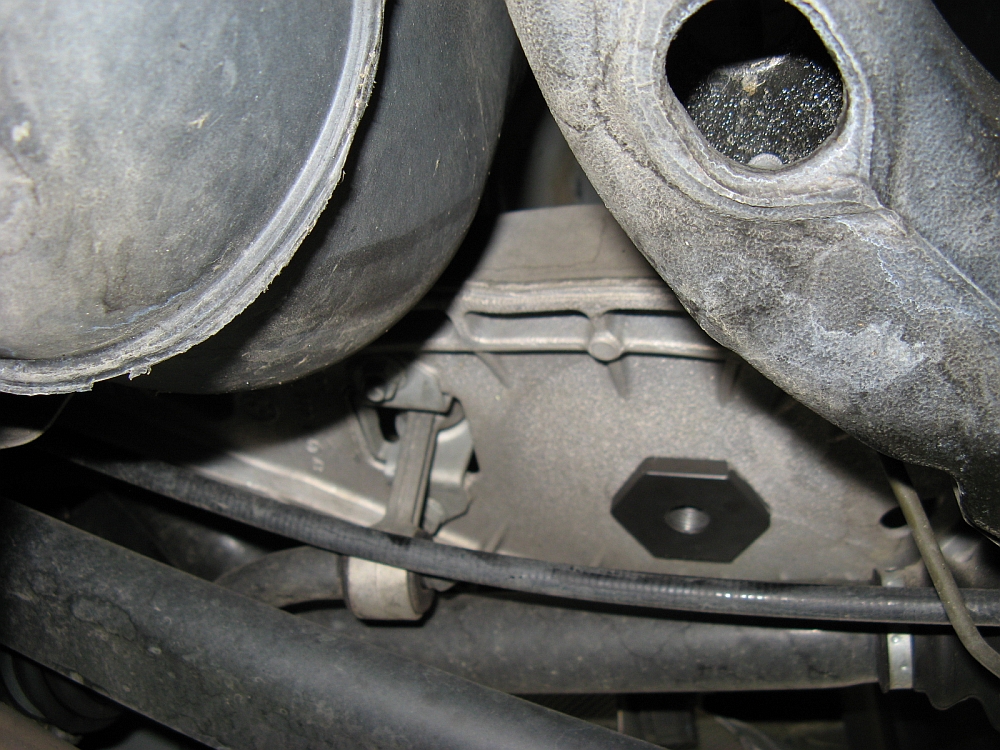
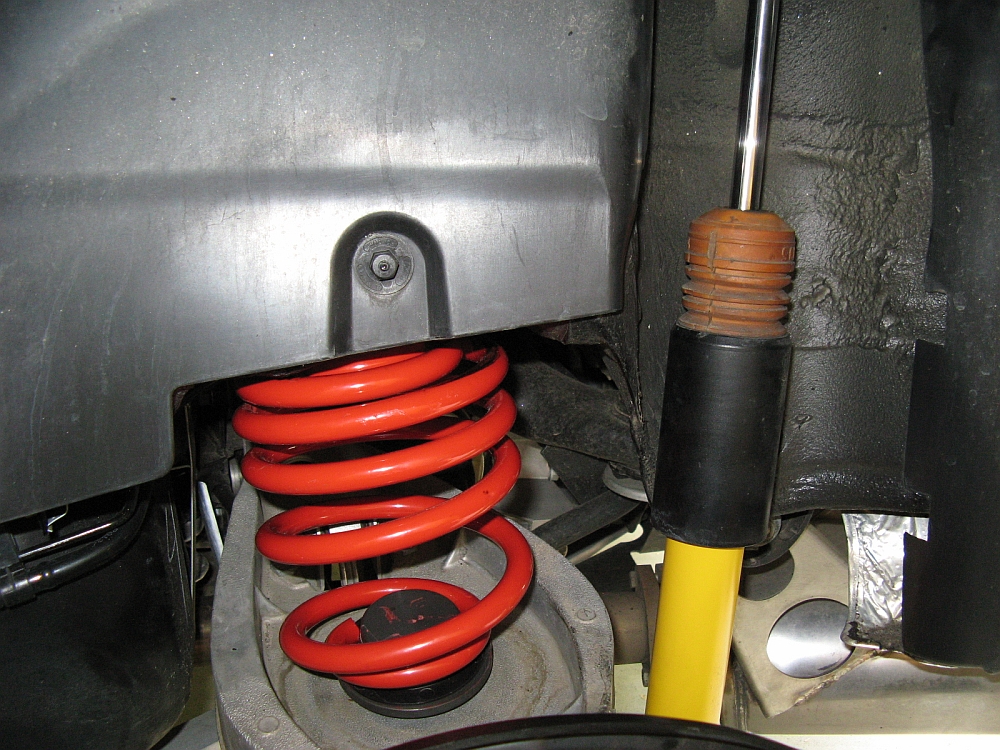
H&R Street Performance Coilovers installed, P/N 29097-1. The KW V3 setup I had been running for the past 2k miles or so performed well but felt soft to me, I have used H&R "kidney punchers" on other cars before and that's what I am accustomed to. Bimmerforum's member vicj was selling his almost new setup and I thought it was my opportunity to try them out. For the most part my KW V3 installation write-up applies to these as well, one key difference being the need for a spring compressor since the upper OE hardware (strut mount/bearing) is re-used. The H&Rs also re-use the OE sway bar endlink. Once these are transferred from the OE setup to the H&Rs, they can be installed. I also chose to remove the 10mm bolt for the passenger side leveling switch in place of popping it off the ball socket- less opportunity for damage. The H&R spring height adjuster in the rear is a little different, it mounts to the lower control arm and a hex wrench is used to adjust it- [CAUTION: ALL spring tension must be removed prior to adjustment in the rear, the hex bolt walls are thin and WILL break if there is any force required to turn it]. The adjuster is mounted and locked in place with a hex head screw, once the lower perch is threaded in it is held in place with a circlip. It sits close to the driveshaft but no worries, it never makes contact while driving and you will be adjusting the lower perch up once the spring is installed anyway. The rear bumper and guard are re-used on the damper, there is clear heat shrink at the top of the piston rod that holds the bumper/guard in place on top, not as pictured below. I am pretty satisified with this setup and prefer the monotube damper qualities over the twin-tube dampers, to some these are harsh but to me they feel just right. After installation an alignment was performed by Jesus at Kauffman Tire in Suwanee (770-614-5650), specs HERE. I will most likely be purchasing the adjustable BMS Ground Control sway bars once the KW V3 setup is sold so that I can dial in more rear bar, I accomplished the rear bias prior with the compression setting on the KWs. H&R documentation is HERE.
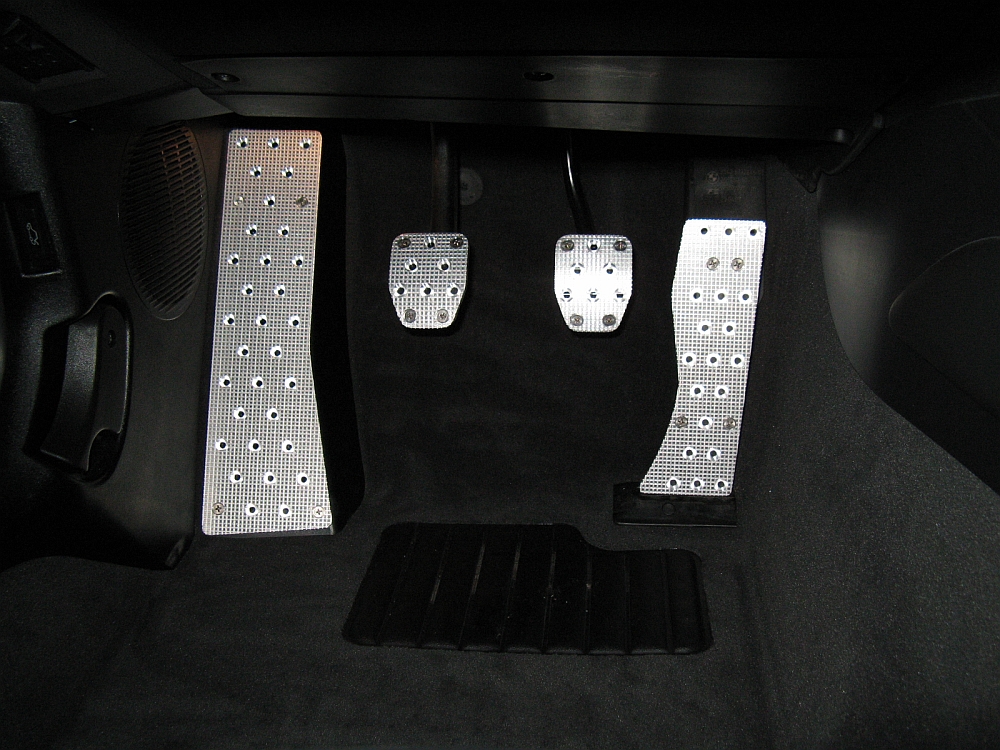
Ultimate Pedals gas/clutch/brake/dead pedals installed, shiny anti-slip finish - shop their eBay store HERE for significantly better prices. These pedals are made to order and the fit and finish is great. Installation hardware includes self-tapping screws for the plastic pedals and nylon locking nuts/bolts/washers for the metal pedals. I opted for the upper left gas pedal heel/toe extension. These pedals not only offer better aesthetics but also provide more function and feel than the OE heavily insulating (and slippery when wet) rubber pedal pads. Installation guide is HERE. I opted to use a Dremel with a small 1/8" bit in place of the center punch to dimple the metal and/or start the hole in the plastic pedals- it is kind of tight and this was easier to both line up and use.
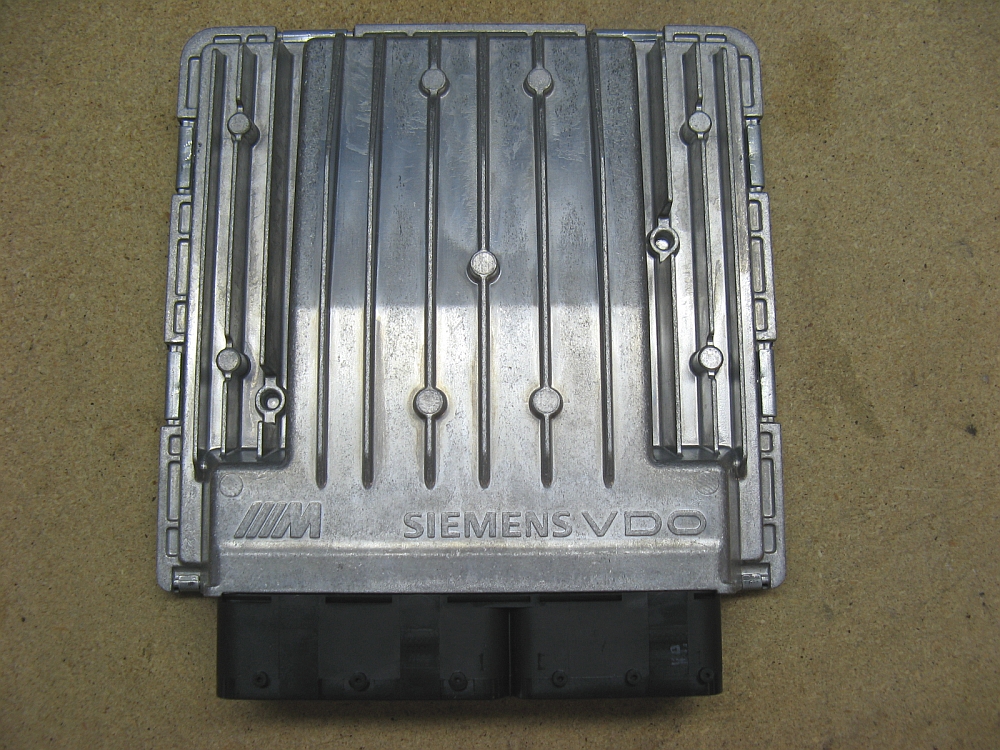
ESS Tuning
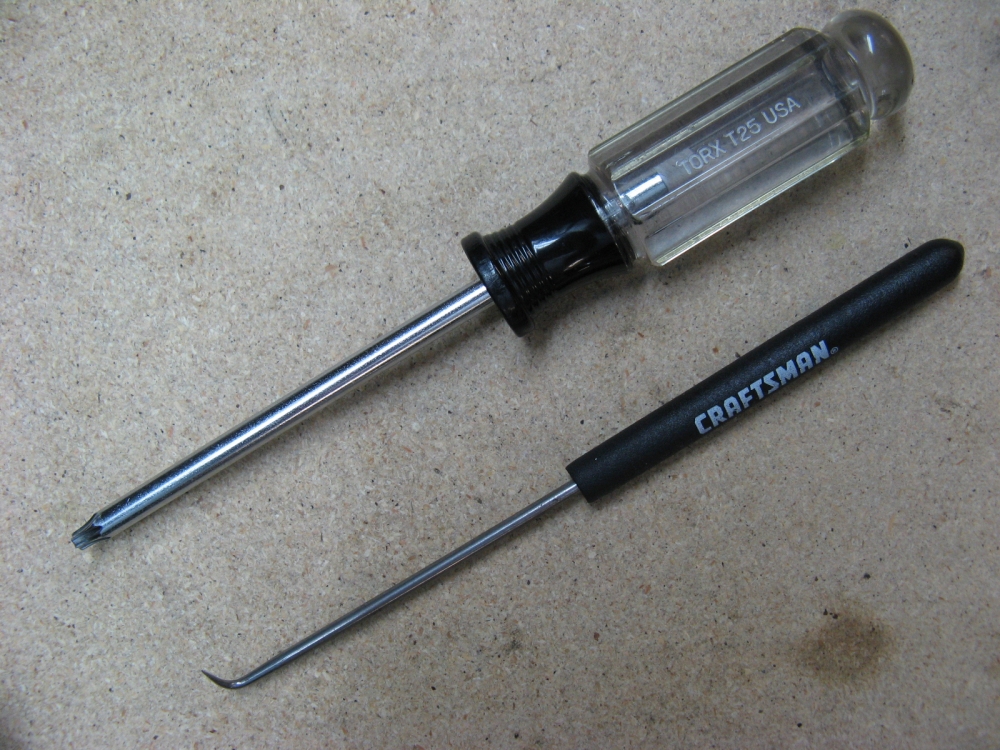
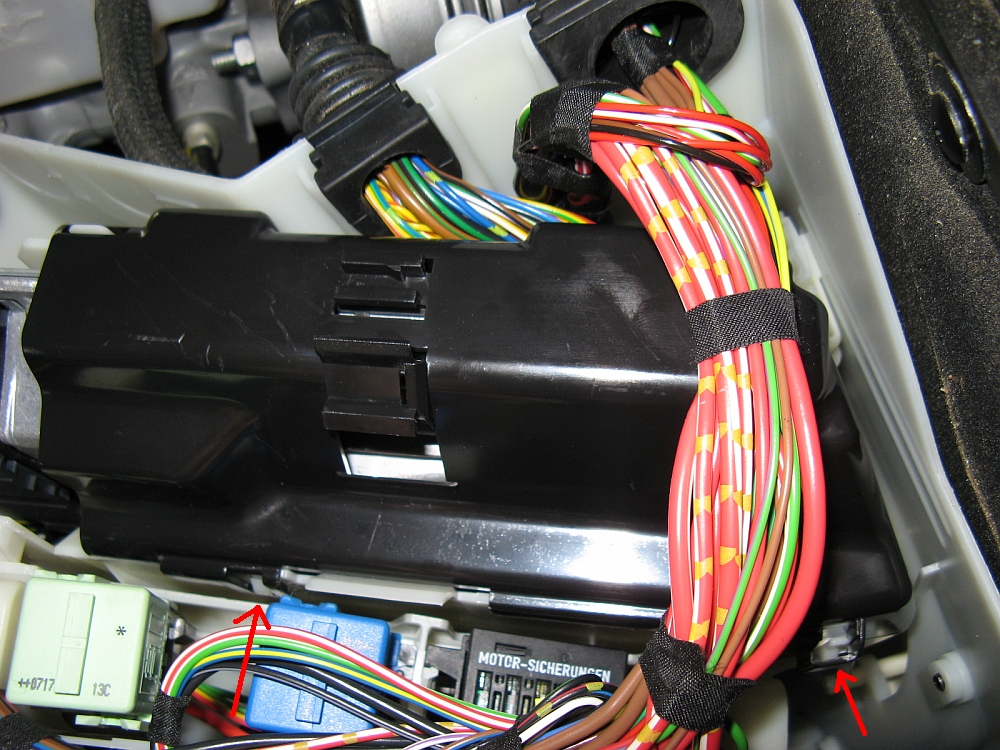
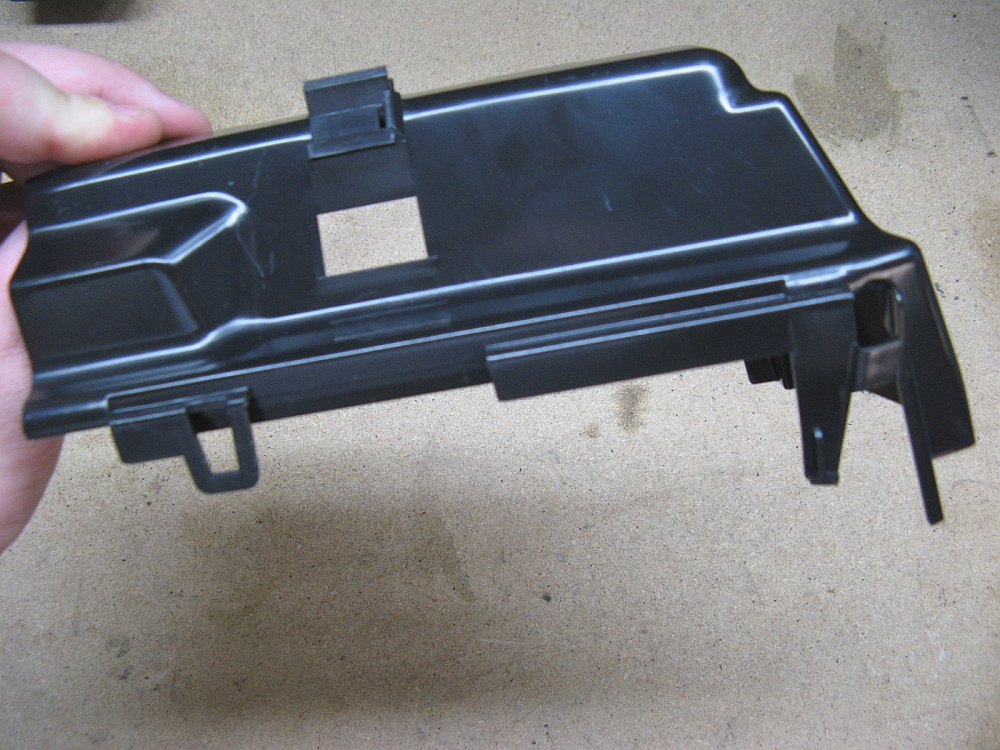
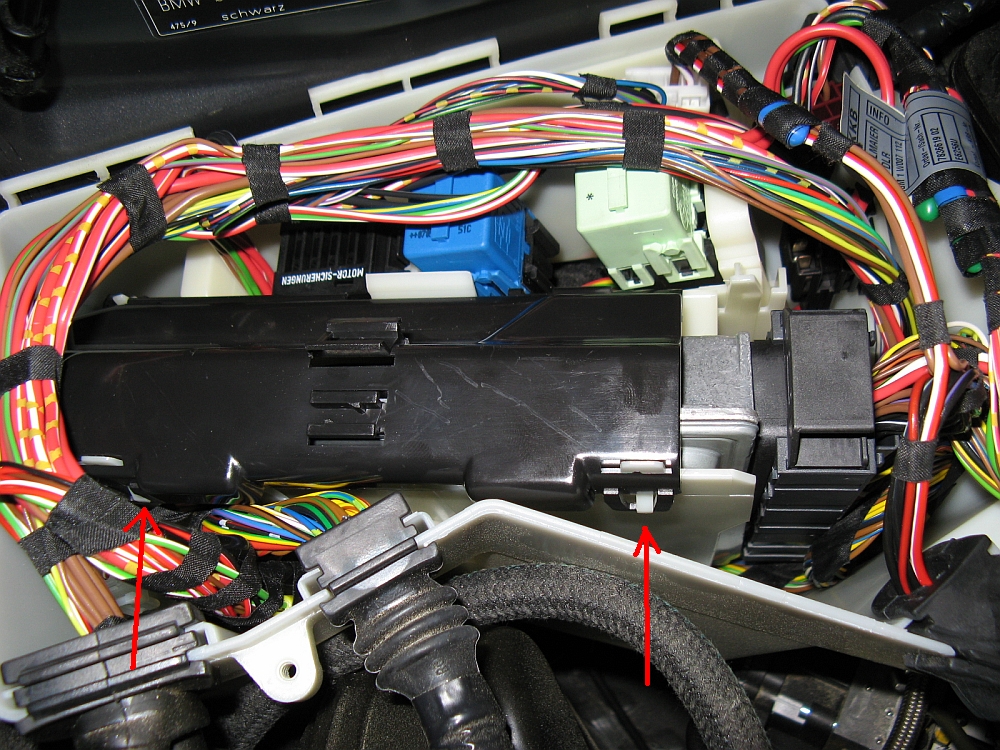
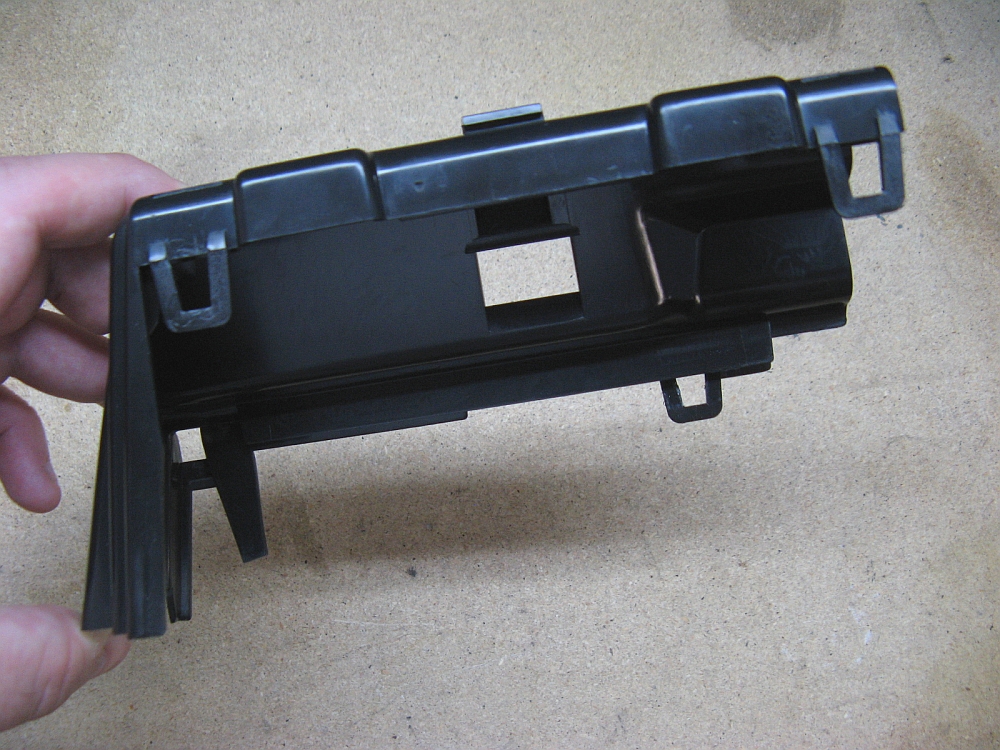
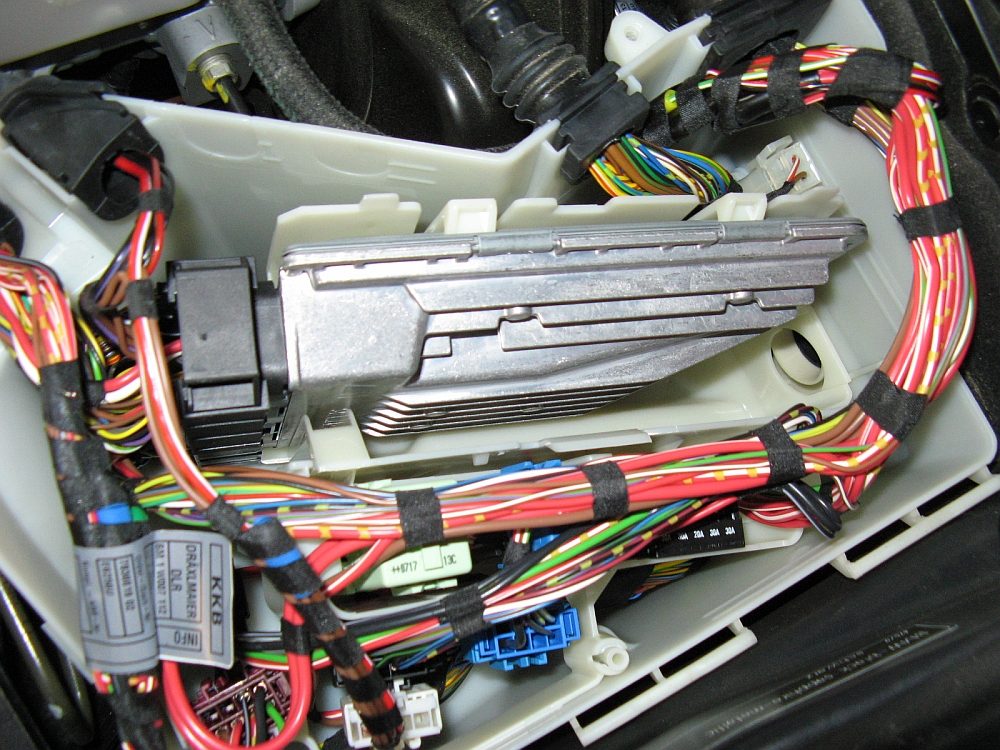
DME Upgrade installed. DME removal is fairly easy in the Z4 M, four screws are removed (Torx T25) from the hinged cover and the cover is removed. There is a black
clip holding the DME in that has four clips that need to be unsnapped, I found this easiest to do with a pick. The DME is still retained by two white clips
that need to be released before the DME can be pulled up and to the front of the car. At this point the two connectors can be removed, they are cam locking plugs
that will automatically unseat themselves as the tab at the end is pulled out.
First impressions are not dramatic, but there is noticeably smoother/more linear power delivery with more power down low, this is the way the car should have come from BMW. Sport mode is
a lot more usable, not as jerky as the OE settings. I also had the post cat O2 sensors turned off since I will install headers soon and replace the secondary cats
with primary cats. Some reviews/dynos of the ESS chip from other owners can be found
HERE and
HERE,
dyno video of EVOMS customer HERE.
ESS DME removal instructions HERE, be sure to specify header/post cat O2 off
when ordering. Thanks to Dawn and Todd at ESS for their help in answering questions and turning this around quickly. Removed Thursday and shipped overnight FedEx, arrived at ESS
and programmed Friday, back to me via FedEx by 10:30AM Saturday


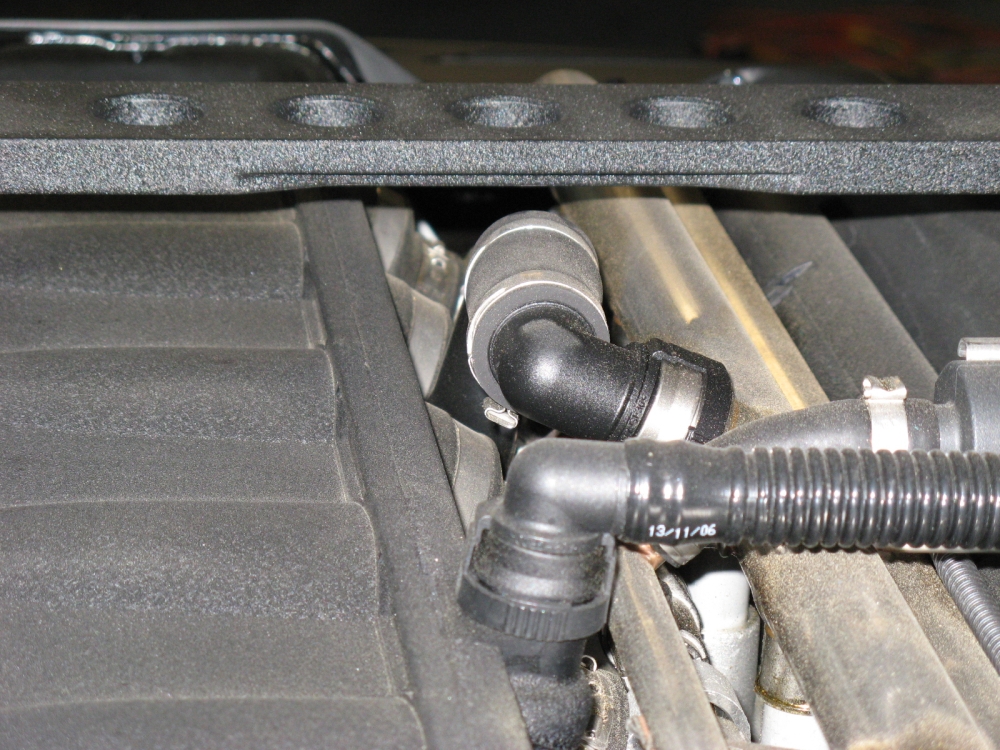
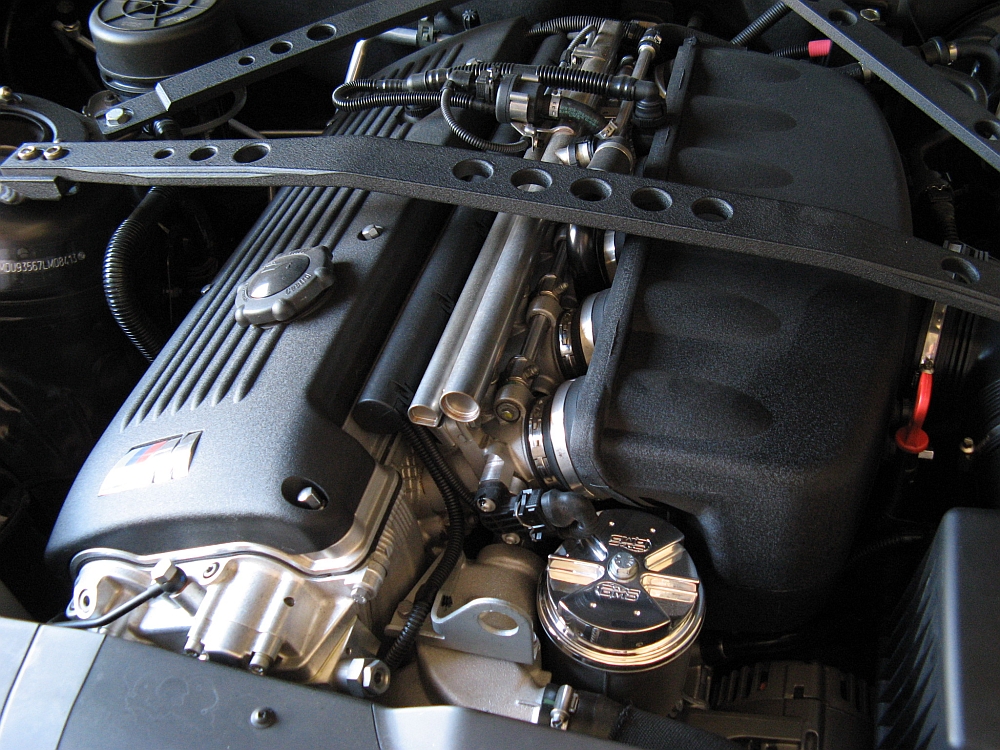
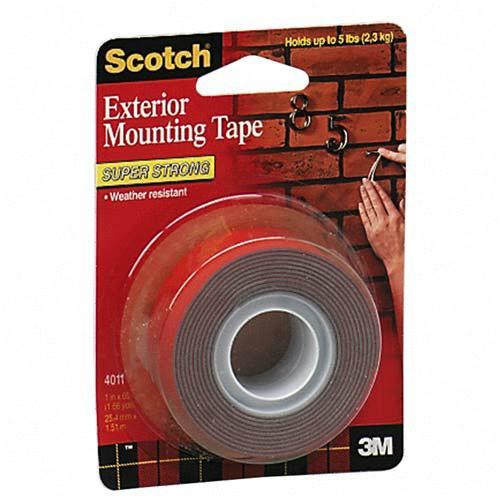
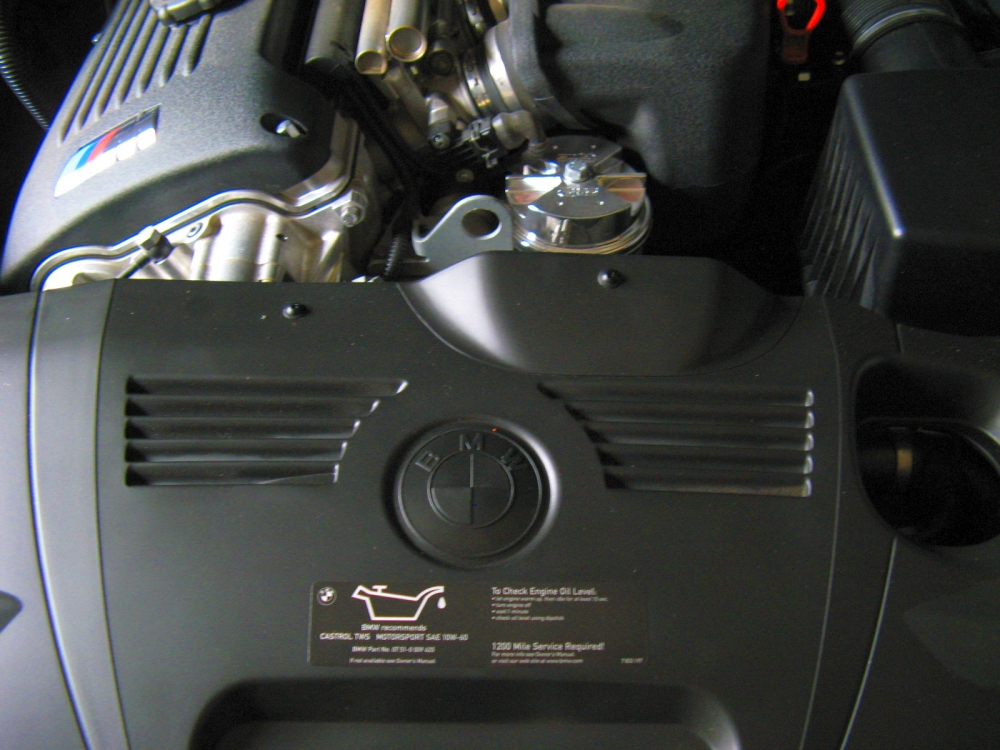
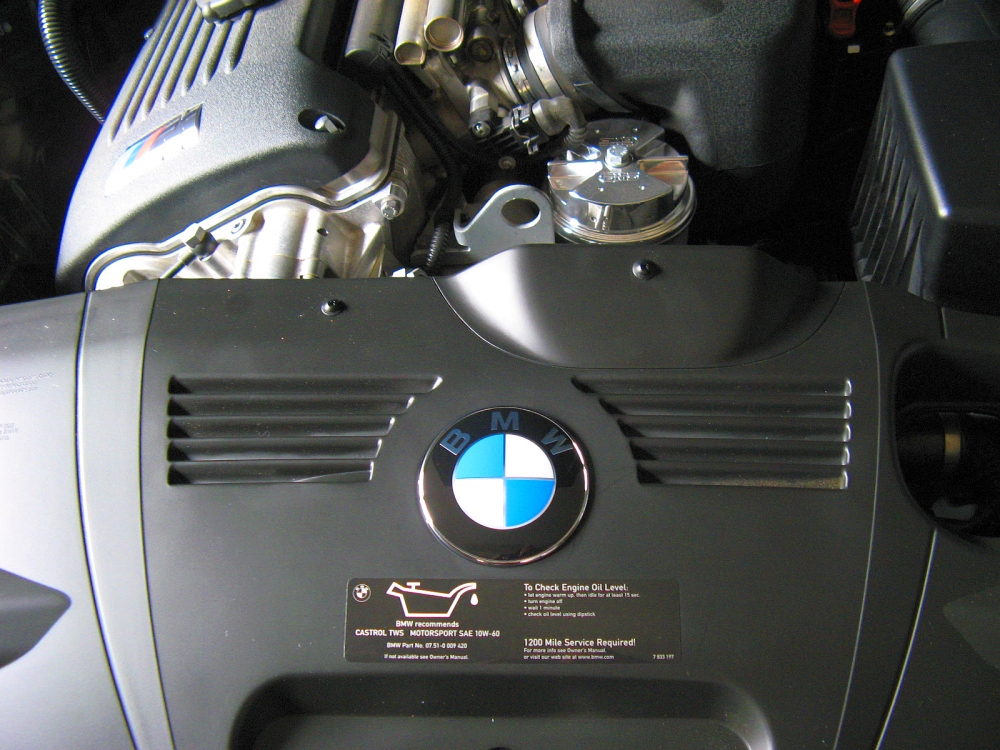
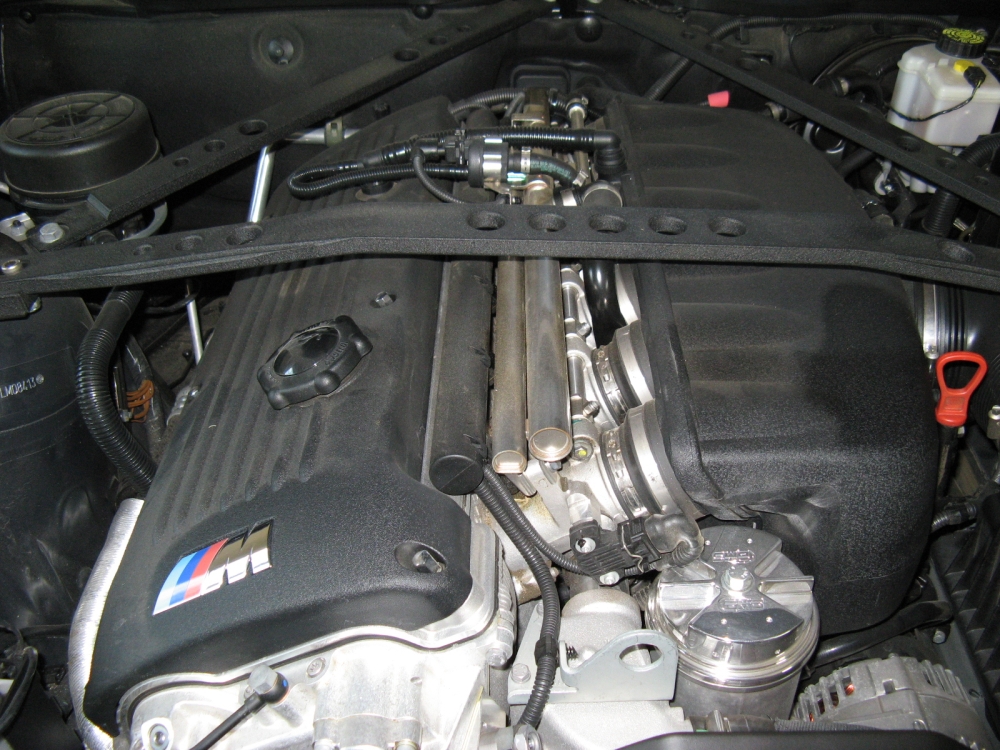
Purchased BMW Roundel (P/N 51148132375) to cover the BMW Roundel stamped in the plastic radiator cover in the engine compartment. This is the standard hood mounted Roundel for most other BMWs, 82mm in diameter, and covers the other perfectly. Because it is the hood mounted emblem, it includes two posts for mounting that I removed with a Dremel tool. 3M Exterior double-sided tape is stronger than regular double-sided tape and was used to mount the emblem after cleaning the plastic surface with brake cleaner. Definitely an aesthetical improvement if you ever open your hood at car GTGs or shows:


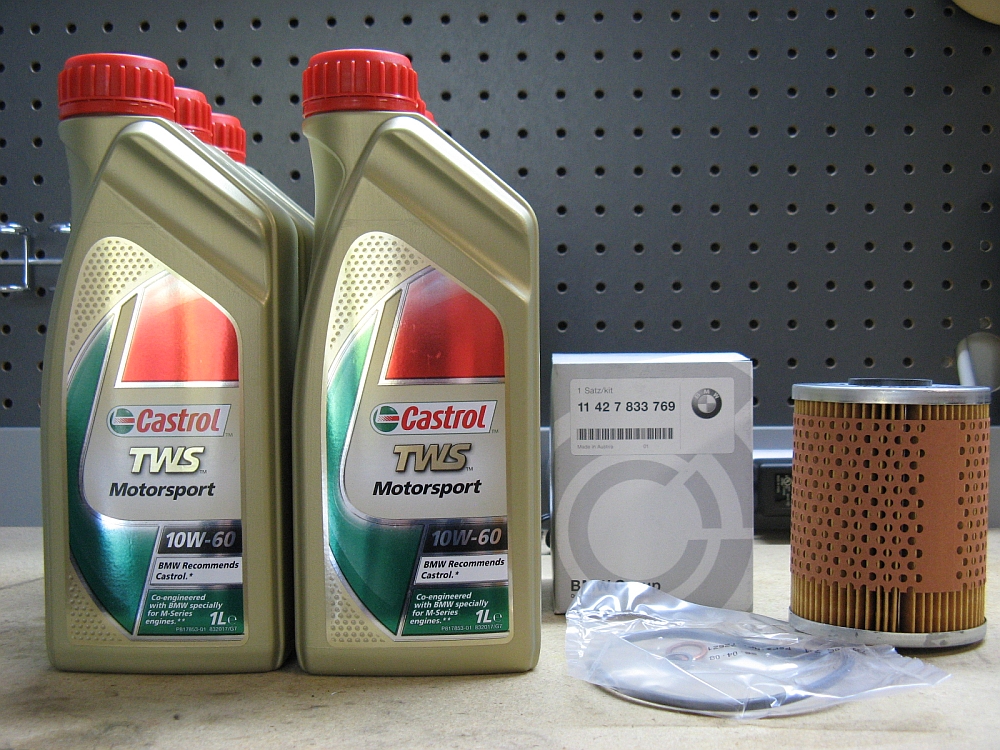
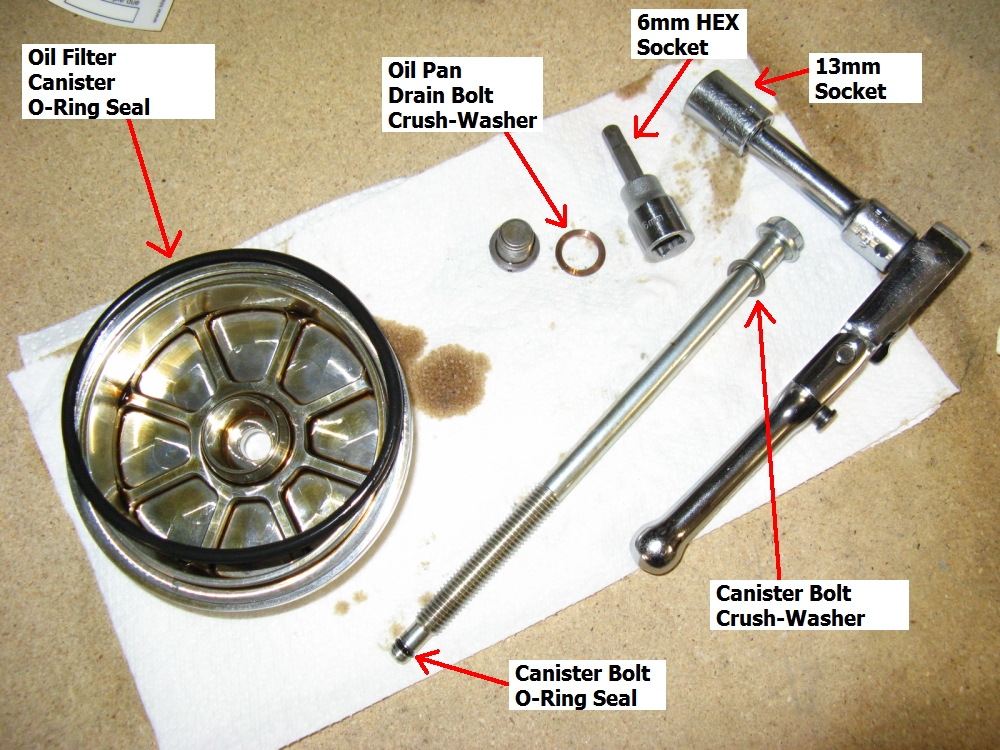
Purchased Oil Change Kit (Item# PKE46M3OIL) from
Tischer BMW
to perform interim oil change. This kit includes 6 quarts of Castrol TWS 10w60 oil (P/N 07510009420) and the S54 oil filter with
O-Ring seals and crush washers (P/N 11427833769).
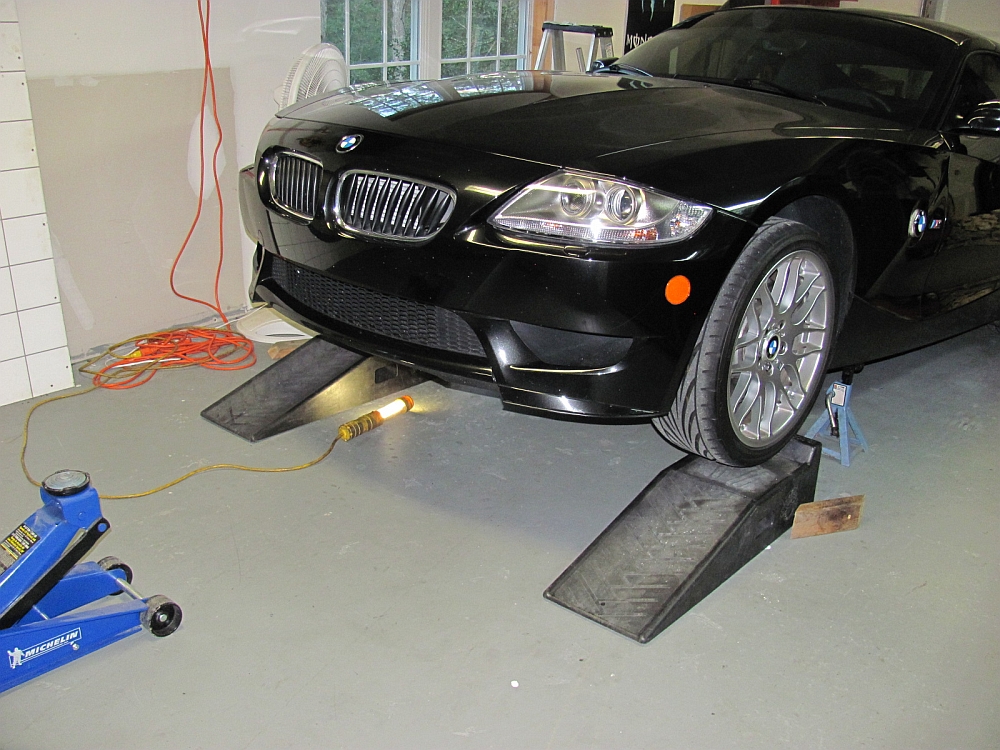
I detailed my oil change HERE. Cliff Notes: Drive car on ramps, remove drain bolt cover and drain bolt, while
oil drains remove oil filler cap and oil filter canister lid/bolt, remove oil filter, replace all o-ring seals and crush washers, reinstall drain bolt,
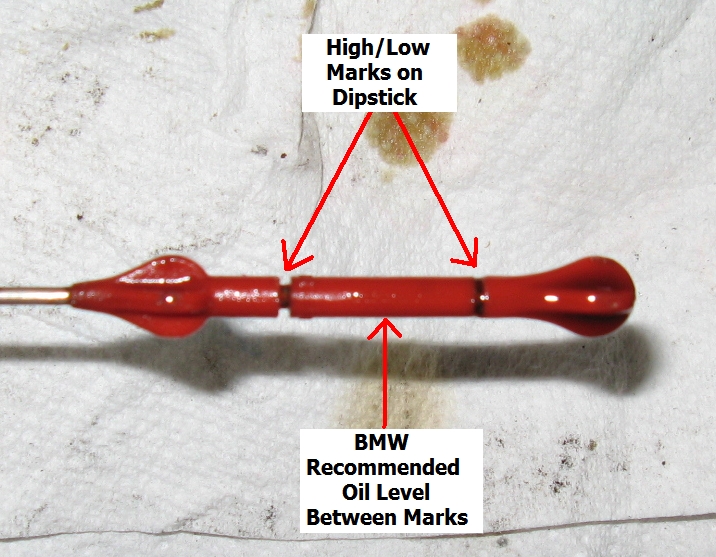
install new oil filter, add 5.5 liters of oil to bring up to midpoint on dipstick between lines. The dealerships (at least my local one and some others on
the forums) commonly put all 6 liter bottles of oil in (maybe erroneously rounding up from 5.8 quarts?), so stress to them that the bottles are not quarts but liters and ONLY 5.5 LITERS are needed. The past
two times I have had scheduled oil change services at the dealer I ended up taking .5 liters out with my TopSider when I get home.....I'll check from now on before I leave the
dealership.
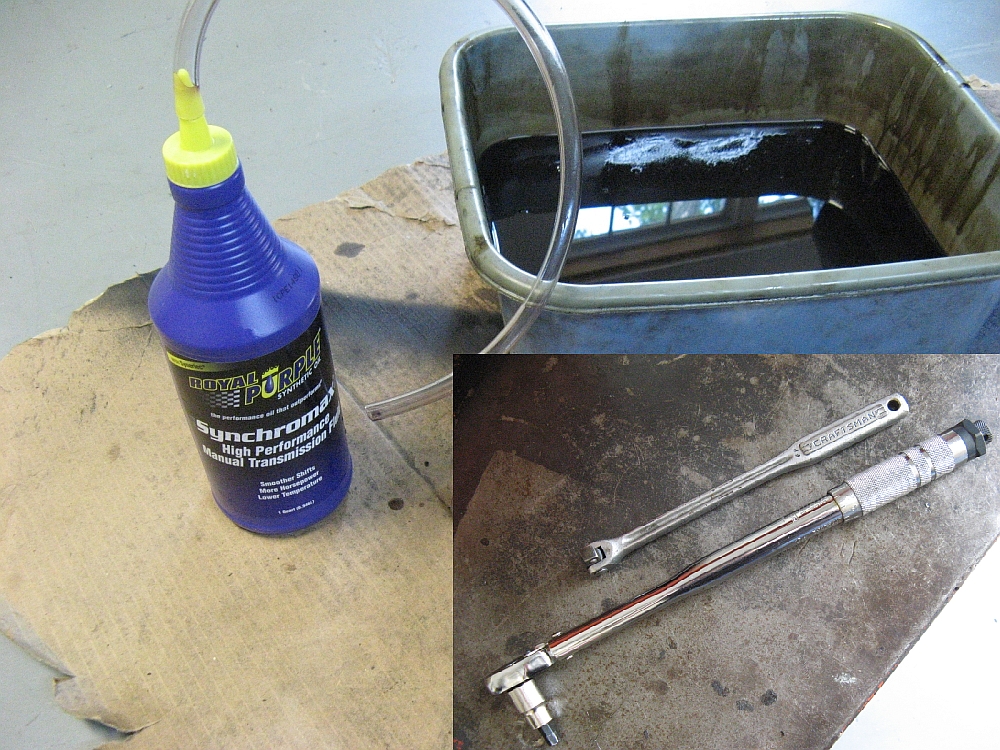
At around 11500 miles the shifter feel had gotten progressively worse.
After trying Royal Purple Synchromax in my 335 and being amazed
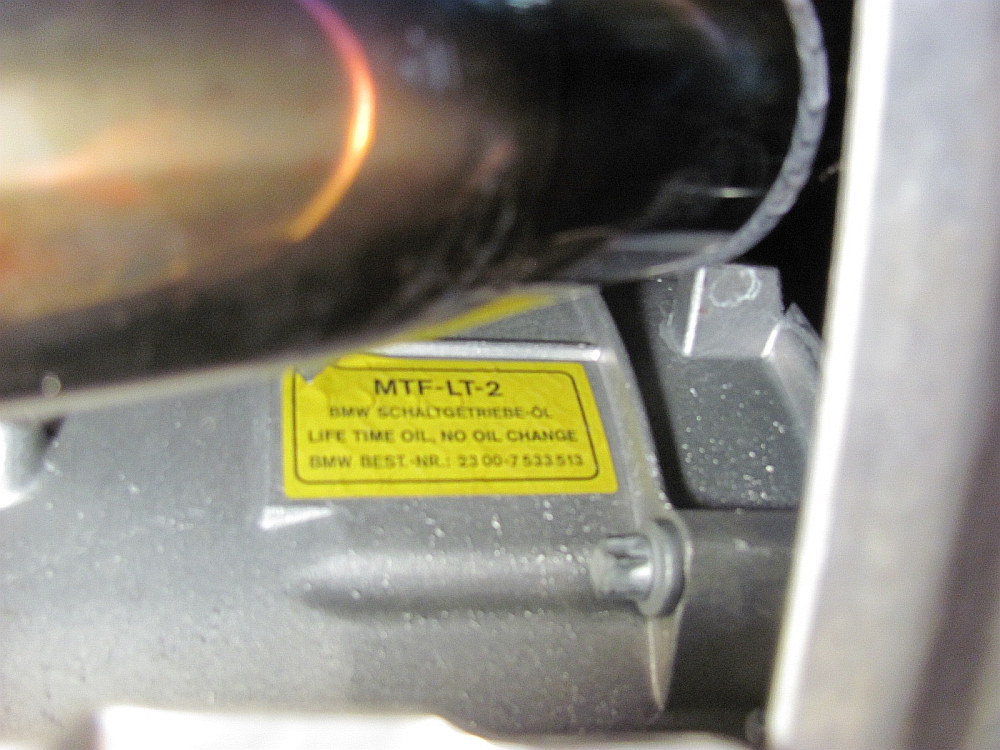
at the difference it made in shift quality, I decided to try this in the M even though I had the BMW
OE MTF-LT-2.
Ron Stygar has assembled some helpful pictures and documentation with torque specs HERE.
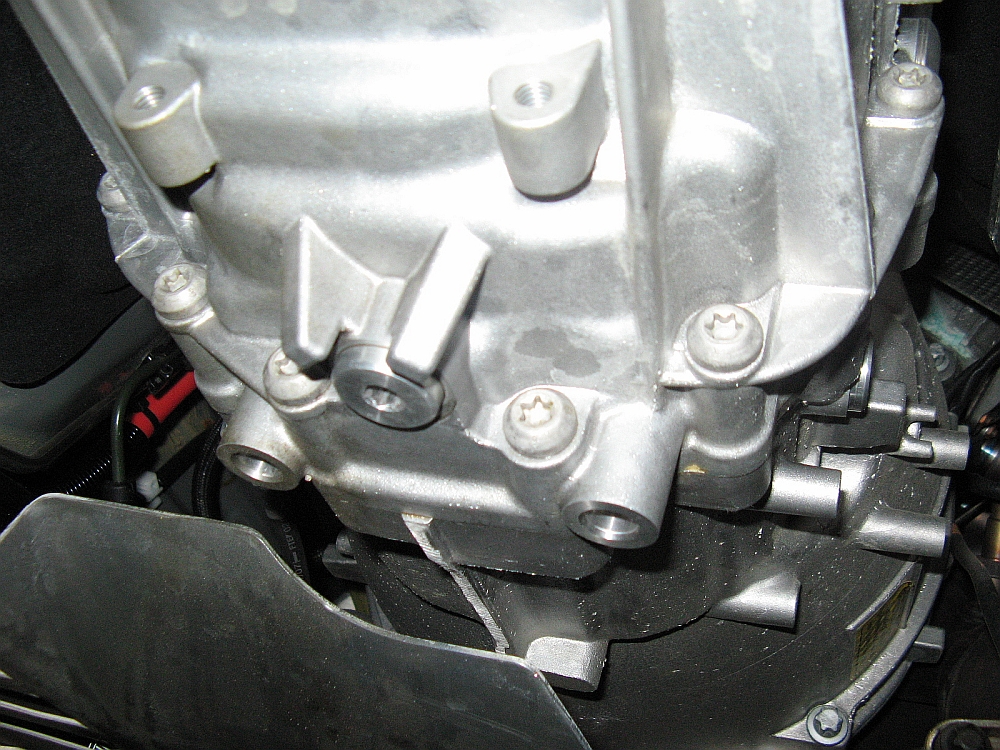
Cliffs Notes DIY: Raise car so that it is level front to back and side to side (4 jack stands work great), remove fill bolt first (8mm hex socket), then remove drain bolt and drain
all old fluid, reinstall drain bolt (35 Nm or ~26 ft/lbs), fill through fill hole using tubing and/or pump until fluid starts to come out, reinstall fill bolt (35 Nm or ~26 ft/lbs)- ENJOY 
BMW/forum users recommend replacing the fill and drain bolts (P/N 23117531356) since the new bolts have an integrated seal (no longer a crush washer),
something I found out after doing fluid changes on both of my cars.
No leaks but I will do this next time.
I used the tubing and squeeze bottle method to fill the transmission-a little less than 2 quarts. The
car should be at operating temperature when you do the change, this affects the oil level since heat=expansion and it also helps in draining all the old
fluid:

![]()
![]()
![]()
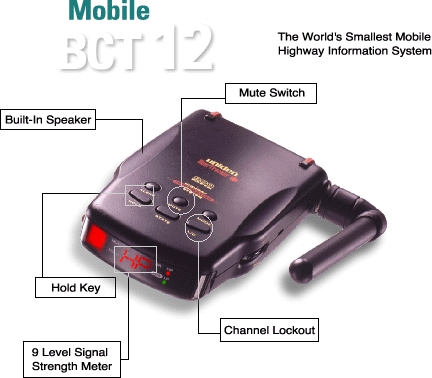
I replaced the Uniden BCT-15 with a Uniden
Beartracker BCT-12 scanner (manual here). It has the same basic functionality (but none of the more advanced features) in a smaller package that
allows you to listen to police bands and alerts for transponder signals within 3-mile radius- acts as a pre-radar detector and programmable by state.
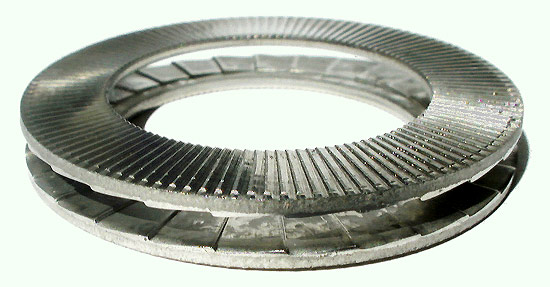
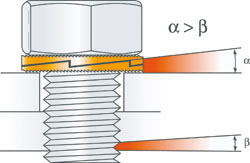
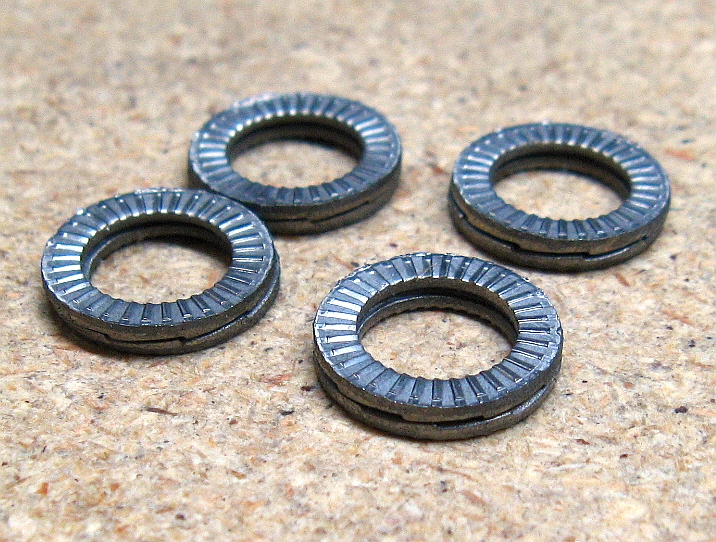
Nordlocks
sourced from McMaster-Carr installed on rear sway bar mount bolts, P/N 91812A230. Mine were still tight but some people had reported issues
with them loosening (detailed HERE),
this was a preventative measure. With my aftermarket exhaust mine were easy to get to, those with OE exhaust may have to remove the lower
cover plate for easier access. The torque spec for these bolts is 22 Nm (~16 lbs/ft).
NordLock general information sheet HERE, introduction information HERE,
technical information HERE,
and video introduction HERE.
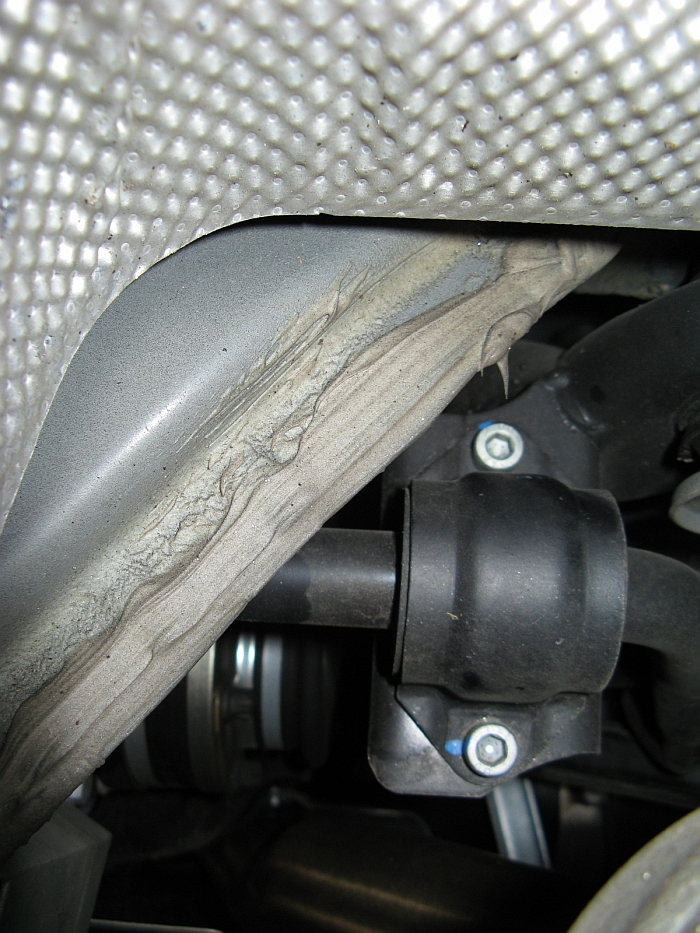
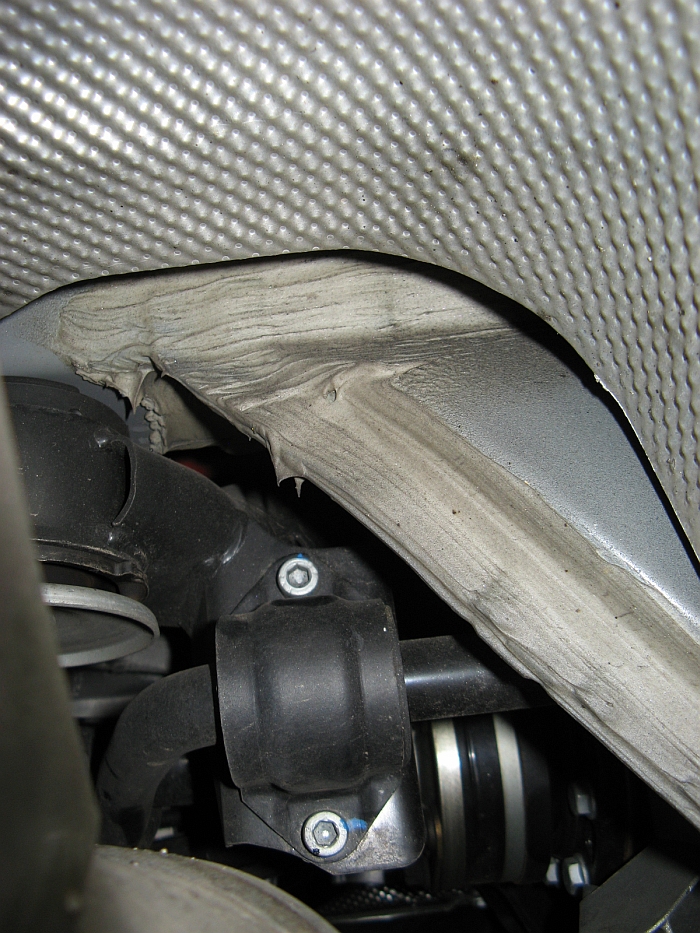
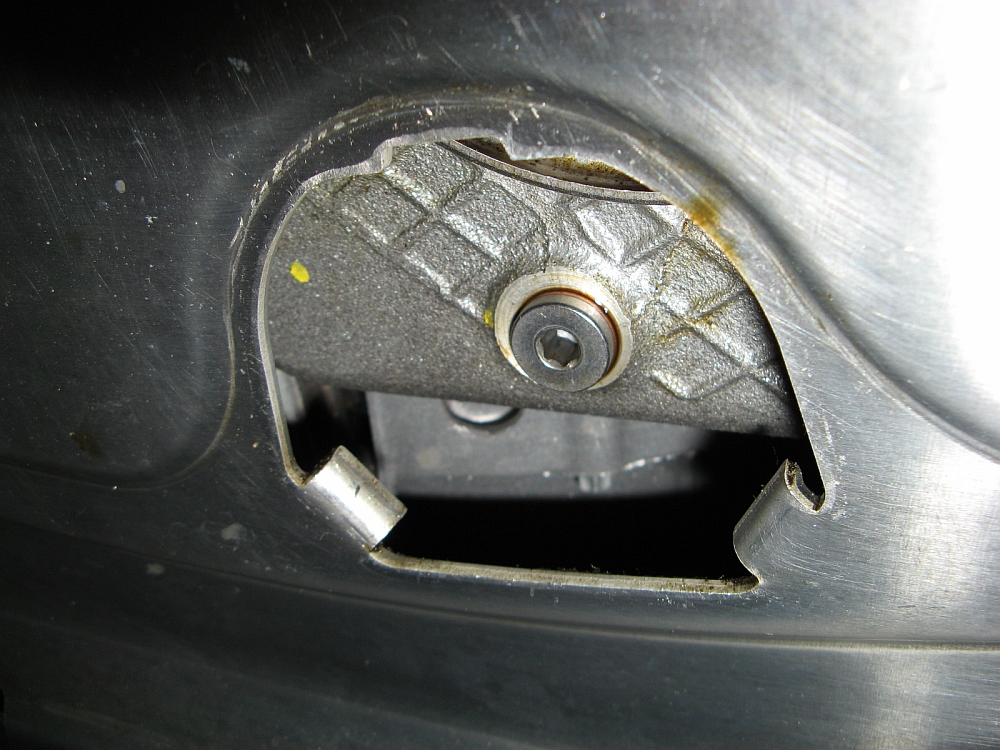
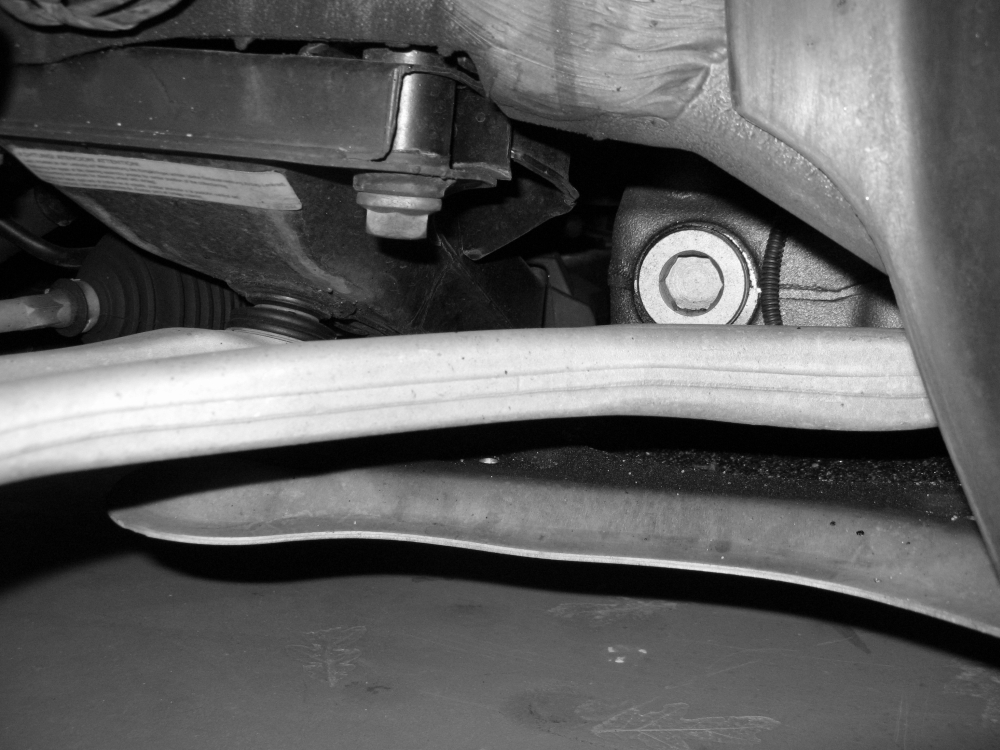
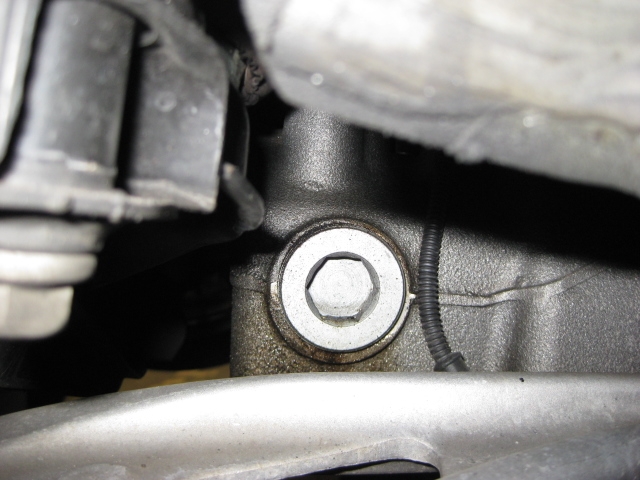
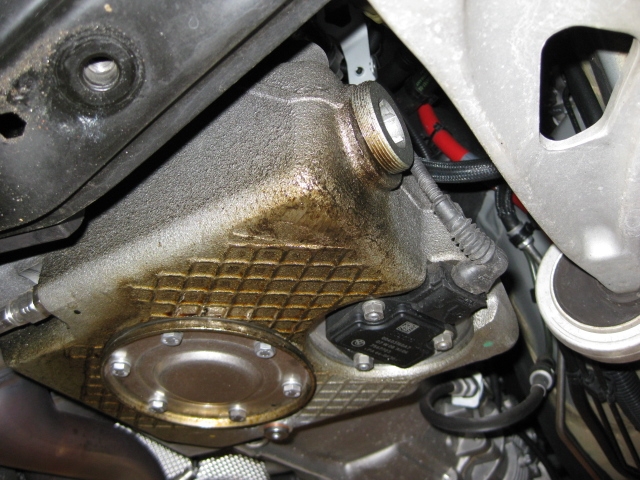
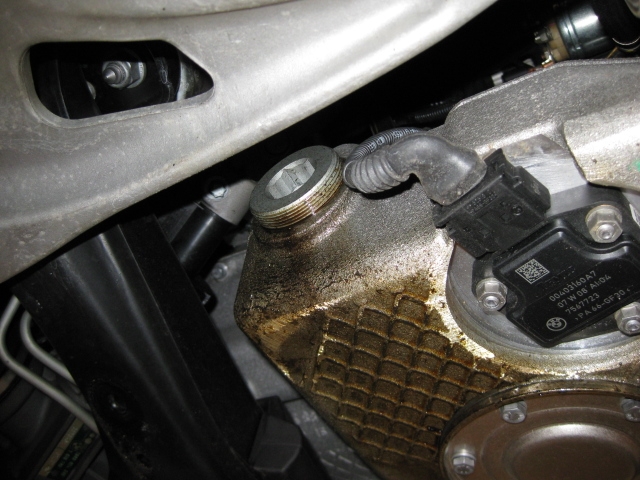
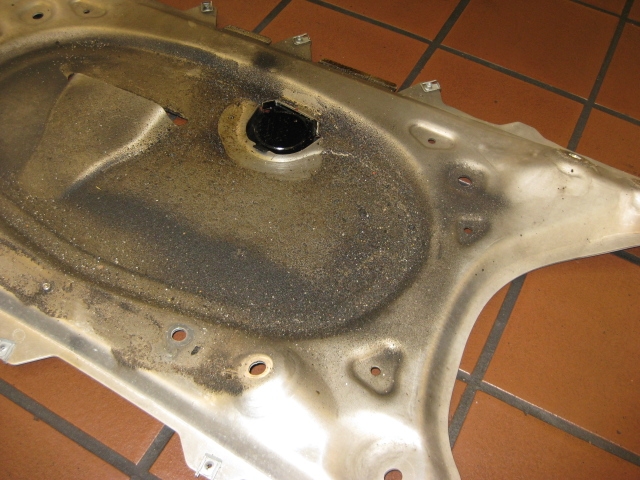
Ever since the 1200 mile service I have noticed a small oil spot
under the car which I chalked up to oil spilling on to the skid plate during the oil change. When I performed the intermediate oil change I didn't notice
any on the rear of the motor so I cleaned up the top of the plate the best I could with the oil pan drain bolt plastic piece removed and the leak stopped for a while
but came back. Today I took the car in for the scheduled oil change (12392 miles, only 4568 miles on oil) and asked the tech to check the motor mount bolts
and the source of the oil leak. The passenger side motor mount bolts checked out OK but the oil leak turned out to be the oil pan casting plug.
Since this part and/or sealer is not available separately, the oil pan will be replaced.
As always, Adriana (SA) and Jeffrey (Tech) at United BMW Gwinnett were courteous, professional, and meticulous while performing the services on the car today and explaining the
problem while the car was on the lift . The oil pan had to be ordered from Germany so the car was taken back in later for the R&R,
Jeffrey and Adriana were nice enough to take/email me some pics of the oil leak while the car was apart for the oil pan replacement.

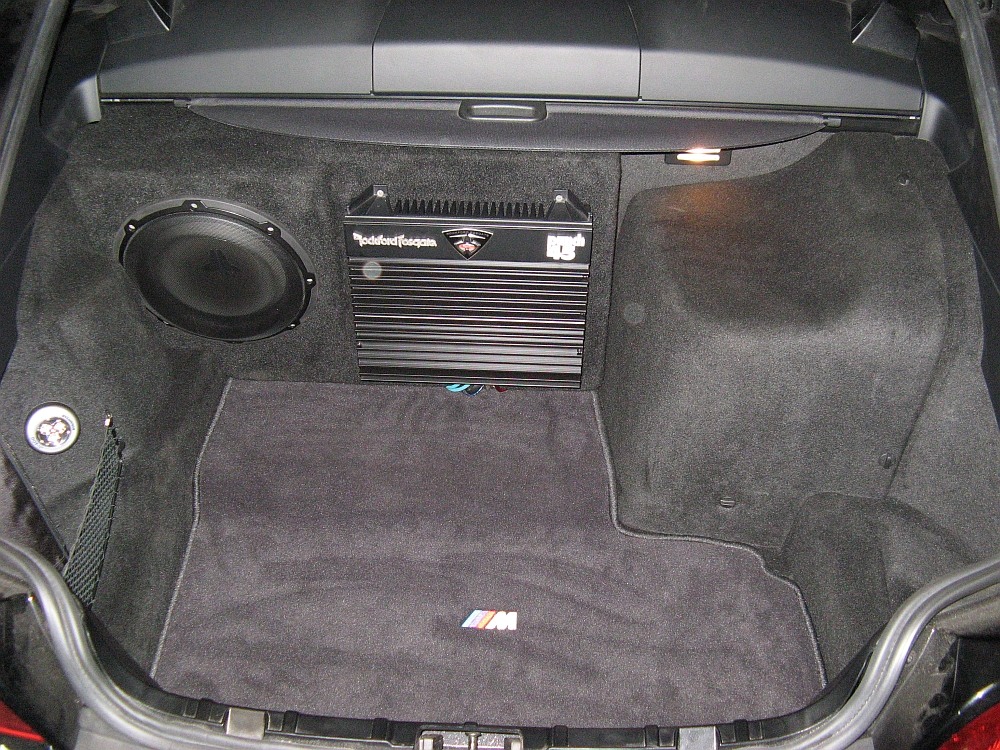
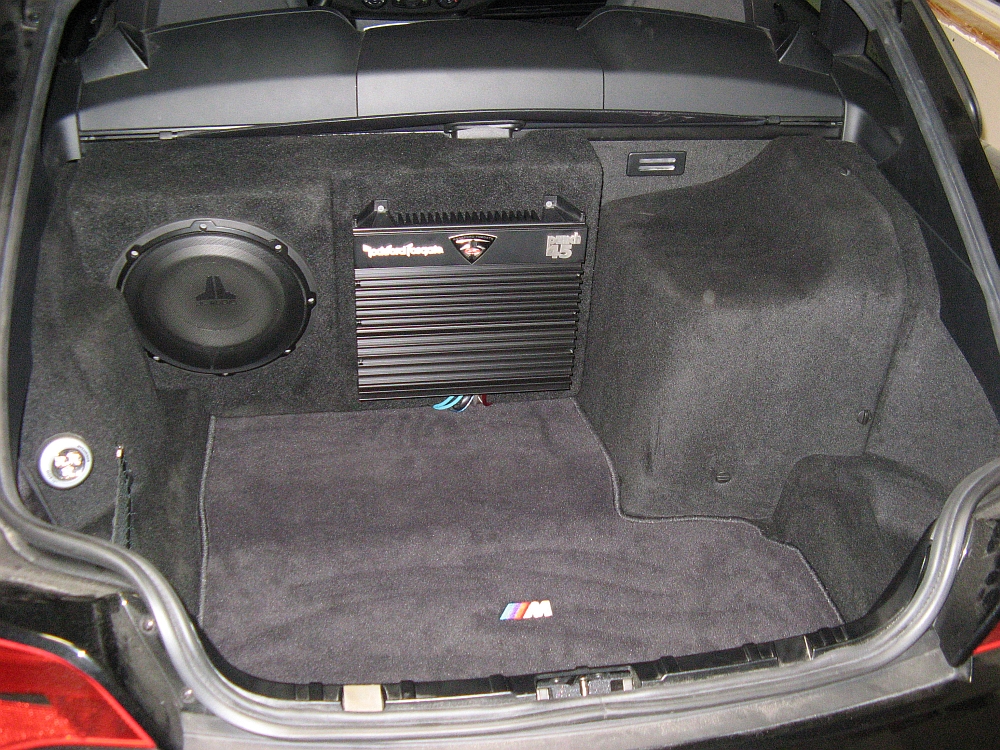
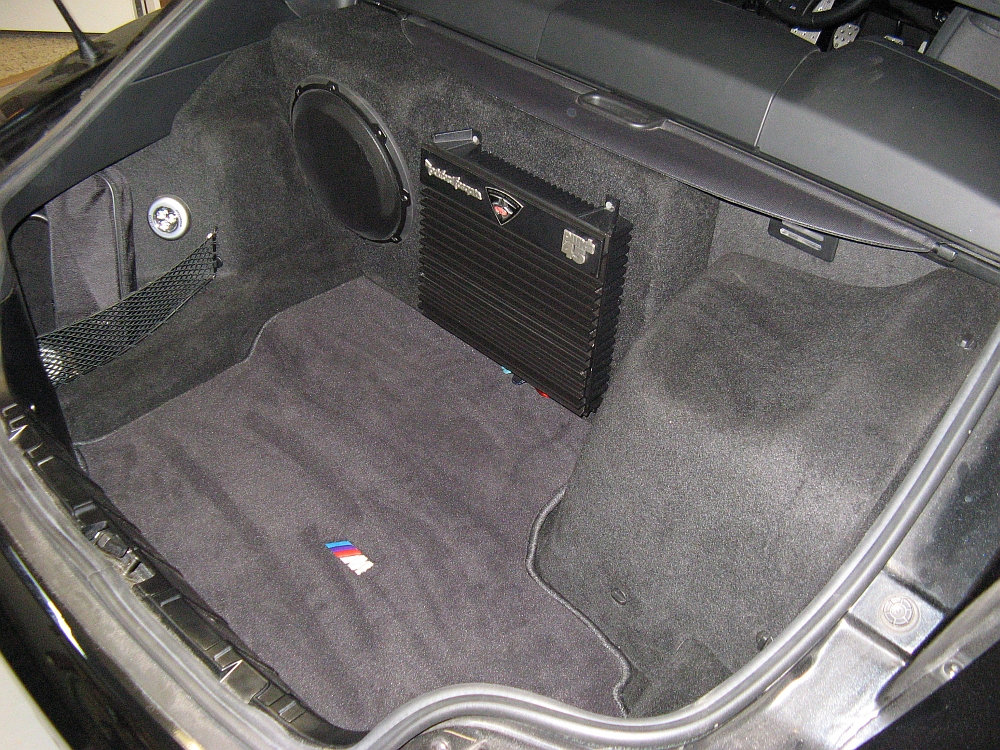
I decided to install an add-on subwoofer to correct my perceived
lack of low-end with the BMW Top HiFi Carver system in this car. I used a Rockford Fosgate Punch 45 (25 to Life) amplifier, a JL Audio 10W1v2-4 subwoofer,
and a MTX REQ line level converter/bass restoration processor. I am now satisfied with the audio system in the car and particularly the subwoofer since it
is an add-on to a factory head unit and amplifier. I initially had a LOT of trouble finding information on how to tie in to the OE audio system but did eventually
find some helpful forum threads and other information/web sites- all detailed here
in My BMW M Coupe Subwoofer Installation web page along with installation details and photos, product manuals, and product information:
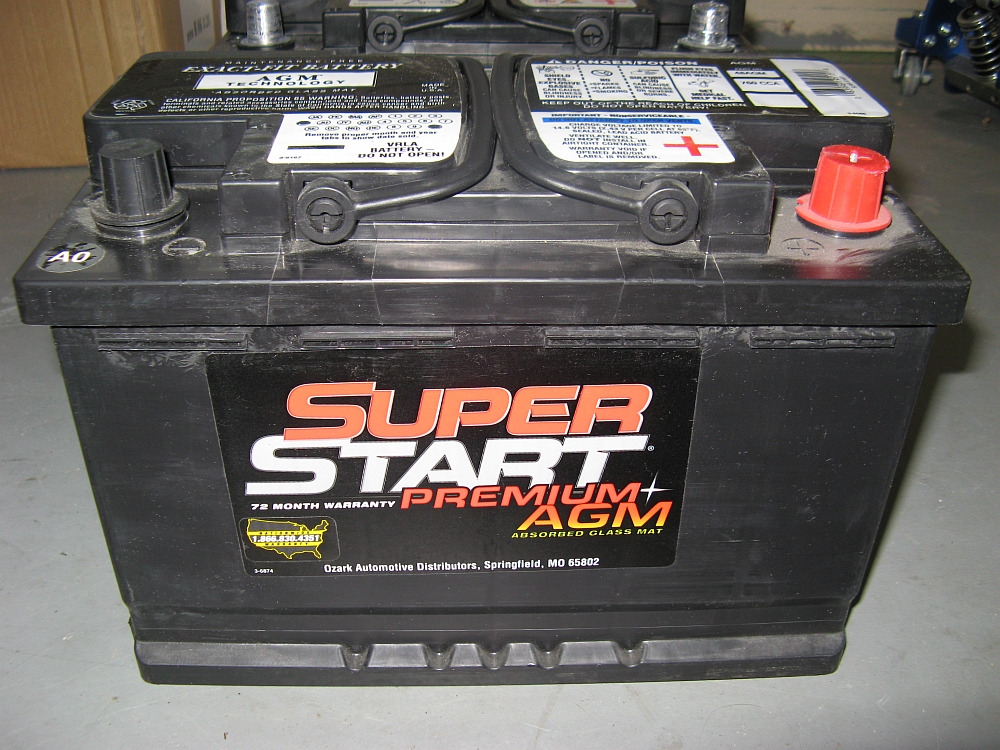
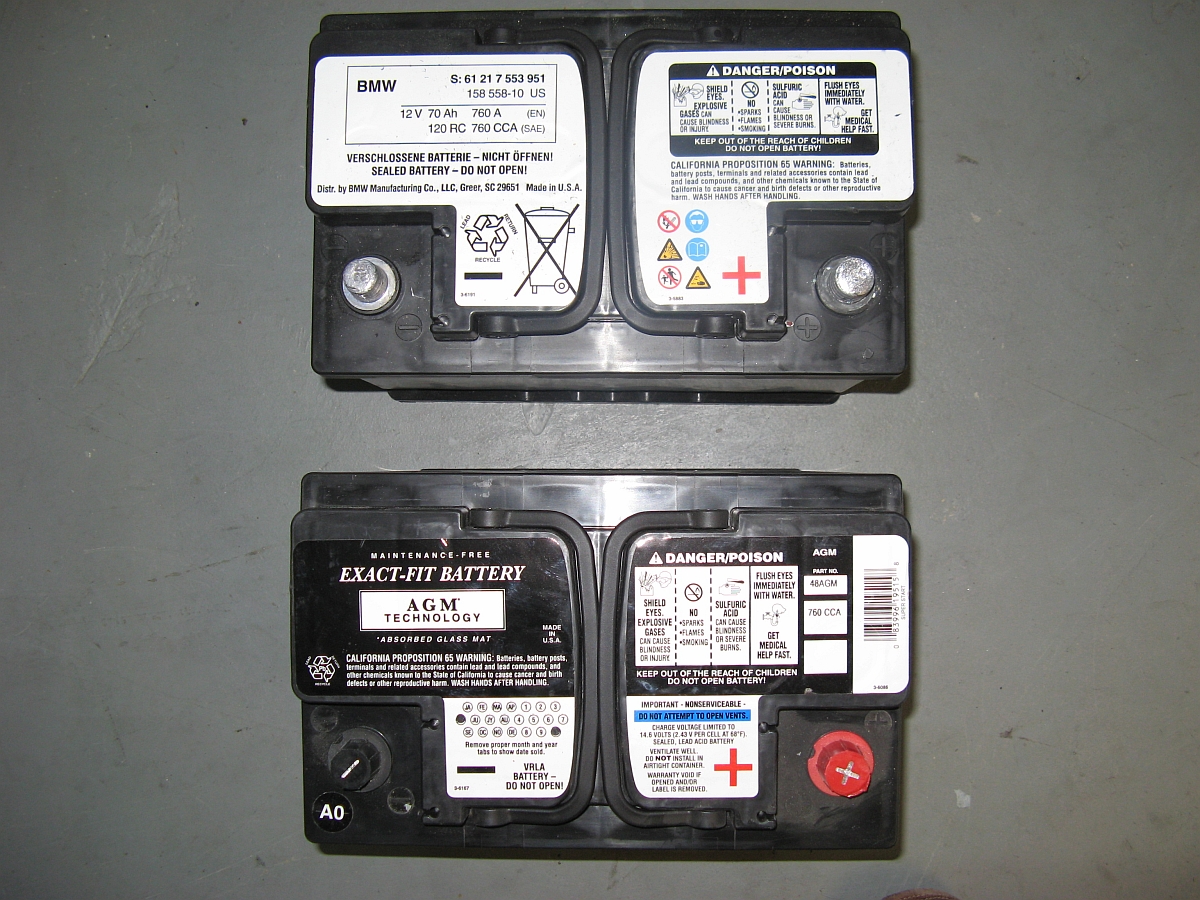
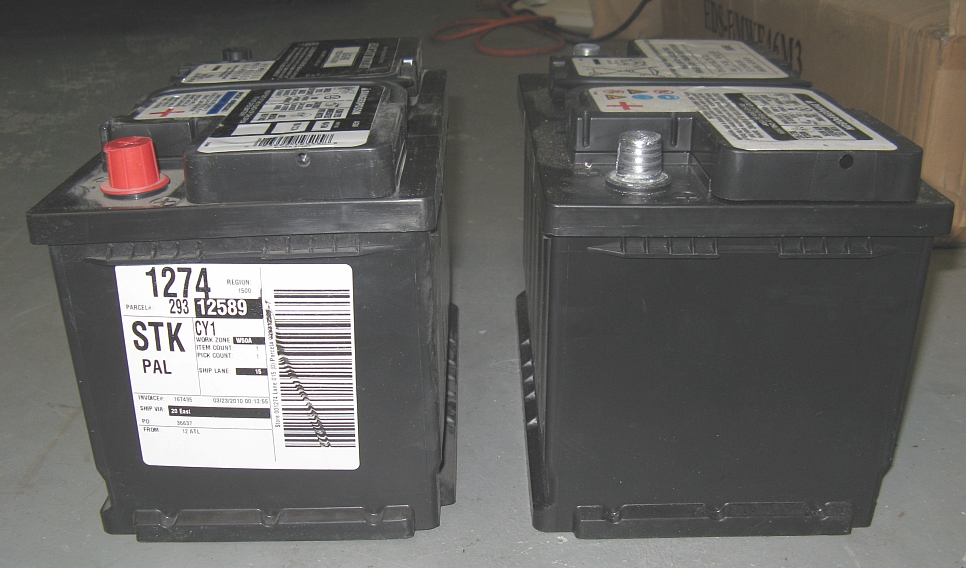
After 13k miles and 2.5 years, the battery finally went to battery heaven-
no warning, just no start. I put the charger on it and BAD BAT was the resulting message. I imagine the warranty would have covered the battery but since I have been
traveling during the week it would be impossible. After several calls to the local McParts stores only one had a battery that fit the description,
O'Reilly Auto Parts -
see battery listing with specs HERE.
The battery looked exactly like the one that went bad, vent tube in the same place- EASY swap. It seems some other forum members that purchased their cars around the same
time I had purchased mine had similar issues with the BMW battery and premature death.....hopefully this one will last longer but it does come with a 72 month warranty, first 2 years
no charge replacement and after that pro-rated.
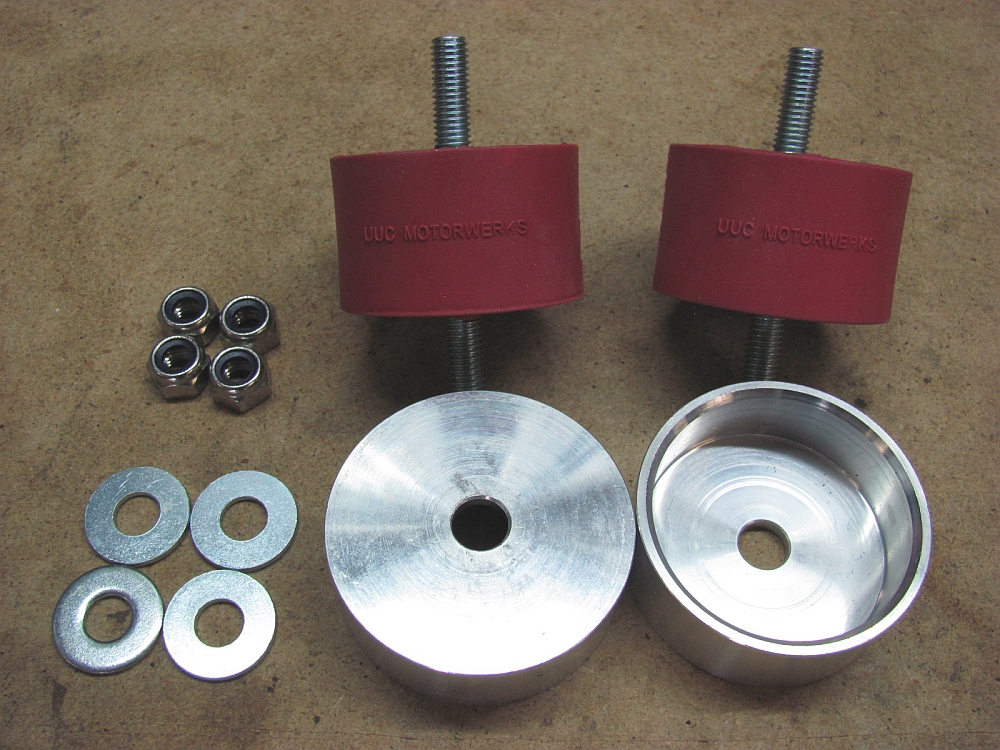
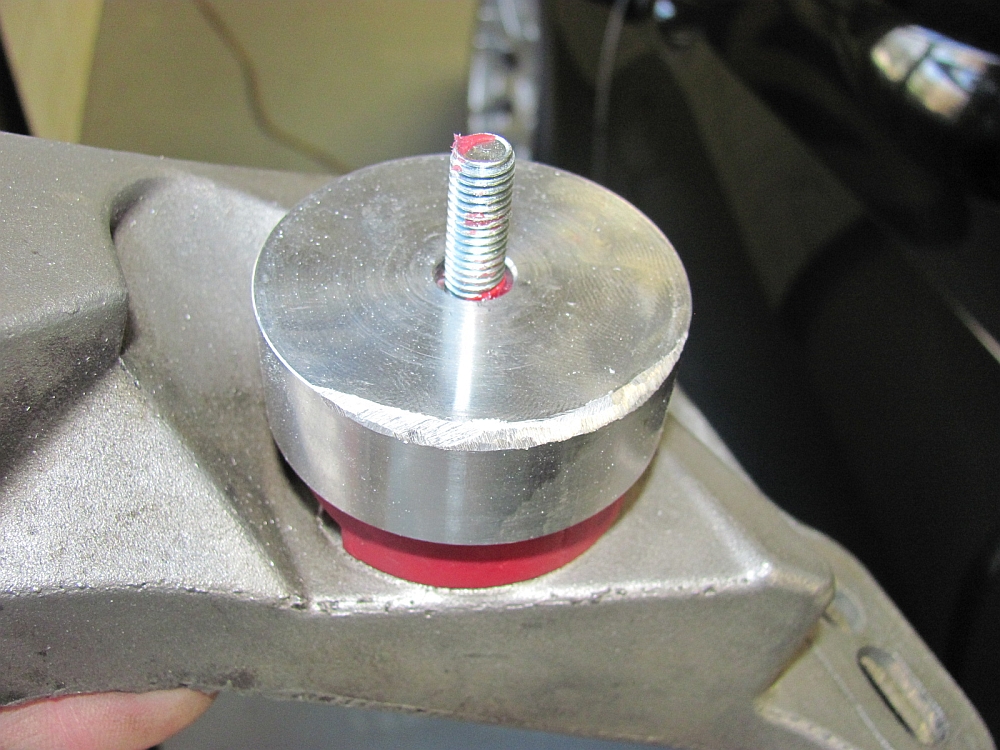
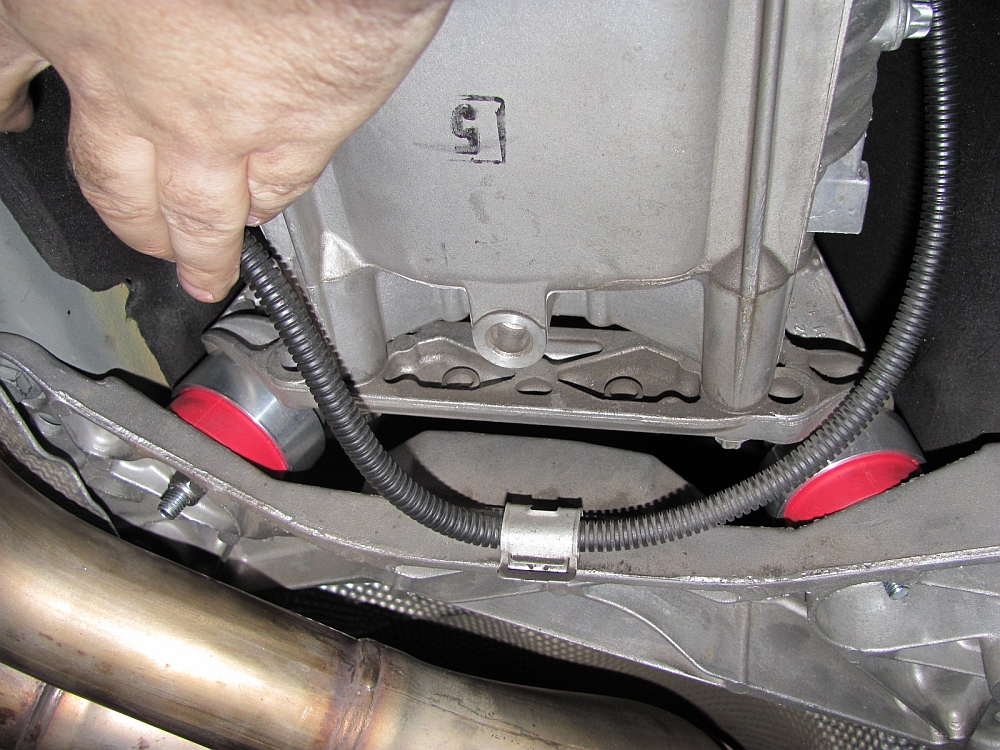
UUC Transmission Bushings and Enforcer Cups installed after collecting dust in the garage for two years.
Had I known they would make such an improvement, I would have installed them sooner- they really make the shifts more solid and consistent by eliminating the
transmission movement that braking, acceleration, and cornering forces cause.
UUC product information HERE,
ordering information HERE.
My installation write-up is HERE.
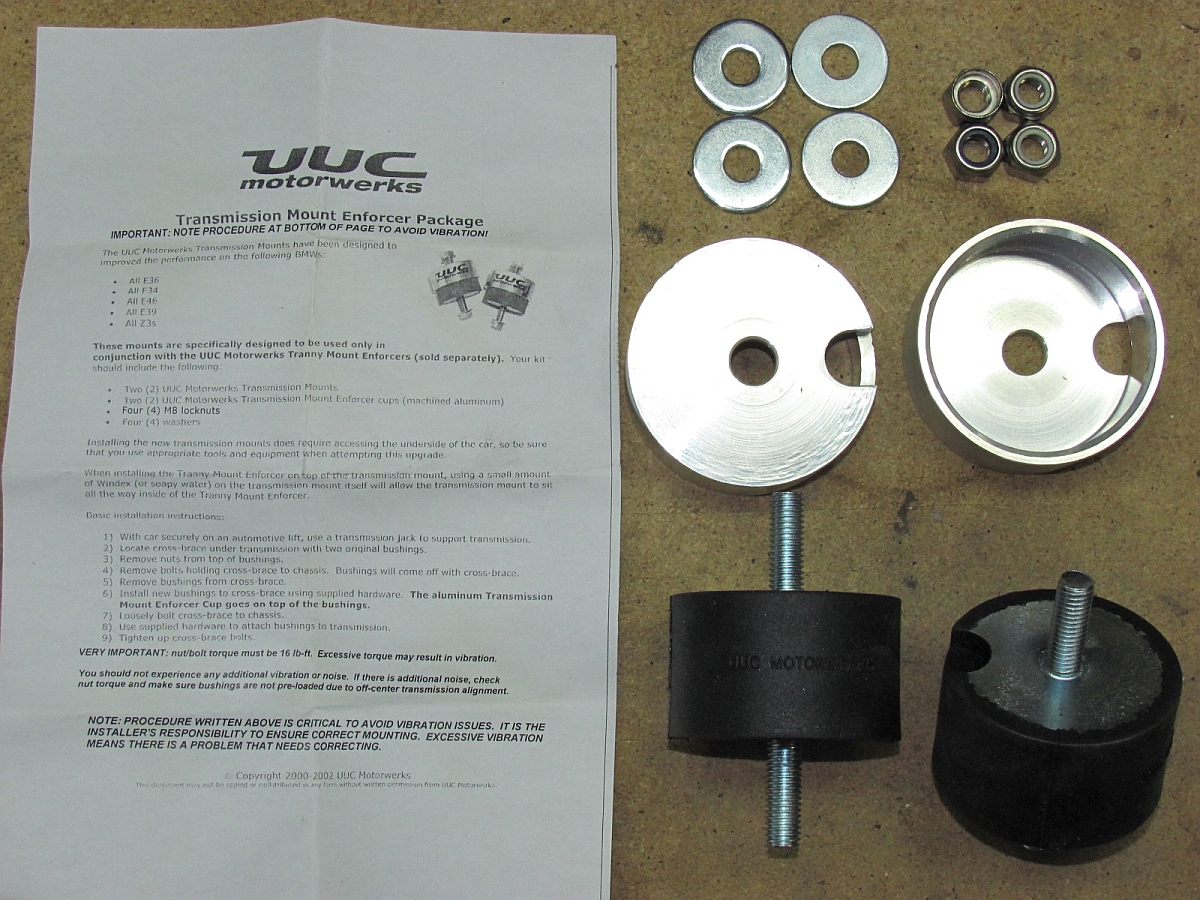
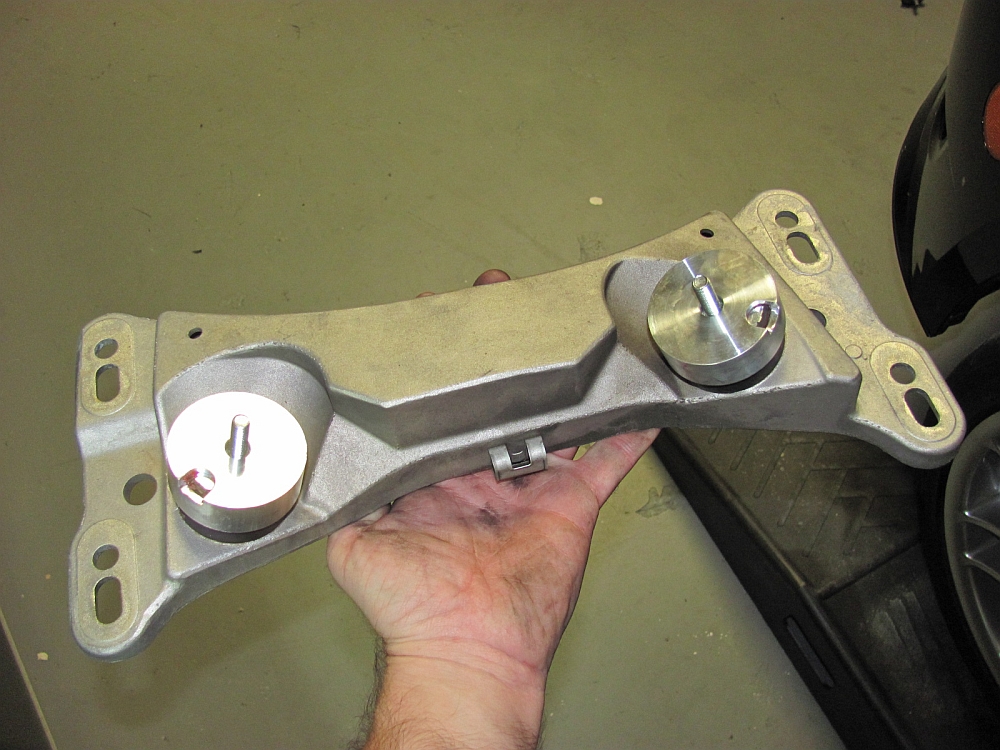
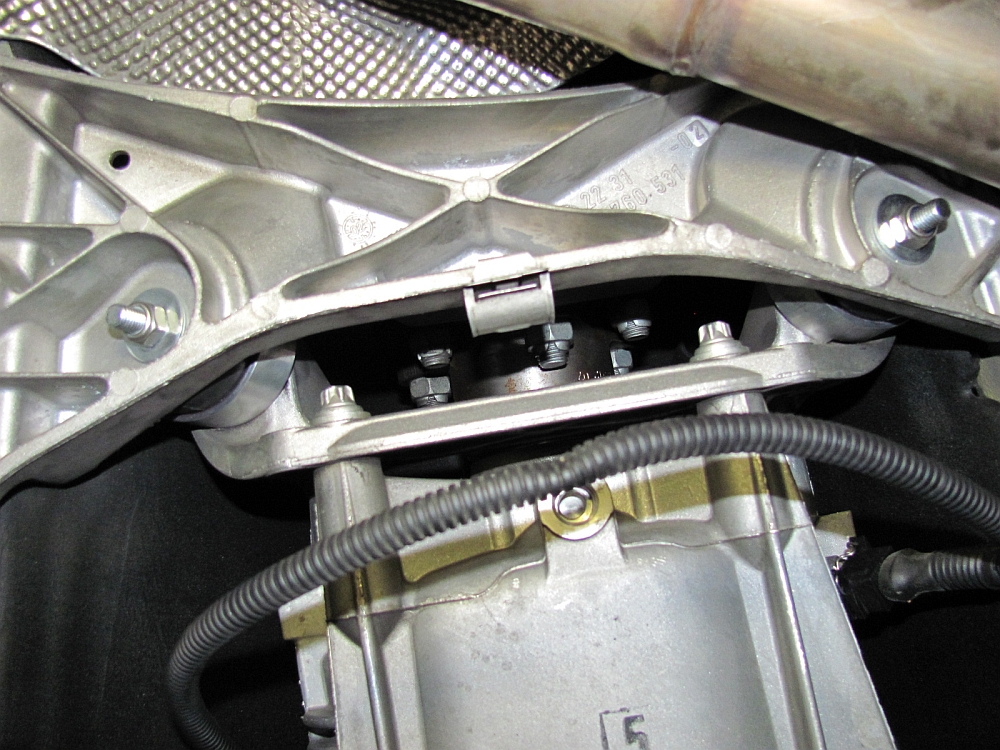
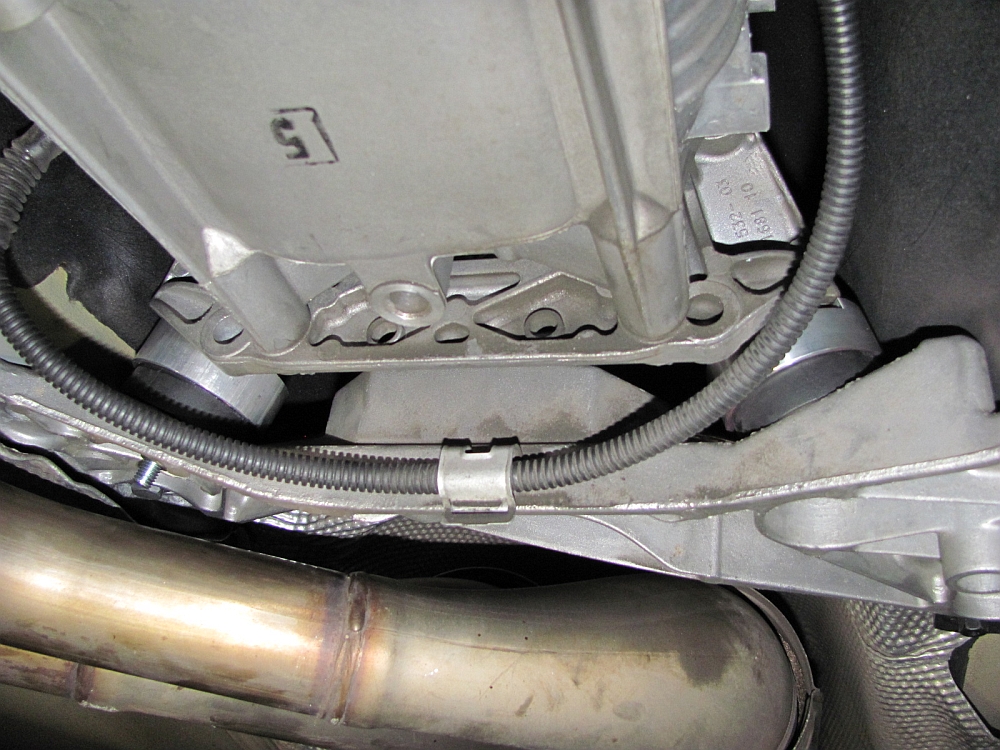
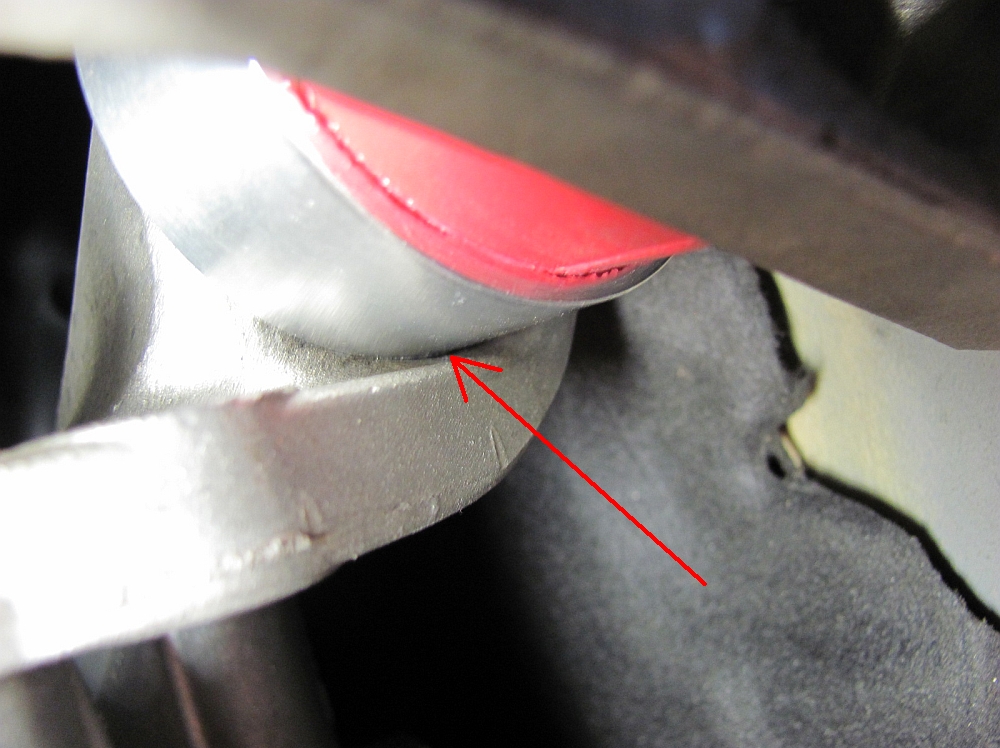
[UPDATE] I got used to the black trans mounts so I found a deal from someone with NOS UCC red neoprene mounts, one step up from the black mounts. These enforcers did not have locating pin notches (not needed for this application but I used these on the blacks to allow more movement) and I found some interference between the transmission case and the enforcer on the passenger side that would not let it slide all the way into place. Some light chamfering of the enforcer edge with a grinder made it all better and I was able to install the mount with no preload. I found these to have a touch more NVH but feel even more solid:
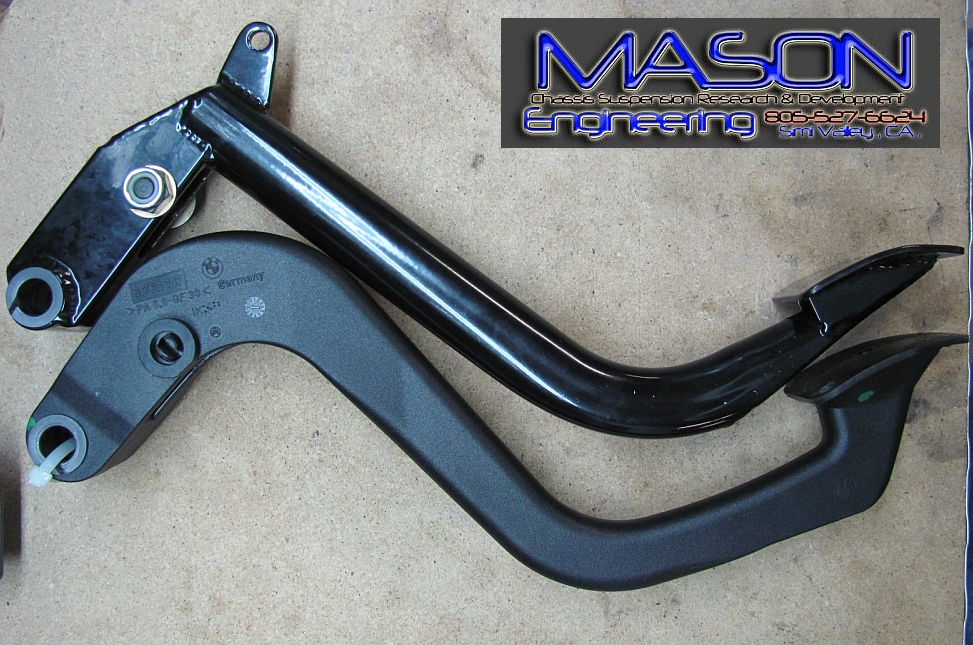
Mason Engineering Clutch Pedal and
UUC "Big Boy" Clutch Stop installed.
The Mason clutch pedal is made of steel, unlike the OE plastic piece, and is supposed to prevent bushing deformation that causes side to side play. Even better,
it removes a lot of the freeplay/slop in the clutch action so now the clutch is engaged within a few inches of the floor.The UUC clutch stop removed the remaining
bit of freeplay but required some modification to the clutch safety interlock switch.
All is detailed in my installation write-up HERE.
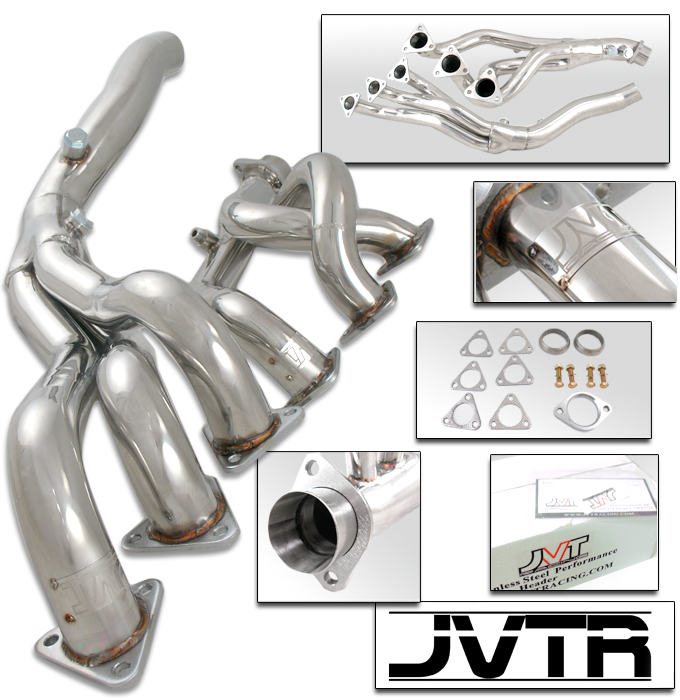
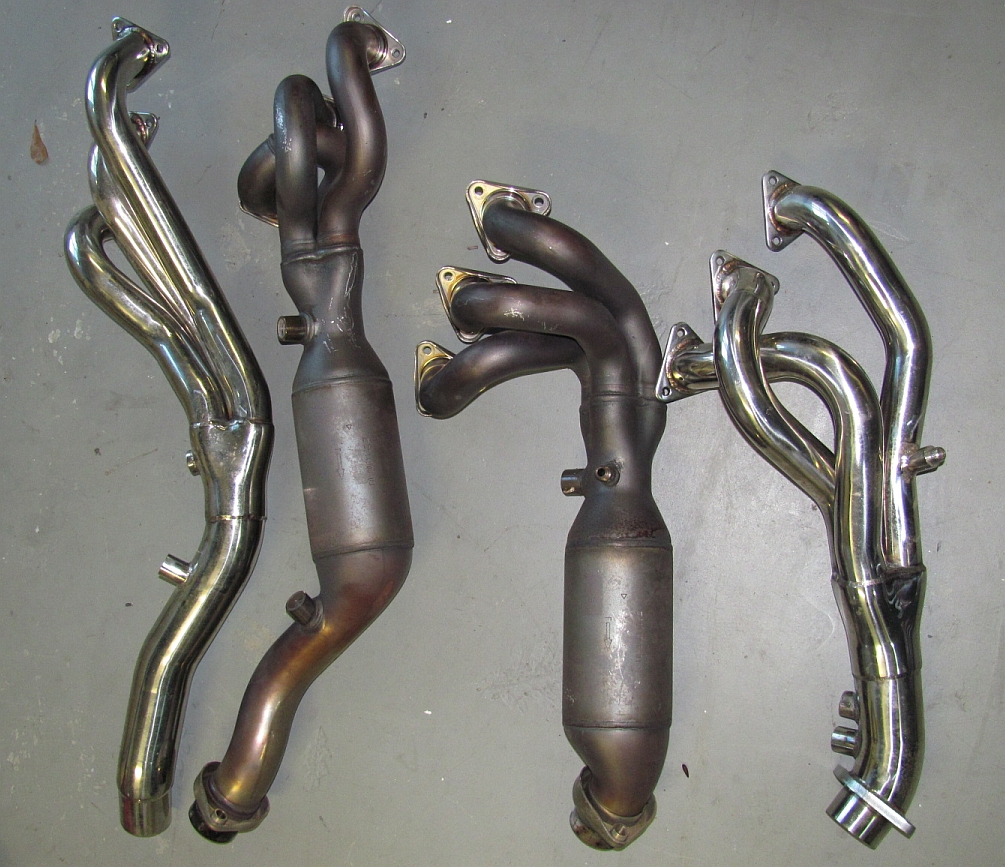
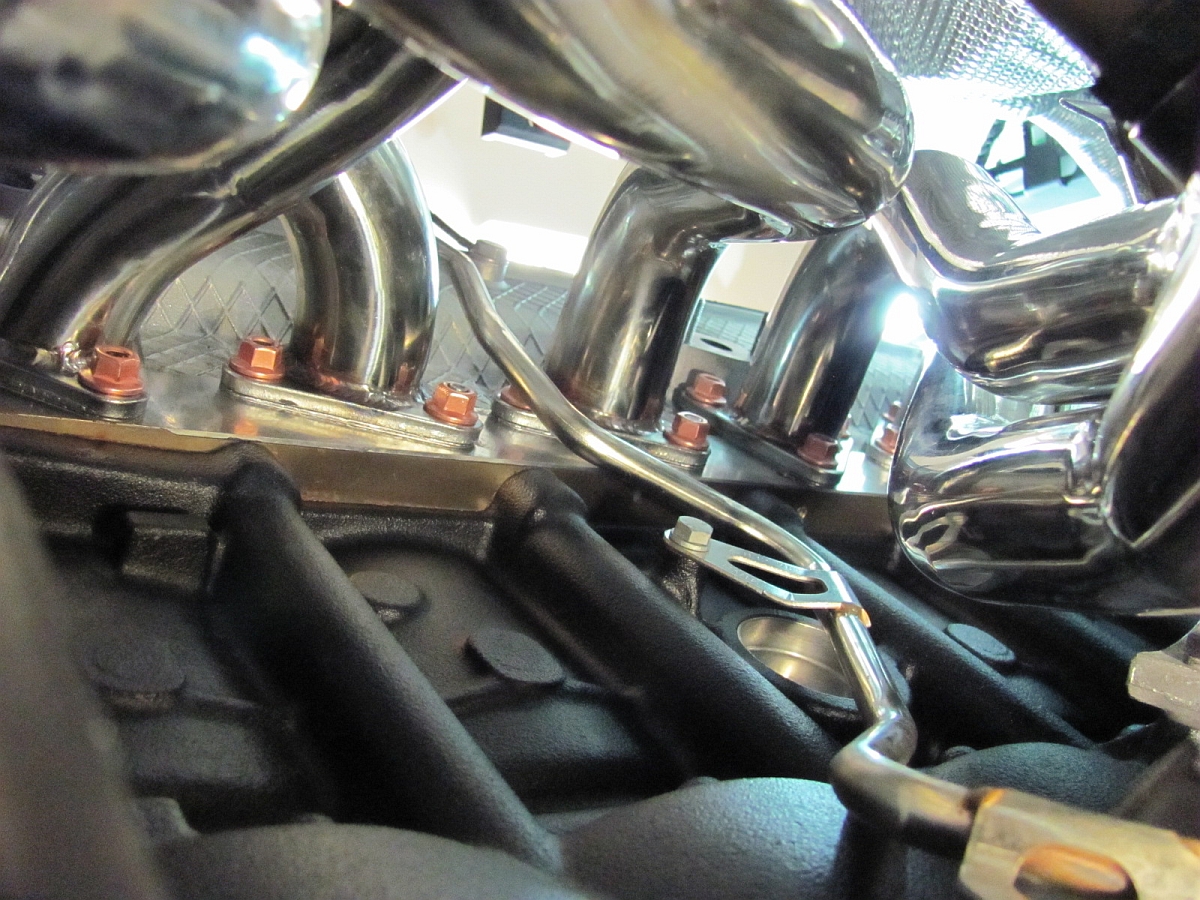
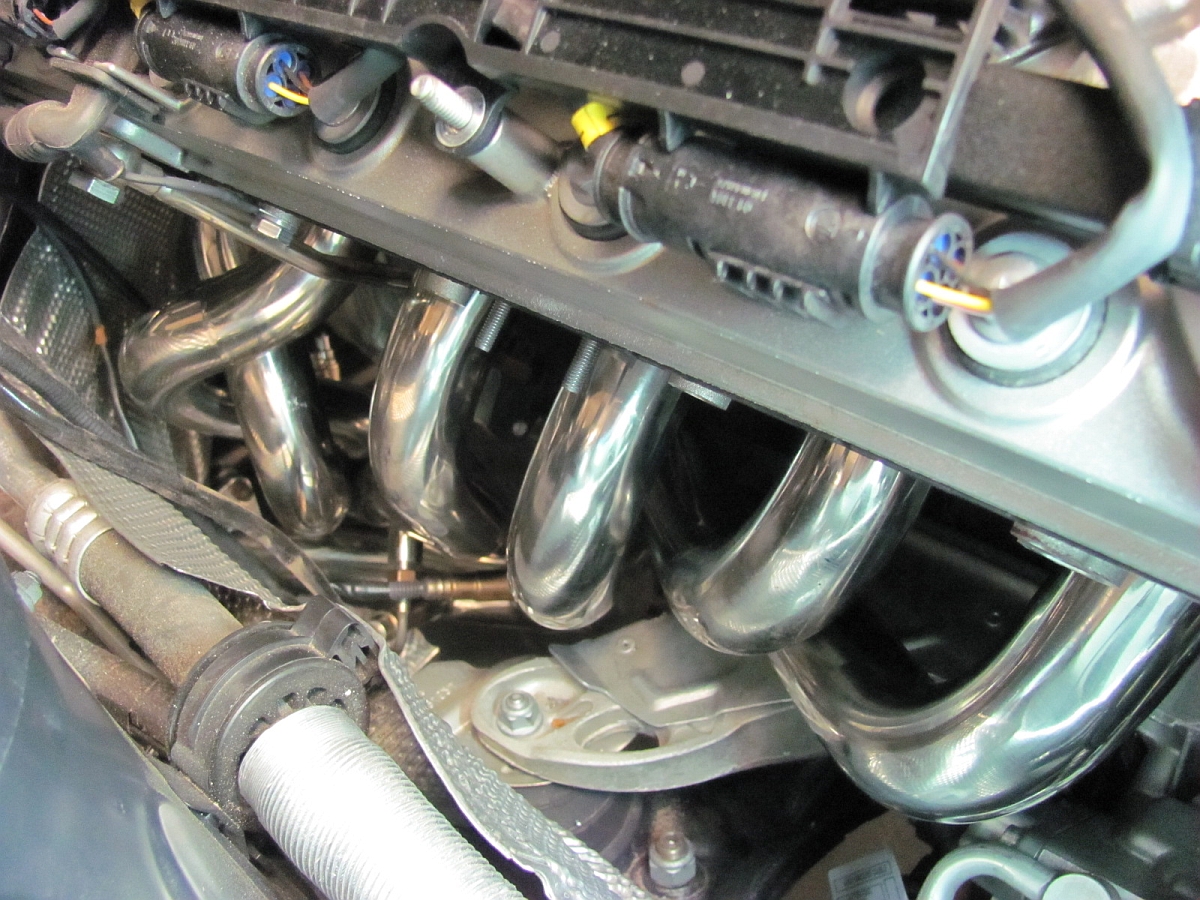
JVT Racing
headers from ERZ Performance installed. These headers were purchased a
few years ago and are NLA, but similar headers can still be found on eBay- Chinese copies of the SuperSprint headers. They might require a bit of work to
fit, but are cheap enough to justify the effort.
All detailed in my DIY Guide HERE.
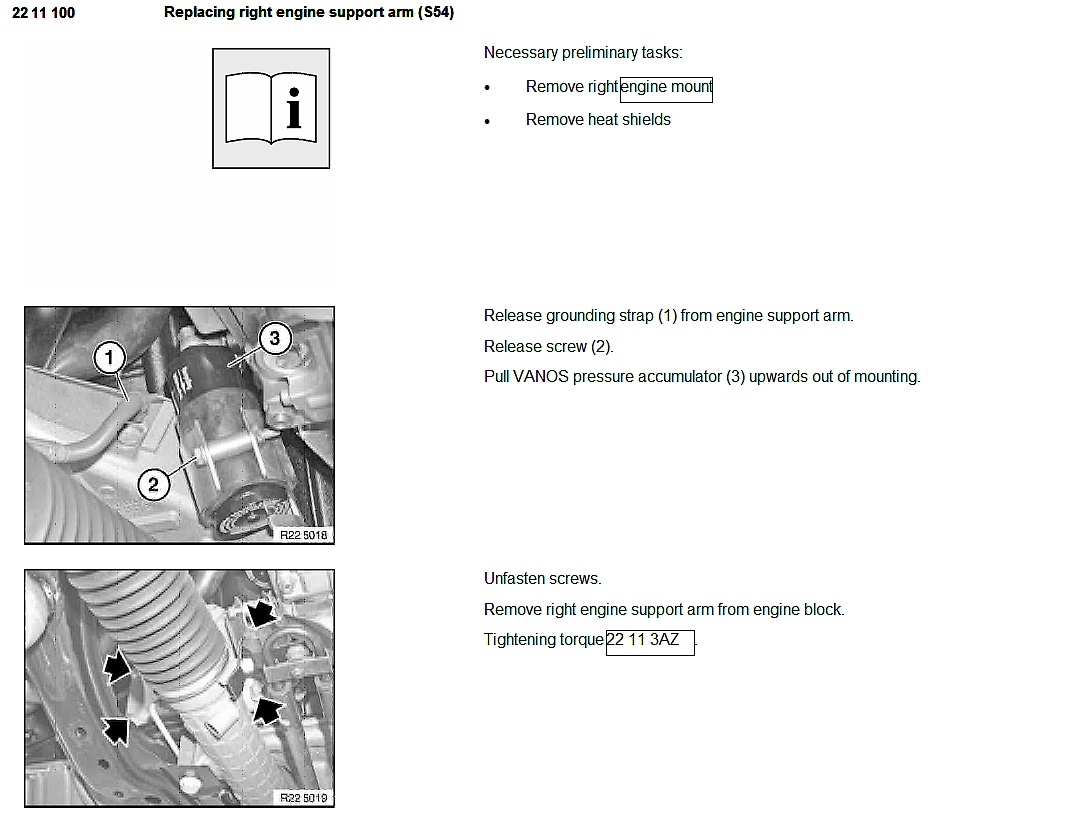
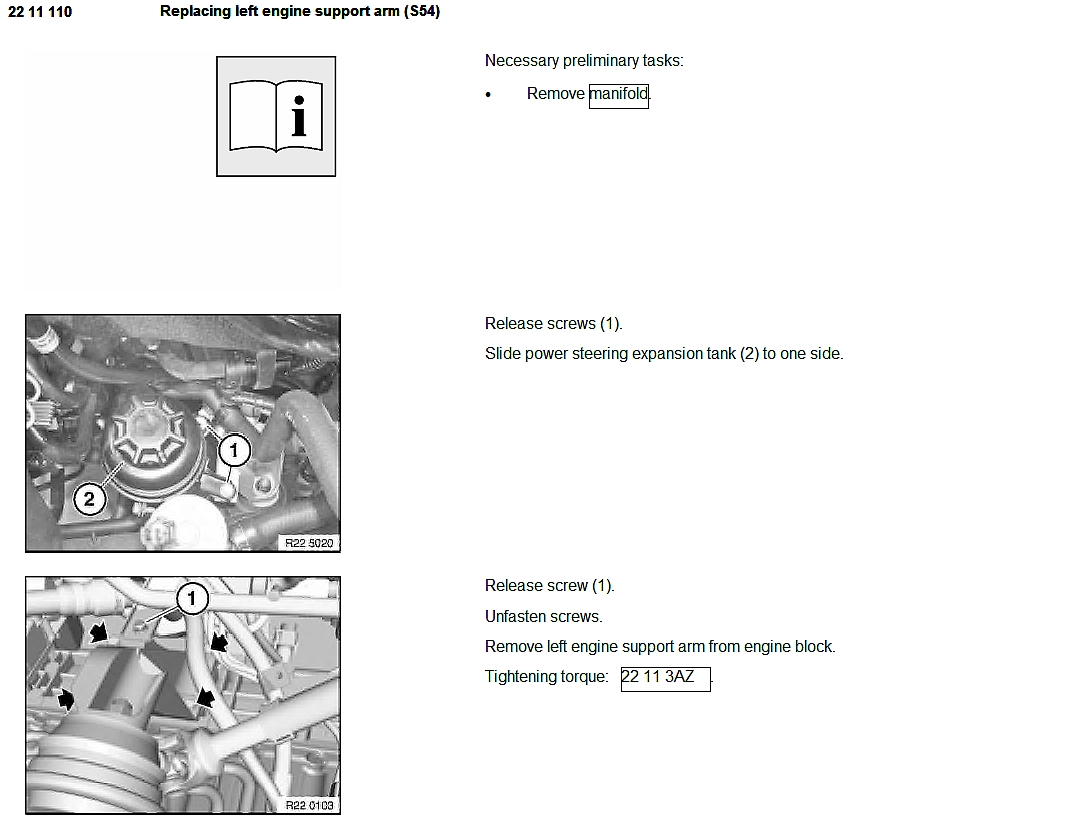
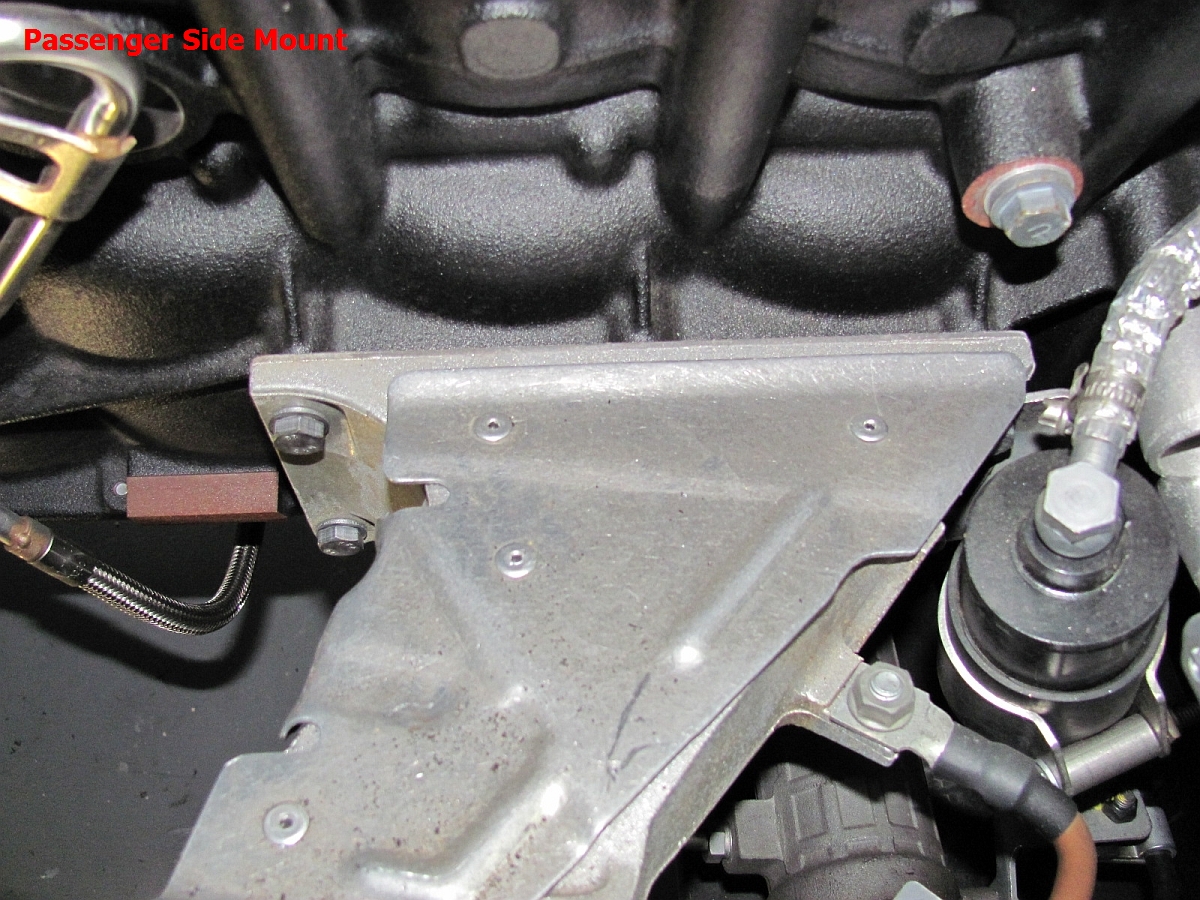
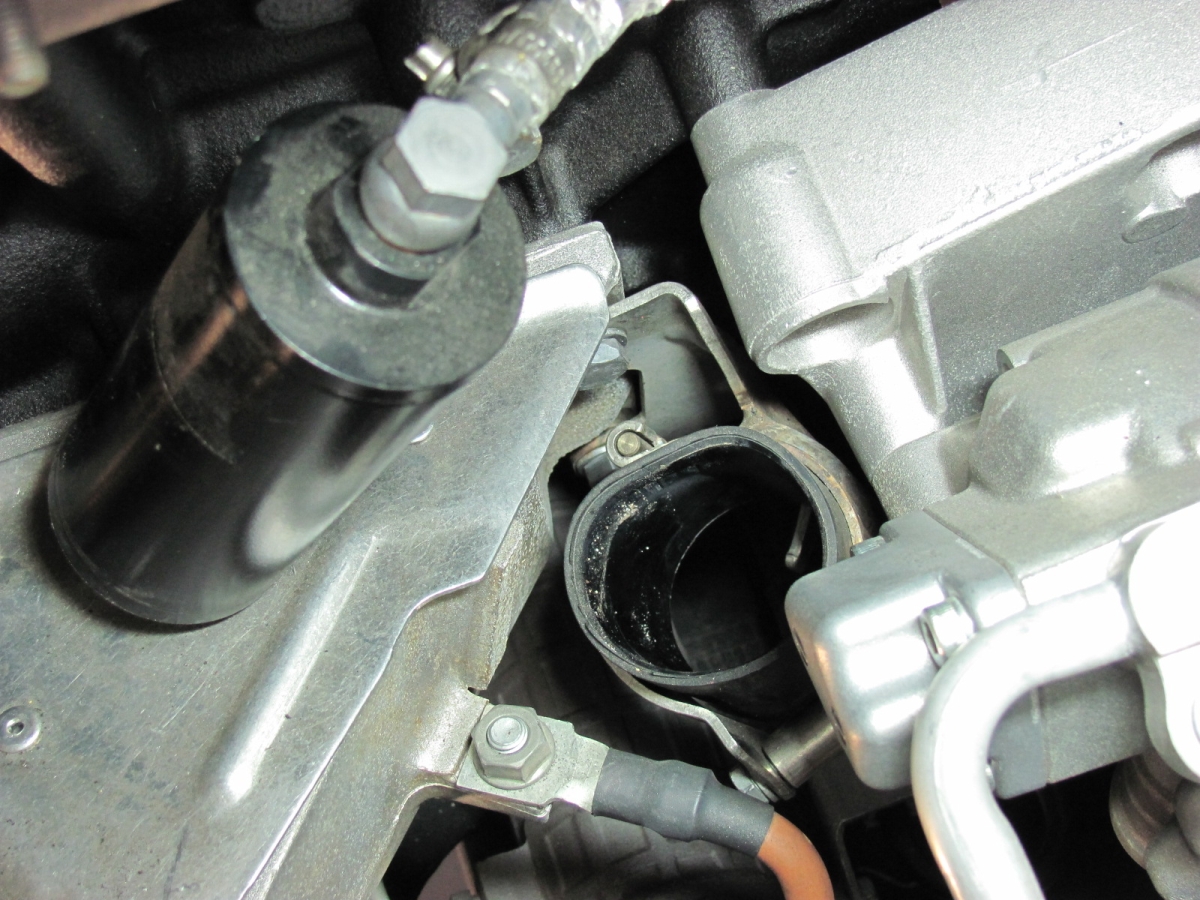
Several forum members have had issues with motor mount engine bracket
bolts becoming loose or failing as seen HERE and
HERE, just a few examples- there are other cases. BMW eventually
released an SIB concerning the issue HERE (SI B 22 01 09).
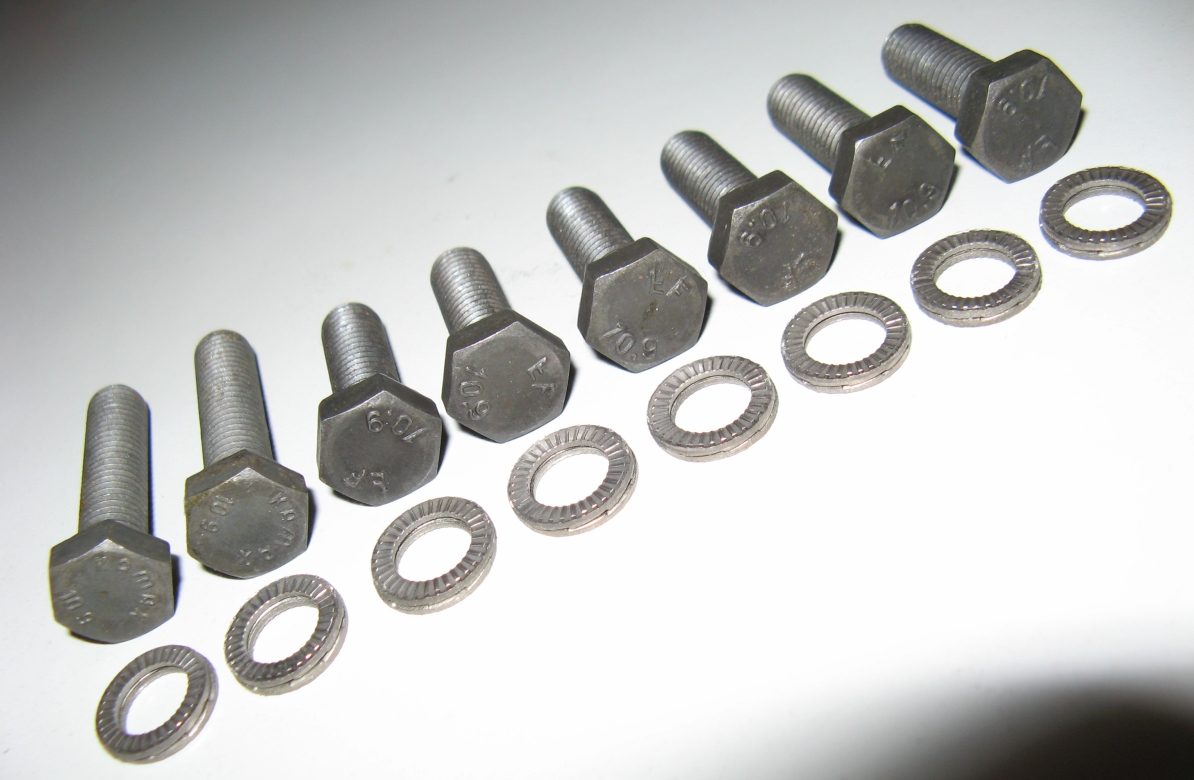
Not wanting to wait until something broke, I opted to buy the stronger BMW Motorsports
10.9 bolts from Tischer BMW and utilize some NL-8 5/16" SS
Nordlocks (P/N 91812A230) sourced from McMaster-Carr in place
of the OE BMW washers. I also decided to do both sides even though the SIB only stated the right side as a possible issue, other owners have seen issues with
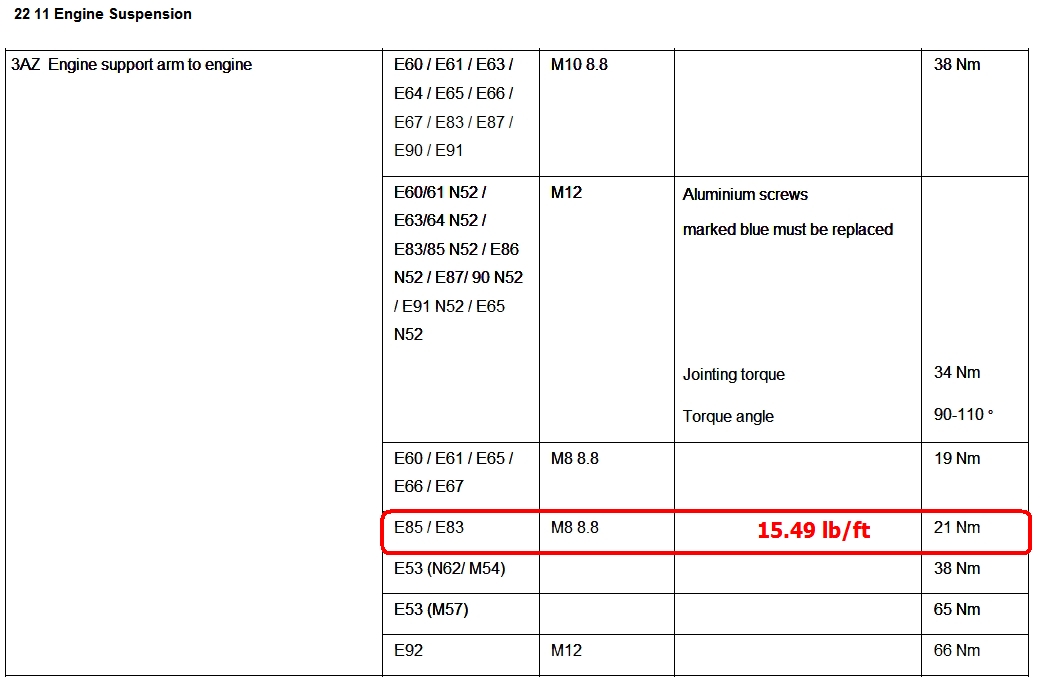
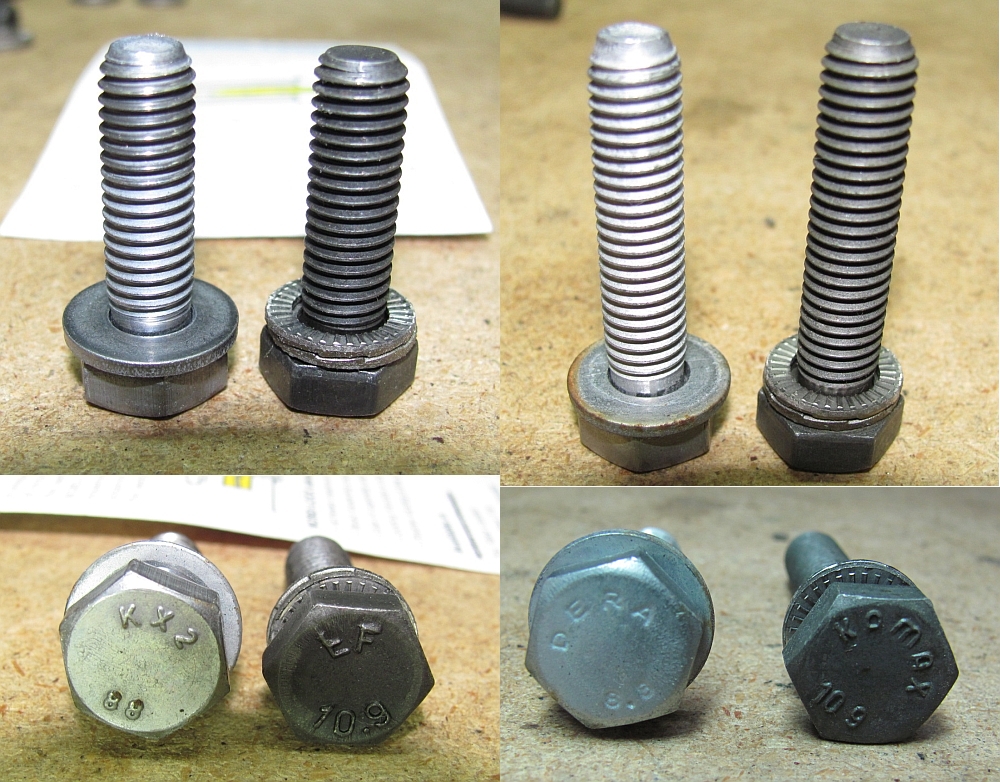
the left side as well. Illustration below shows the mount bracket bolts and the OE 8.8 bolt part numbers.
The BMW part numbers and German references from the BMW Motorsports Catalog are as follows:
(Left Hand Motor Mount Hardware)
Tragbock li an Kurbelgeh use support lh to crankcase
- 07119913653 * SECHSKANTSCHRAUBE Hex. Screw M8x25 10.9 (2 required)
- 07119913673 * SECHSKANTSCHRAUBE Hex. Screw M8x35 10.9 (2 required)
- 07119903078 * SCHEIBE Washer 8-200 HV (4 required)
(Right Hand Motor Mount Hardware)
Tragbock re an Kurbelgeh use support rh to crankcase
- 07119913653 * SECHSKANTSCHRAUBE Hex. Screw M8x25 10.9 (4 required)
- 07119903078 * SCHEIBE Washer 8-200 HV (4 required)
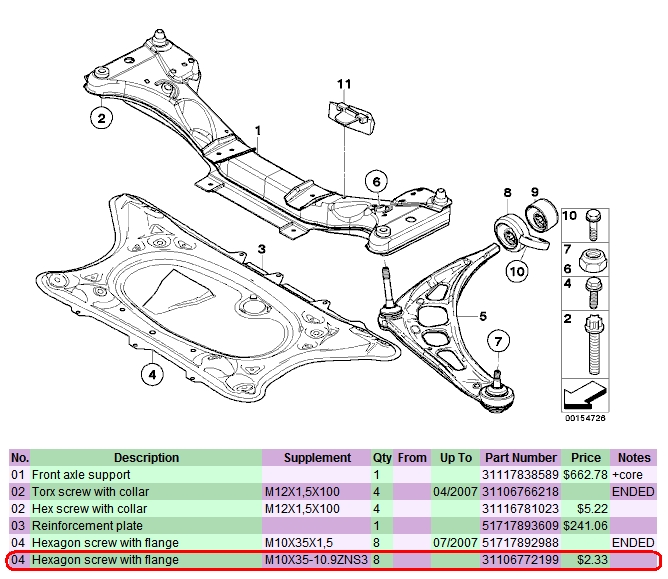
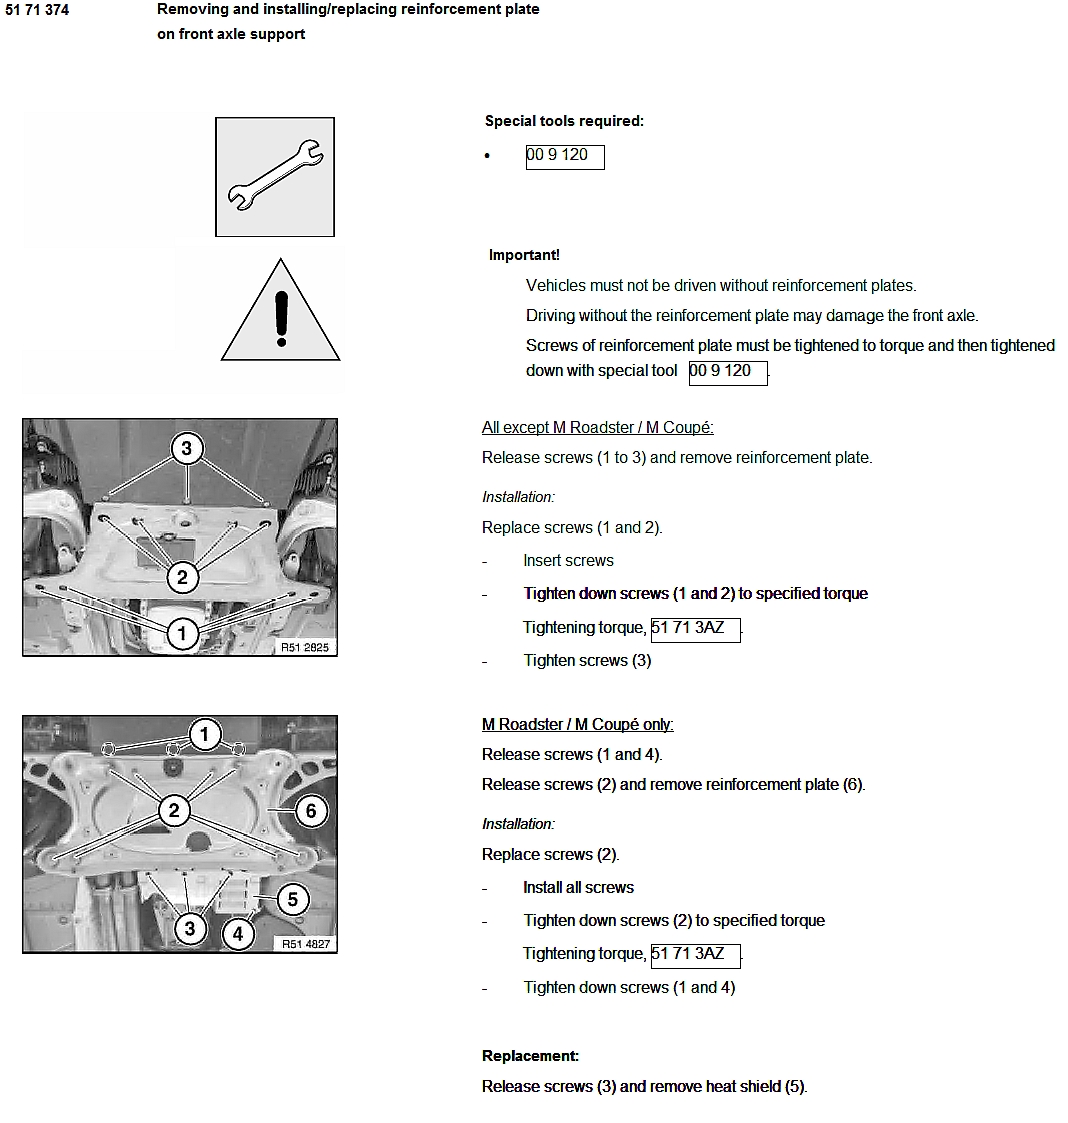
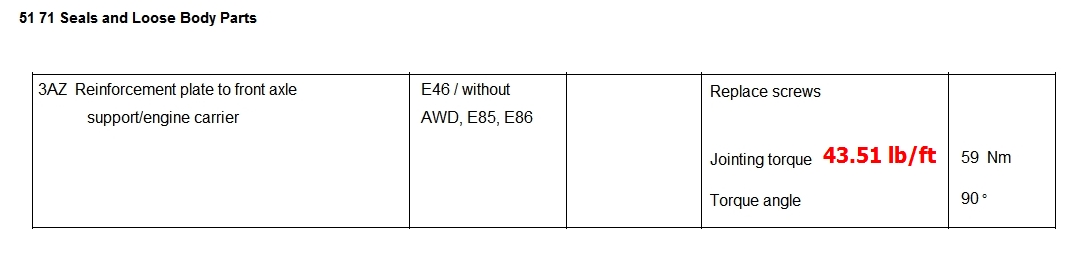
You will also need (8) reinforcement plate bolts since they are one time use, BMW P/N 31106772199, pay attention to the torque spec and method,
torque to spec and then add 90 degrees of rotation.
NordLock general information sheet HERE, introduction information HERE,
technical information HERE,
and video introduction HERE.


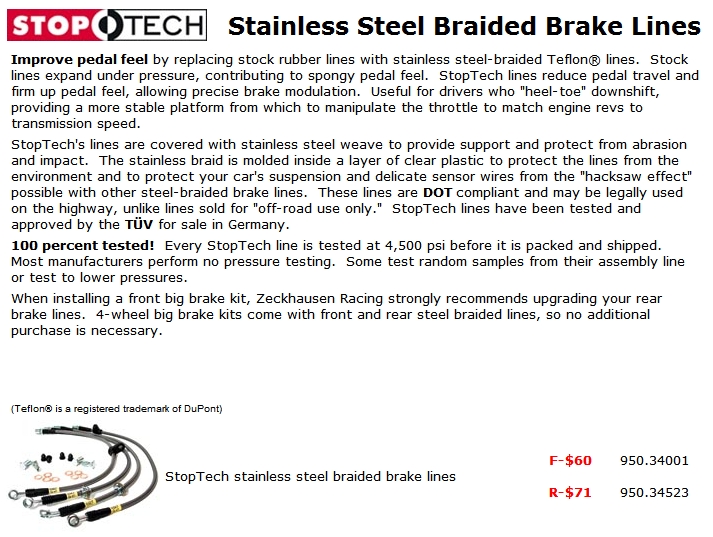
StopTech Stainless Steel Braided Brake Lines from Zeckhausen Racing (P/N F-950.34001,R-950.34523) ordered. **Write-up coming soon**
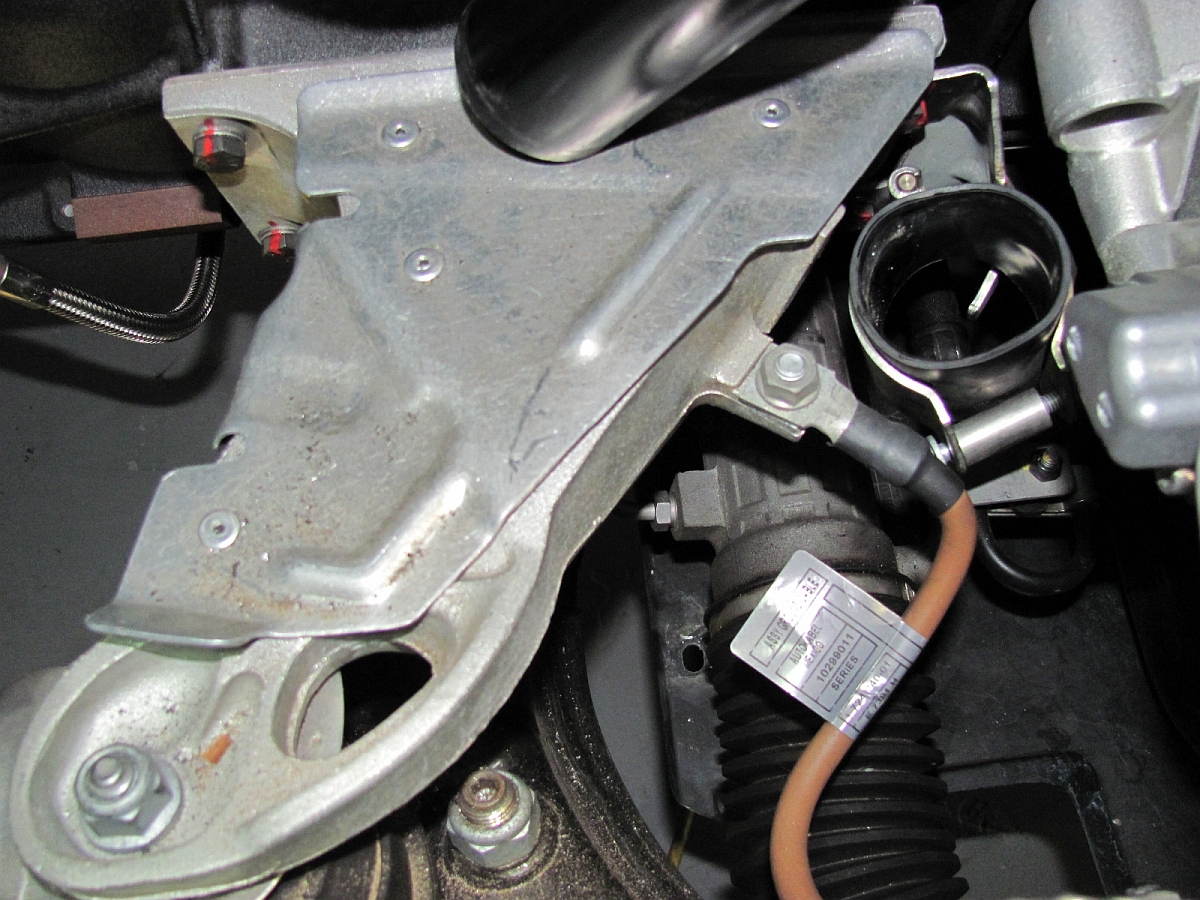
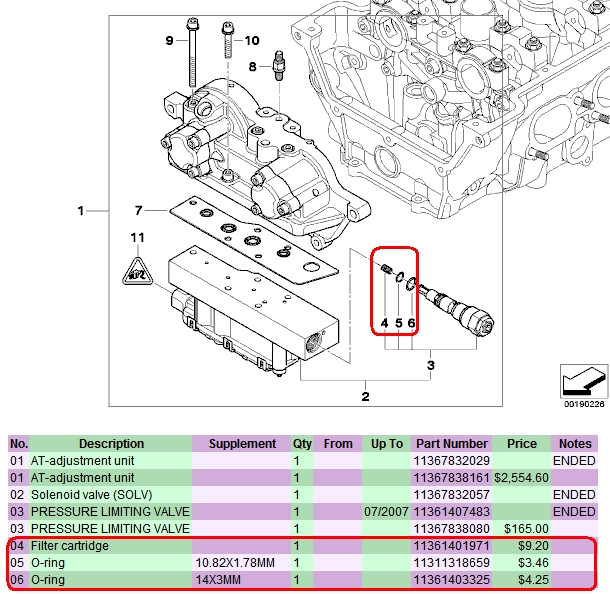
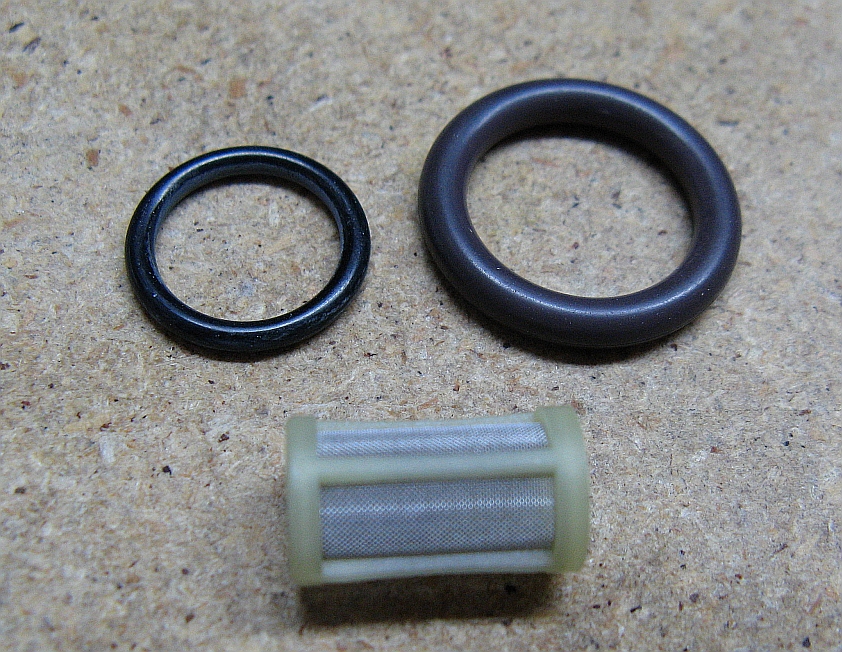
After seeing the threads HERE and HERE I ordered the VANOS solenoid valve filter cartridge (P/N 11361401971) and o-rings (P/N 11311318659 and 11361403325) from Tischer BMW Parts. I think I will be replacing these at 15k miles and see how they look, cheap insurance. **Write-up coming soon**:
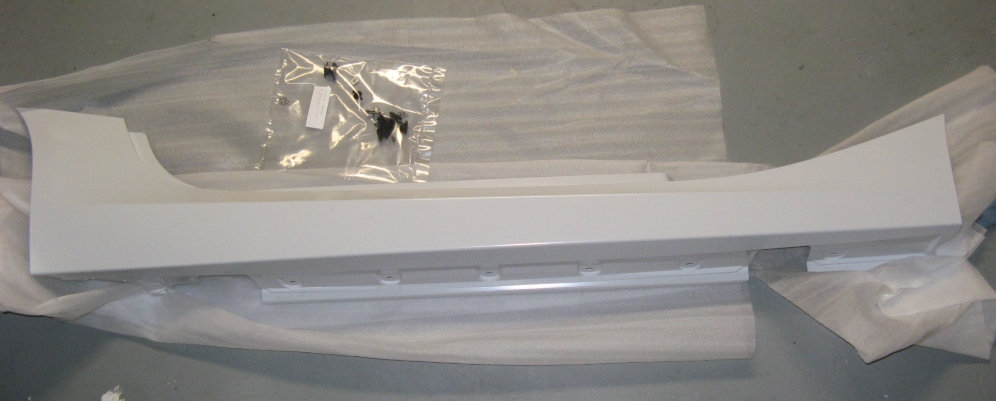
BMW Z4 Aero Side Skirts (P/N 51710150780 and 51710150781) from Tischer BMW Parts. These skirts come with all hardware and are primed for prep/paint. Write-up by z4-forums's inTgr8r HERE. **Write-up coming soon**:
After 4 years of ownership this car was traded in for the last year 2011 Lotus Elise in the 111R body style for the US market.
It was a great car, probably the BEST BMW will ever have to offer
HERE is the LOA listing after I took it almost back to stock (left only the H&R coilovers, UUC shifter/trans mounts, and comp wheels) and traded it in.
Oil Analysis performed by Blackstone Laboratories
1200 Mile Service Invoice from BMW Dealer
Engine Oil Analysis at 1200 miles- OEM BMW Castrol 10w60
Transmission Oil Analysis at 1200 miles- OEM BMW Transmission Fluid
Rear Differential Oil Analysis at 1200 miles- OEM BMW Rear Differential Fluid
Engine Oil Analysis at 7824 miles- OEM BMW Castrol 10w60
BMW 2007 M Coupe Brochure
BMW M Coupe Reviews:
MDriver - M Coupe Debuts in New York
evo: BMW Z4 M Coupe - November 2009
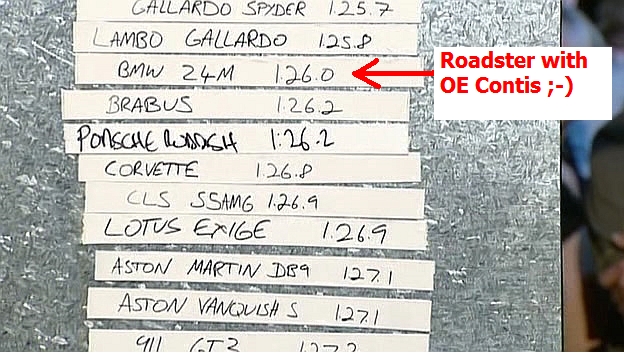
evo: BMW M Car Ultimate Test 2009
European Car: 2007 BMW Z4 M Coupe - Long Term Intro
European Car: 2007 BMW Z4 M Coupe - Long Term Update #1
European Car: 2007 BMW Z4 M Coupe - Long Term Update #2
European Car: 2007 BMW Z4 M Coupe - Long Term Update #3
European Car: 2007 BMW Z4 M Coupe - Long Term Update #4
European Car: 2007 BMW Z4 M Coupe - Long Term Wrap-Up
European Car: Z4MC Project Part 1- Intro
European Car: Z4MC Project Part 2- Strut Brace and Wheels/Tires
European Car: Z4MC Project Part 3- Brembo Big Brake Kit
European Car: Z4MC Project Part 5- Supersprint Headers and Exhaust
European Car: AC Schnitzer's BMW M Coupe - Bullet
European Car: Slice and Dice-2008 Lotus Exige S,BMW Z4 M Coupe,Porsche Cayman S
Automobile Magazine: 2007 M Coupe Review
Road and Track: 2006 M Coupe vs 2006 Porsche Cayman S Comparison Test
Road and Track: 2006 M Coupe vs 2006 Porsche Cayman S Data Panel
Top Gear- BMW Z4M Coupe vs Porsche Cayman S
Playboy Magazine- 2007 CAR OF THE YEAR: BMW Z4M Coupe
AutoWeek: 2006 BMW M Coupe Road Test
TopGear: 2006 BMW M Coupe Road Test
PistonHeads: 2007 BMW M Coupe Review
Autocar: BMW M Coupe First Drive
Autocar: BMW M Coupe Road Test
Car Connection: 2006 BMW M Coupe Review
Edmunds.com: 2007 BMW M Coupe/Roadster Review
Edmunds.com Inside Line: 2006 BMW M Coupe First Drive
ZDNet: 2007 BMW M Coupe Review
C|Net: 2007 BMW M Coupe Review
TimesOnline (Jeremy Clarkson): 2007 BMW M Coupe Review
TimesOnline (Andrew Frankel): 2006 BMW M Coupe Review
MotoringFile: 2007 BMW M Coupe Review
Automobile.com: 2007 BMW M Coupe Review
National Post (Canada): 2008 BMW M Coupe Road Test
NewCarNet TV: BMW M Coupe Road Test
Roundel Dec 2007: Made in America - BMW Z4M Coupe
BMW Video:
*High Speed Connection Recommended*
BMW M Coupe MicroSite Video [Press Activate Search Mode to start]
Road & Track: BMW M Coupe vs Porsche Cayman
Top Gear: BMW M Roadster Review by Hammond
BMW Magazine: BMW M Coupe Driver Training at Nurburg Ring
Motoring TV Test Drive (Canada): 2006 BMW M Coupe
BMW Z4 Factory: How the Z4 is Manufactured
BMW Magazine on Spike: The first Driver Training session in the BMW Z4 M Coup

BMW DIY Guides/Installation Instructions:
Z4M Suspension DIY: KW V3 Coilovers Installed
Z4M Exhaust DIY: BMS Stage II Exhaust Installation
Z4M Short Shifter DIY: UUC Evo 3 Installed
Z4M Transmission Bushing DIY: UUC Transmission Bushings with Enforcer Cups Installed
Z4M Clutch Pedal/Stop DIY: Mason Clutch Pedal and UUC Clutch Stop Installed
Z4M JVT Header Installation DIY Guide
Z4 E85-E86 Alarm Retrofit Installation Instructions posted/edited by Ron Stygar
Z4M E86 Luggage Compartment Trim Removal posted/edited by Ron Stygar
Z4 Window Initialization Process posted by Ron Stygar
Z4 Mirror Removal posted by Ron Stygar
Kristopher Linquist's BMW Navigation Information Web Page
Wheel Paint and Light Scratch Repair by AudiWorld.com's NASAracer
How to Mod your Z4 CDV by Z4-Forum.com's srhutch
Z4 Cabin Filter DIY by micronAir.com
BMW M Coupe Documents/Files/Links:
Real OEM: OEM Part Numbers and Diagrams Online
BMW Fans: OEM Part Numbers and Diagrams Online
BMW Product Knowledge on Demand
BMW Z4 M Coupe Press Release Jan. 2006
BMW 2007 M Coupe/Roadster Owners Manual Supplement
BMW 2007-2008 Z4 Z4M Service Maintenance Checklist
BMW Z4 (E85) Technical Training Manual
BMW M Series S54 Technical Training Manual
BMW E85 Z4 Communications Manual
BMW Z4 Coupe and M Coupe Accessories Guide
BMW Guide: 2006 BMW Z4 M Roadster vs Porsche Boxster S
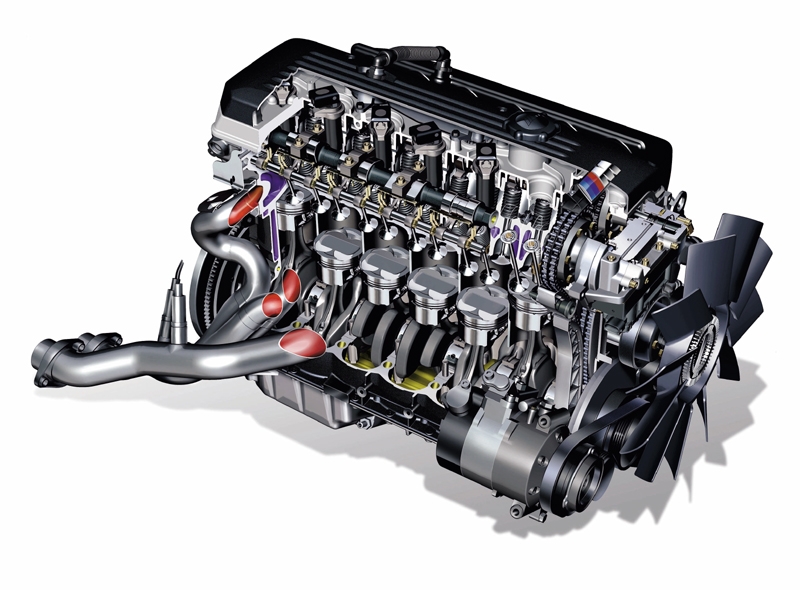
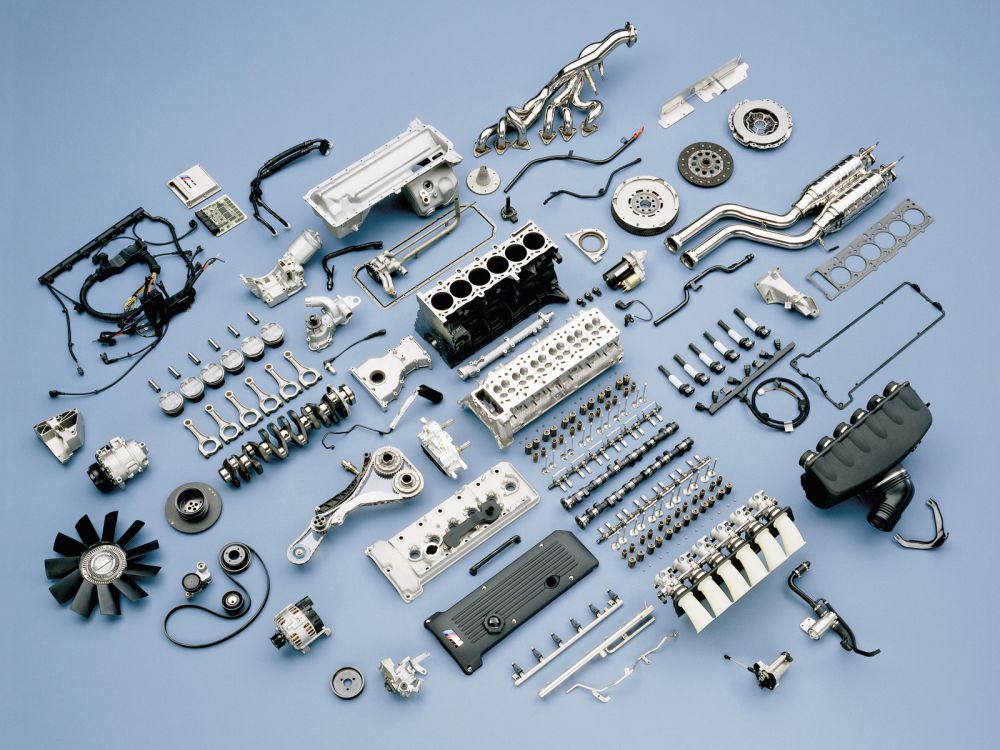
Winding Road Tech Focus: BMW S54 Engine
BMW S54 vs. S65 - Overview, History, Comparison, and Power potential
Z4 M Production Data by VIN compiled by Bimmerforum's wildag: CSV format or XLSX format
BMW Z4M SIBs:
BMW Operating Fluids: Manual Transmission
BMW Operating Fluids: Final Drive (Differential)
SI B01 04 10 -BMW Maintenance Program Annual Low-mileage Engine Oil Changes
SI B22 01 09 -Engine Vibration: Passenger Side Motor Mount Bracket Bolts
SI B33 01 02 -Grinding Noise from the Differential during Slow Cornering
SI B41 06 06 -Water Leak into Trunk Area
SI B51 15 07 -Rattling Noise from the Rear of the Door Panel
BMW/E86 Forums/Links: